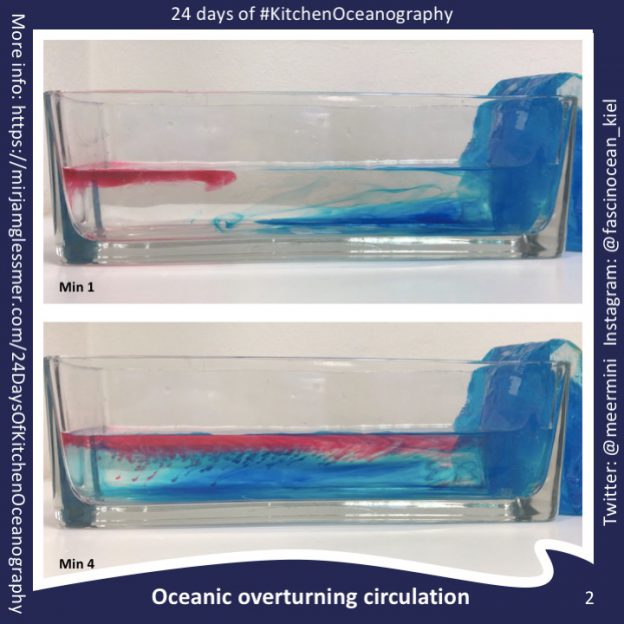
24 Days of #KitchenOceanography — Oceanic overturning circulation
Leave a reply
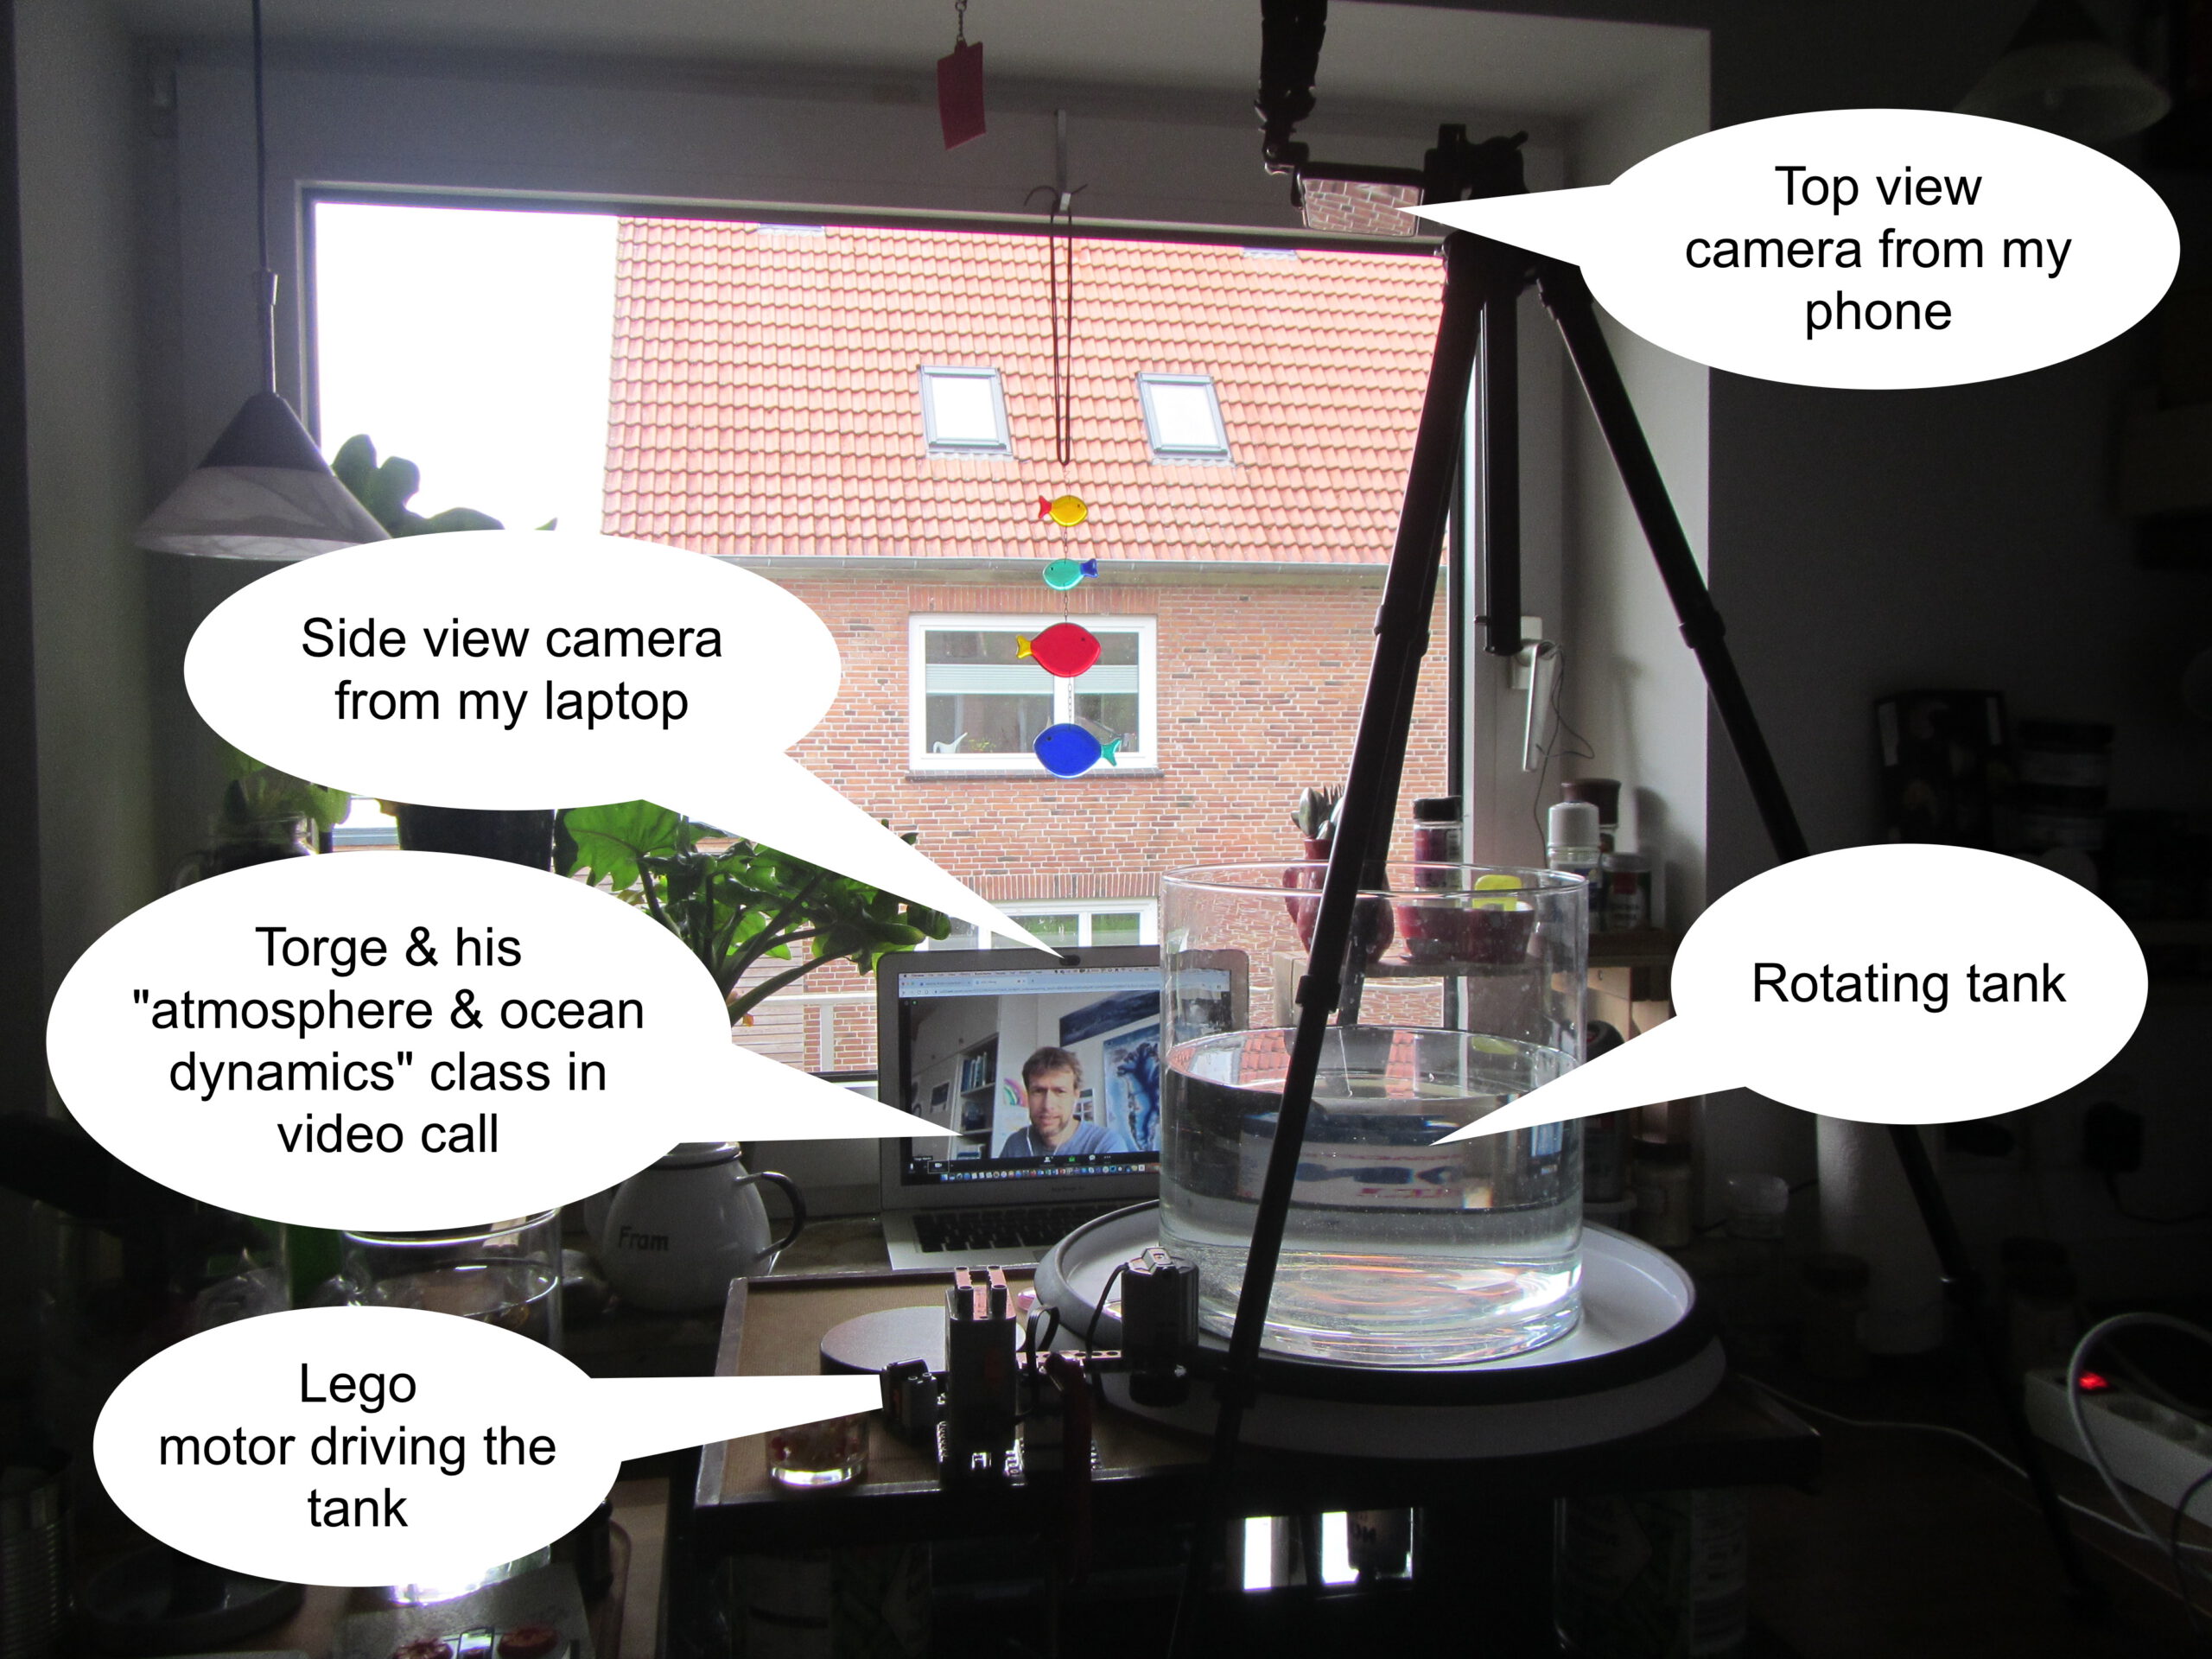
Last Thursday, Torge & I invited his “atmosphere & ocean dynamics class” to a virtual excursion into my kitchen — to do some cool experiments. As you know, I have the DIYnamics rotating table setup at home, so this is what it looked like:
We did two experiments, the very boring (but very important) solid body rotation, and then the much more exciting (and quite pretty, see pic at the very top or movie below!) comparison of turbulence in a non-rotating and a rotating system.
We didn’t manage to record the class as we had planned, so I redid & recorded the experiments. Here are 8 minutes of me talking you through it. Enjoy!
This is the long version of the two full “low latitude, laminar, tropical Hadley circulation” and “baroclinic instability, eddying, extra-tropical circulation” experiments. A much shorter version (that also includes the end cases “no rotation” and “no thermal forcing”) can be found here.
Several of my friends were planning on teaching with DIYnamics rotating tables right now. Unfortunately, that’s currently impossible. Fortunately, though, I have one at home and enjoy playing with it enough that I’m
Here is me introducing the setup:
Today, I want to share a video I filmed on thermal forcing vs rotation. To be clear: This is not a polished, stand-alone teaching video. It’s me rambling while playing. It’s supposed to give students an initial idea of an experiment we’ll be doing together during a video call, and that they’ll be discussing in much more depth in class. It’s also meant to prepare them for more “polished” videos, which are sometimes so polished that it’s hard to actually see what’s going on. If everything looks too perfect it almost looks unreal, know what I mean? Anyway, this is as authentic as it gets, me playing in my kitchen. Welcome! :-)
In the video, I am showing the two full experiments: For small rotations we get a low latitude, laminar, tropical Hadley circulation case. Spinning faster, we get a baroclinic instability, eddying, extra-tropical case. And as you’ll see, I didn’t know which circulation I was going to get beforehand, because I didn’t do the maths before running it. I like surprises, and luckily it worked out well!
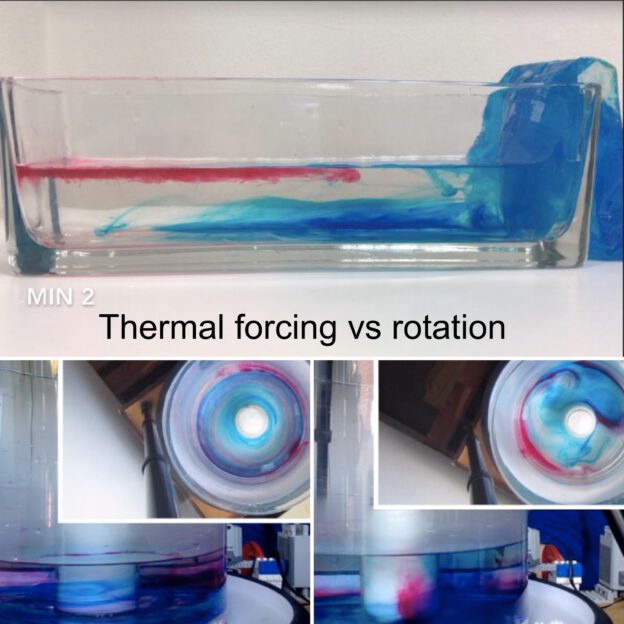
The first experiment we ever ran with our DIYnamics rotating tank was using a cold beer bottle in the center of a rotating tank full or lukewarm water. This experiment is really interesting because, depending on the rotation of the tank, it will display different regimes. For small rotations we get a low latitude, laminar, tropical Hadley circulation case. Spinning faster, we get a baroclinic instability, eddying, extra-tropical case. Both are really interesting, and in the movie below I am showing four experimentsm ranging from “thermal forcing, no rotation”, over two experiments which include both thermal forcing and rotation at different rates to show both the “Hadley cell” and “baroclinic instability” case, to “no thermal forcing, just rotation”. Enjoy!
Several of my friends were planning on teaching with DIYnamics rotating tables right now. Unfortunately, that’s currently impossible. Fortunately, though, I have one at home and enjoy playing with it enough that I’m
Here is me introducing the setup:
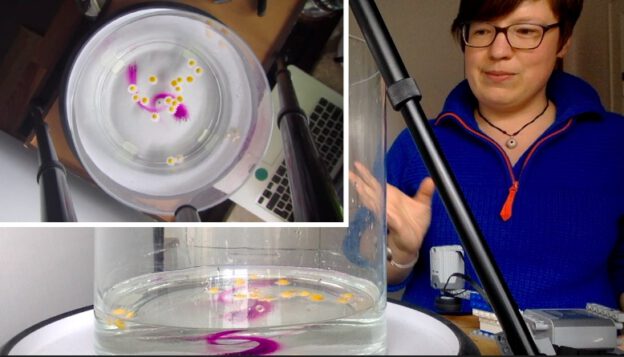
Today, I want to share a video I filmed on Ekman layers. To be clear: This is not a polished, stand-alone teaching video. It’s me rambling while playing. It’s supposed to give students an initial idea of an experiment we’ll be doing together during a video call, and that they’ll be discussing in much more depth in class. It’s also meant to prepare them for more “polished” videos, which are sometimes so polished that it’s hard to actually see what’s going on. If everything looks too perfect it almost looks unreal, know what I mean? Anyway, this is as authentic as it gets, me playing in my kitchen. Welcome! :-)
In the video, I am stopping a tank that was spun up into solid body rotation, to watch a bottom Ekman layer develop. Follow along for the whole journey:
Now. What are you curious about? What would you like to try? What would you do differently? Any questions for me? :-)
Several of my friends were planning on teaching with DIYnamics rotating tables right now. Unfortunately, that’s currently impossible. Fortunately, though, I have one at home and enjoy playing with it enough that I’m
Here is me introducing the setup:
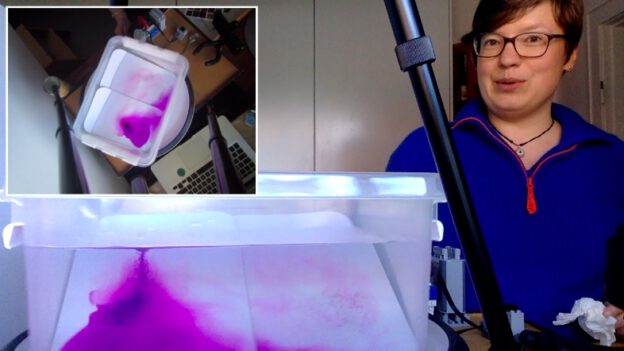
Today, I want to share a video I filmed on planetary Rossby waves. To be clear: This is not a polished, stand-alone teaching video. It’s me rambling while playing. It’s supposed to give students an initial idea of an experiment we’ll be doing together during a video call, and that they’ll be discussing in much more depth in class. It’s also meant to prepare them for more “polished” videos, which are sometimes so polished that it’s hard to actually see what’s going on. If everything looks too perfect it almost looks artificial, know what I mean? Anyway, this is as authentic as it gets, me playing in my kitchen. Welcome! :-)
In the video, I am using an ice cube, melting on a sloping bottom in a rotating tank, to create planetary Rossby waves. Follow along with the whole process:
Also check out the video below that shows both a top- and side view of a planetary Rossby wave, both filmed with co-rotating cameras.
Previous blog posts with more movies for example here.
Now. What are you curious about? What would you like to try? What would you do differently? Any questions for me? :-)
It’s #KitchenOceanography season! For example in Prof. Tessa M Hill‘s class at UC Davis. Last week, her student Robert Dellinger posted a video of an overturning circulation on Twitter that got me super excited (not only because as of now, April 15th, it has 70 retweets and 309 likes. That’s orders of magnitude more successful than any kitchen oceanography stuff I have ever posted! Congratulations!).
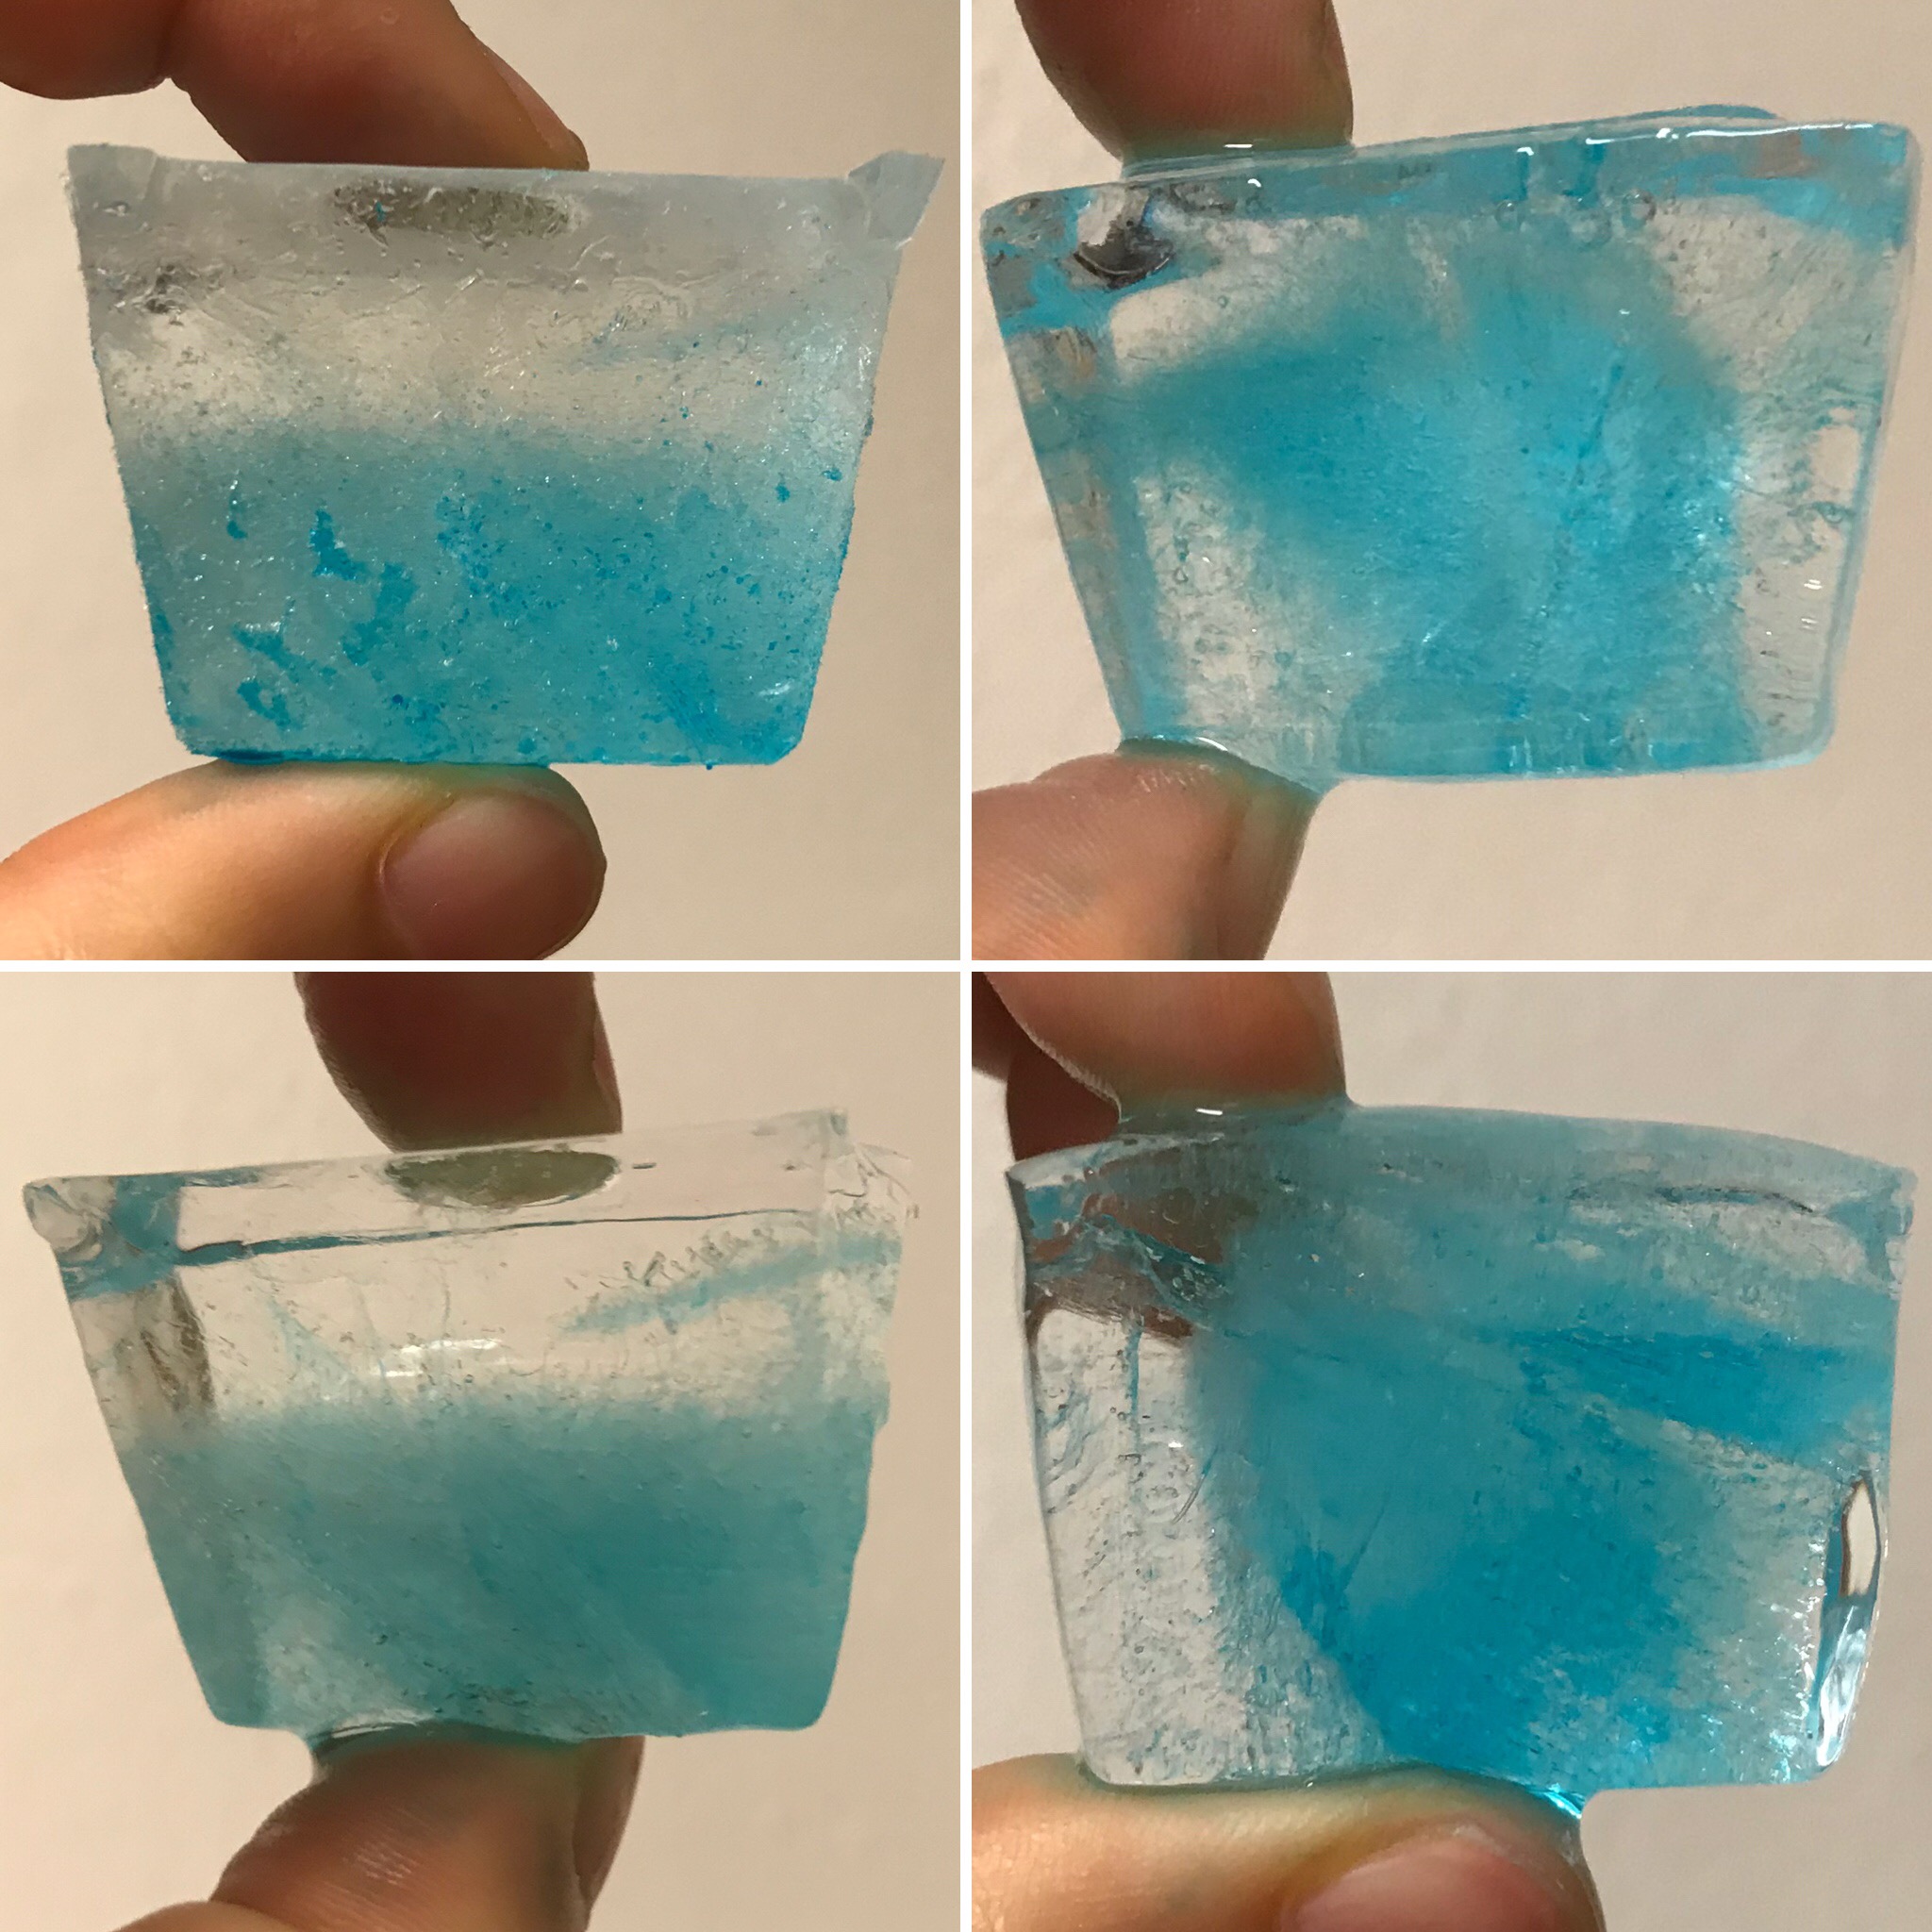
Robert is using red, warm water on one side and melt water of blue ice cubes on the other side to provide heating and cooling to his tank to create the overturning. Why did I get so excited? Because of this: the head of the meltwater plume was very clearly not blue (see above)! Rob kindly agreed to write a guest post about these observations:
“I first and foremost want to start off by thanking Dr. Mirjam Glessmer for doing a phenomenal job at SciCom through Kitchen Oceanography. I was able to replicate her physical oceanography experiment regarding oceanic overturning circulation for my oceanography class with Dr. Tessa Hill.
As mentioned in her previous post, oceanographic currents are often simplified to give an easier understanding of how oceanic overturning circulation operates. The top 10% of our oceans are controlled by wind-driven currents and tidal fluctuations while the bottom 90% of our ocean currents are controlled by density-dependent movements.Originally this process was defined as thermal circulation but was later expanded to thermohaline circulation. Thermohaline circulation is dependent upon both temperature (thermal) and salinity (haline.) These density-dependent reactions occur when either freshwater fluxes meet saltwater and from thermal differences in water masses. Due to differential heating in our planet, colder formations of dense water masses are formed at the poles, which in turn causes the convective mixing and sinking of water masses driving oceanic circulation.
(Video by Robert Dellinger; thanks for letting me use it!)
In this experiment, we primarily focus on the thermally dependent reactions between two water masses. As seen in the video, the warmer water mass is dyed red, while the cold water mass formed by ice melting, is blue. As expected the more dense water mass (cold) is pushed under the warmer mass once they meet. One feature I would like to point out is the clear plume head feature in my experiment (see picture on top of this post). My theory is that part of the ice cube that was not dyed melted first and was pushed under the warm water mass. This feature is most likely due to the ice cube experiencing unequal cooling, which in turn led to an uneven dye distribution as seen in the previous post “Sea ice formation, brine release, or: What ice cubes can tell you about your freezer.”
As seen in the experiment, thermohaline circulation is thermally driven therefore, the role of salinity causes the system to be non-linear. Salinity serves as a positive feedback mechanism by increasing the salinity of deeper water and strengthens the circulation. Furthermore, current studies are focusing on how atmospheric warming is altering thermohaline circulation attributed by increases in ocean heat absorption and freshwater fluxes (primarily from melting ice caps.)”
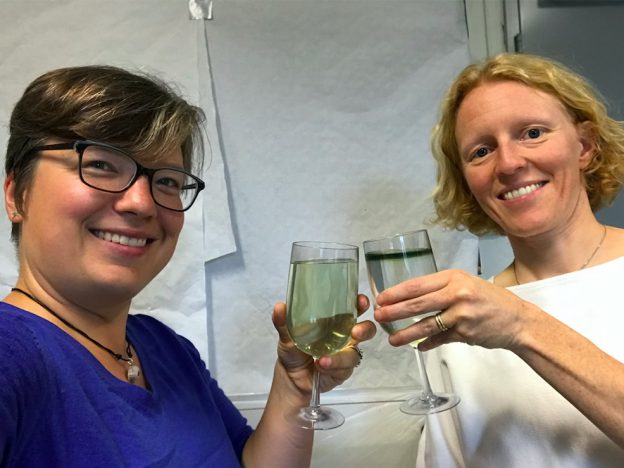
First of all, let me say how much I love having chats like the one Elin and I had over the weekend (which you only see the very beginning of above). I had gotten into a bit of a rut kitchen oceanography-wise, which, I am happy to report, is over now! Thanks, Elin! :-)
One of my favourite experiments of all times are the ice cubes melting in fresh water and salt water. I’ve written about this experiment many times before, so if you aren’t familiar with it, check out my introductory post or all the posts related to the original experiment, because now we are going to take it one step further.
Ready?
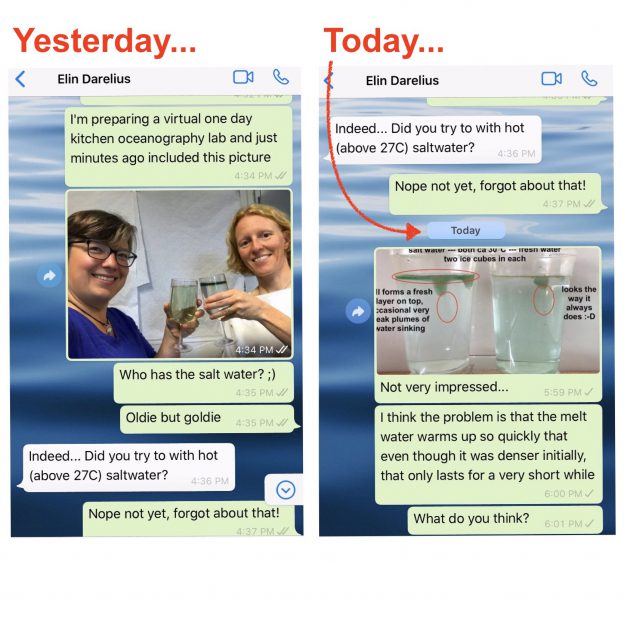
Last year, Elin told me about a conversation she had had with Prof. Emeritus Arne Foldvik (our hero when it comes to tank experiments!) about someone considering towing icebergs from Antarctica to some tropical place to use as freshwater supply. Arne mentioned that when the water in which the iceberg swims gets warmer than 27°C, the situation changes, as in that the iceberg’s melt water now is denser than the warm saltwater it is swimming in. So the assumption from that would be that the melt water would sink, rather than form a layer floating around the iceberg.
And that’s the experiment I had been wanting to try and only got around to doing when Elin reminded me on Saturday. Results were … a bit disappointing. At least at first:
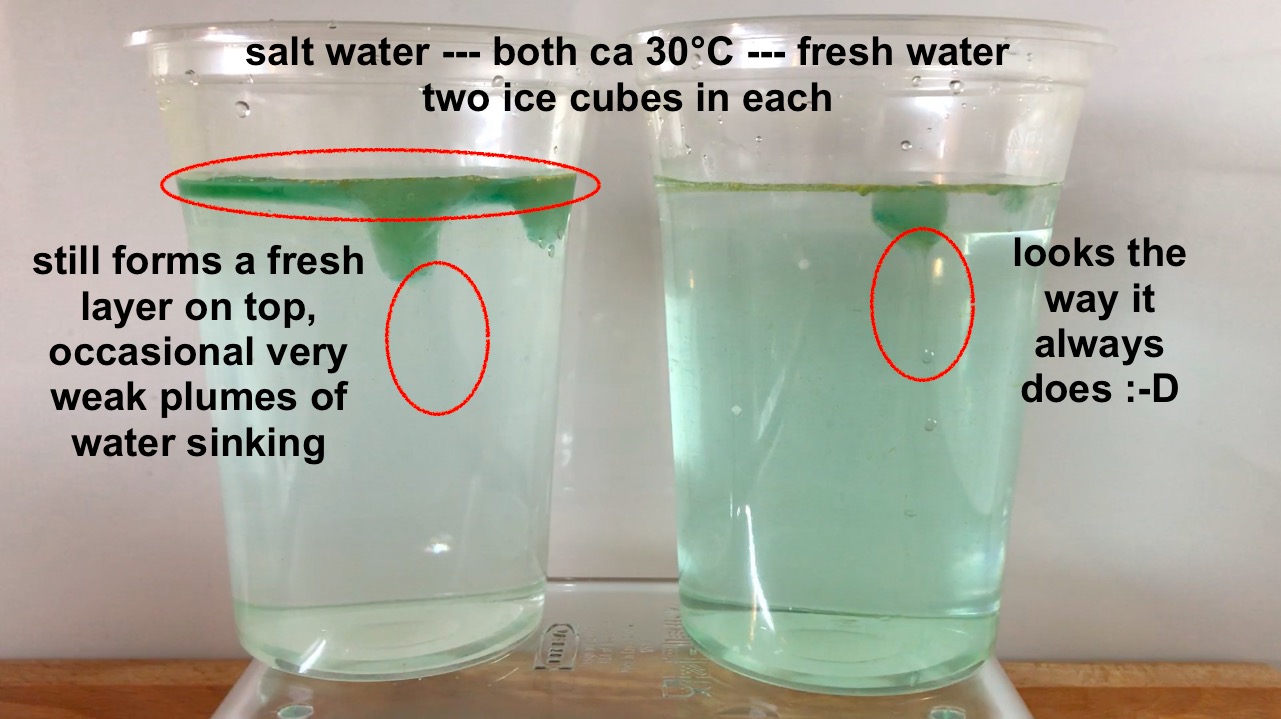
So what is happening is that even though the melt water is initially denser than the salt water, it doesn’t stay that way for very long, because diffusion of temperature is very fast and the fresh meltwater plumes don’t have to warm up by very much before they are less dense than the warm saltwater, so that happens very quickly.
In the movie below we see evidence of this: Around minute 1 (marked in the video) we can spot plumes of dense water sinking down, but at the same time we very clearly see a (green) freshwater layer forming on top of the salt water.
(The “Happy Birthday Arne” in this movie refers to Arne Foldvik’s 90th Birthday which was yesterday!)
For the experiment, I kinda eyeballed the salinity and also my thermometers might not be the most suitable choice for measuring water temperatures, at least in that temperature range. But as Elin and I discussed as the chat above went on: I think it won’t make a big difference to fiddle with temperatures and salinities, in the end the dominant process will be the molecular diffusion of heat that will always quickly warm the meltwater, making it buoyant. And I actually think that this makes this experiment even more interesting — to show how different processes are acting at the same time, and it’s not always obvious right away which one will be the most important one. Kinda similar to what I showed in yesterday’s post: molecular diffusion of heat will sneak up on you faster than you think :-)
Would the same thing also happen if we didn’t just have small ice cubes with low meltwater “production”, but icebergs, where the meltwater plumes would have a larger volume and so wouldn’t be warmed up as easily? Who knows… But my kitchen is too small to try and I’m too lazy to do the maths, so now it’s your turn! :-)

I saw the idea for this experiment on Instagram (Max is presenting it for @glaeserneslabor) and had to try it, too!
The idea is to put drops of dye into hot and cold water and observe how in hot water the dye is mixed a lot faster than in cold water — after all, molecules in hot water should move a lot more due to more energy and thus more Brownian motion. And we see that nicely in the upper panel of the picture: In hot water, structures look blurred, whereas in the cold water, we nicely see the vortex rings of dye falling into the water.
But what I found super interesting: Molecular diffusion of dye is only the dominant process in the very beginning of the experiment! Very quickly, molecular diffusion of heat is taking over. By warming the dye, we now get a convective flow that moves dye upward in the warm water (see lower panel).
For someone who worked on double-diffusive mixing (i.e. me) this is very exciting: It’s so nice to observe the effects of both diffusion of dye and diffusion of heat in one experiment! And to be able to show how different processes are important at different times.
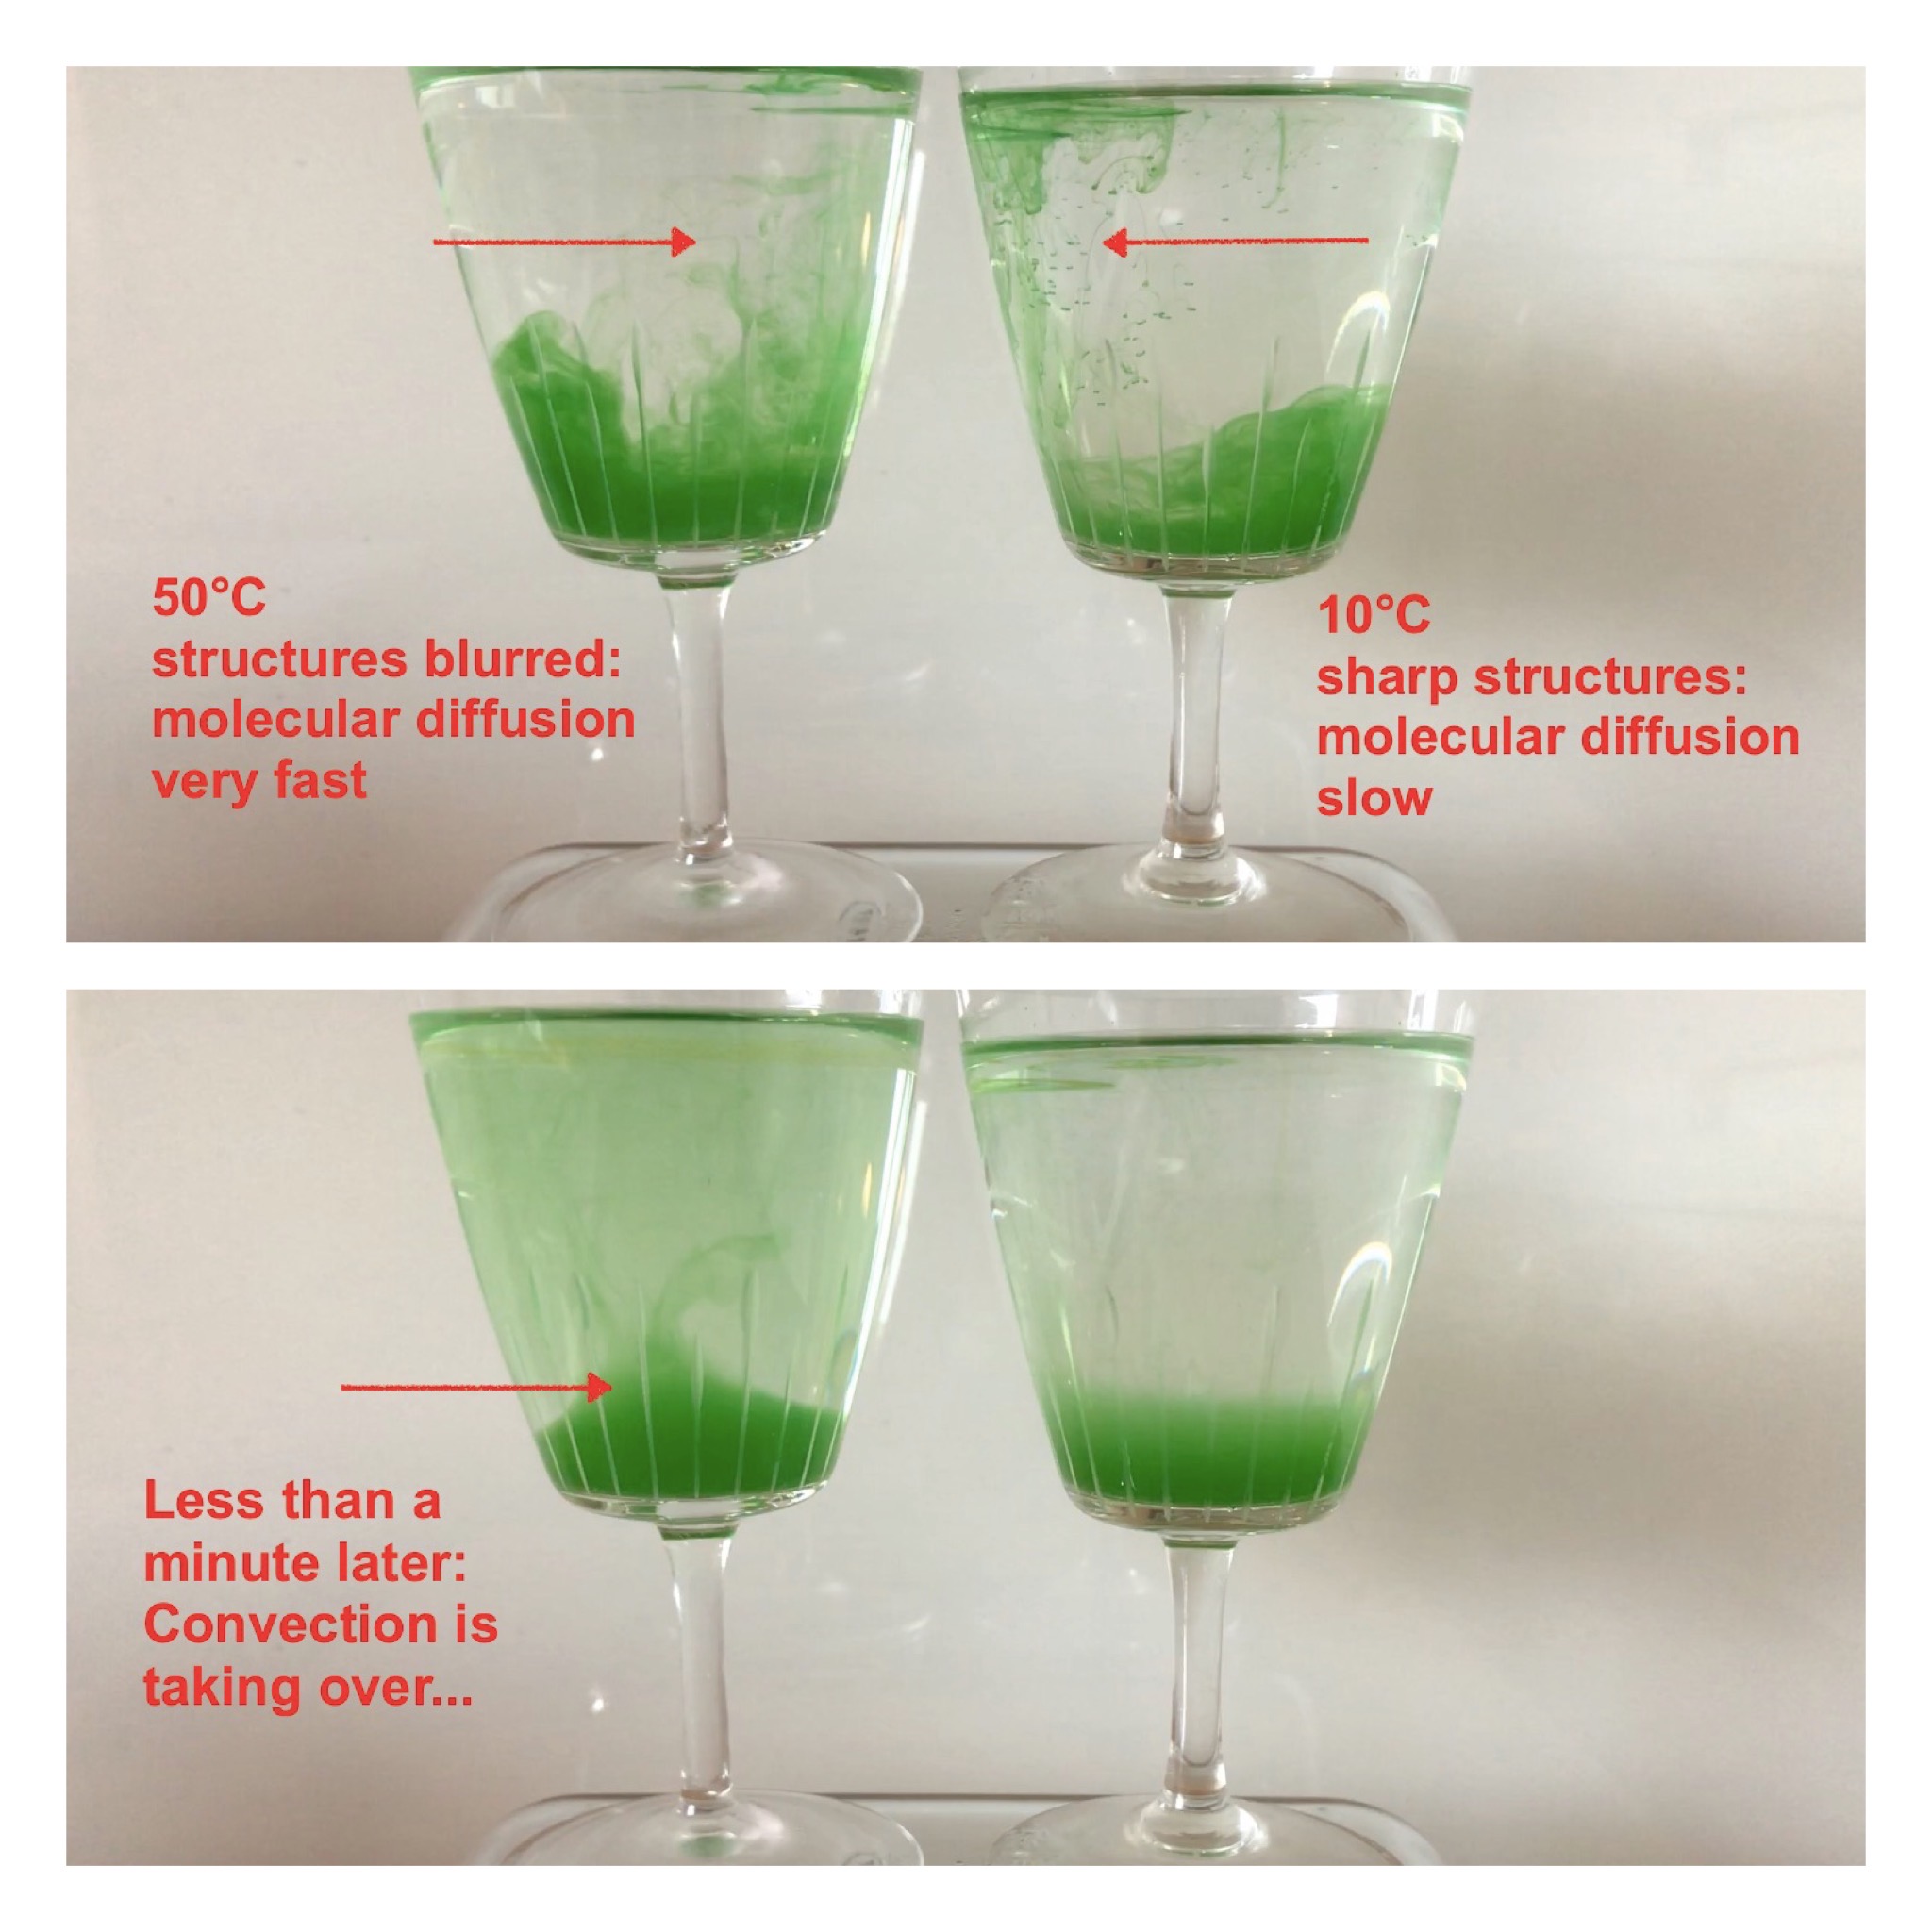
What’s next? I think next time I’ll use dye at the different temperatures of the two glasses, that should get rid of the convection. Very curious to see what will happen then! :-)