Category Archives: demonstration (difficult)

Need your help! “Wish list” for a student lab for tank experiments?

I’d love your input: If your student lab for GFD tank experiments had to downsize, but you had to present a “wish list” for a smaller replacement, what would be on that list? Below are my considerations, but I would be super grateful for any additional input or comments! :-)

Background and “boundary conditions”

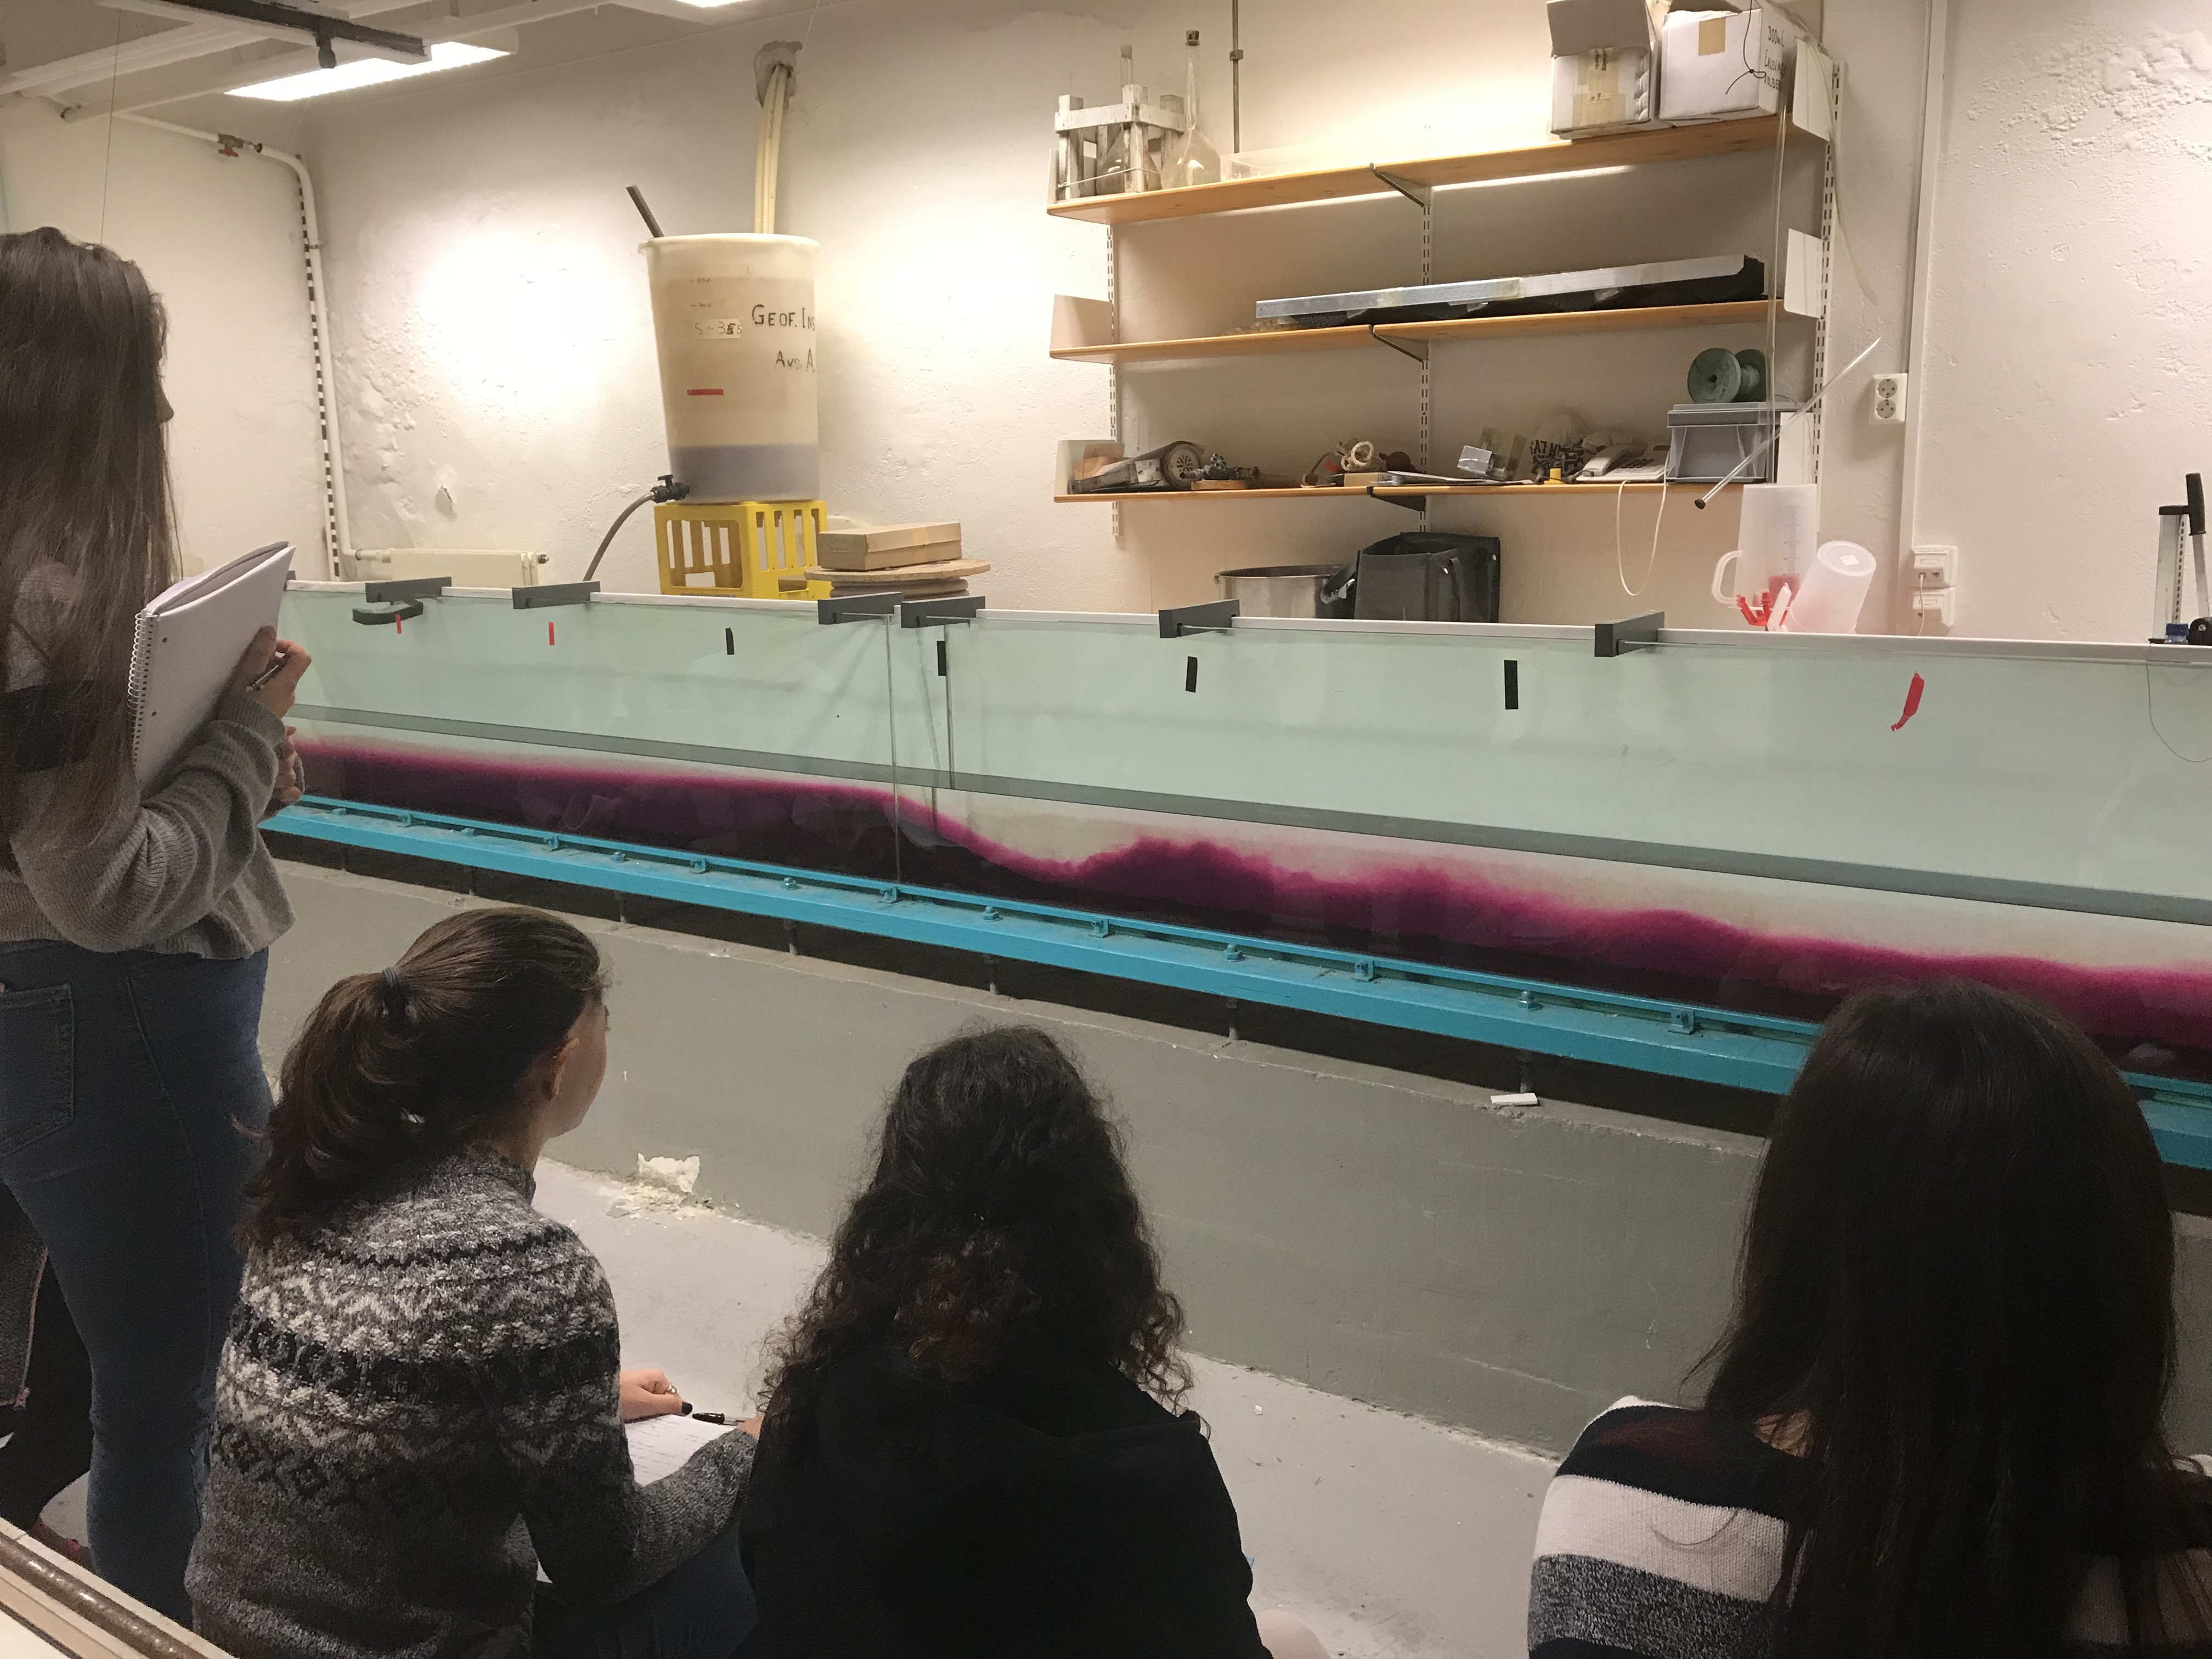
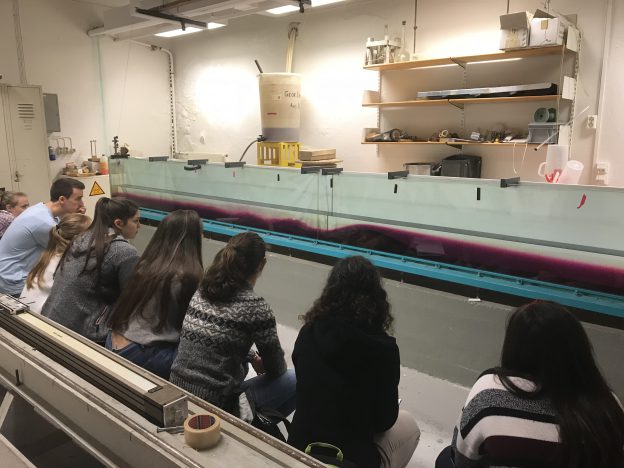
The awesome towing tank that you have come to love (see picture above) will have to be removed to make room for a new cantina. It might get moved into a smaller room, or possibly replaced all together. Here are some external requirements, as far as I am aware of them:

  • the (new) tank should ideally be movable so the (small) room can be used multi-purpose
  • since the new room is fairly small, people would be happy if the new tank was also smaller than the old one
  • the rotating table is kept (and a second, smaller one, exists in the building)
  • There are other, smaller tanks that will be kept for other experiments, dimensions approximately 175x15x40cm and smaller
  • the whole proposal needs to be inexpensive enough so that the likelyhood that it will actually be approved is moderate to fair ;-)

Here are a couple of things I think need to be definitely considered.

Dimensions of the tank

If the tank was to be replaced by a smaller one, how small could the smaller one be?

The dimension of the new tank depend, of course, on the type of experiment that should be done in the tank. Experiments that I have run in the tank that is to be replaced and that in my opinion should definitely be made possible in the new location/tank include

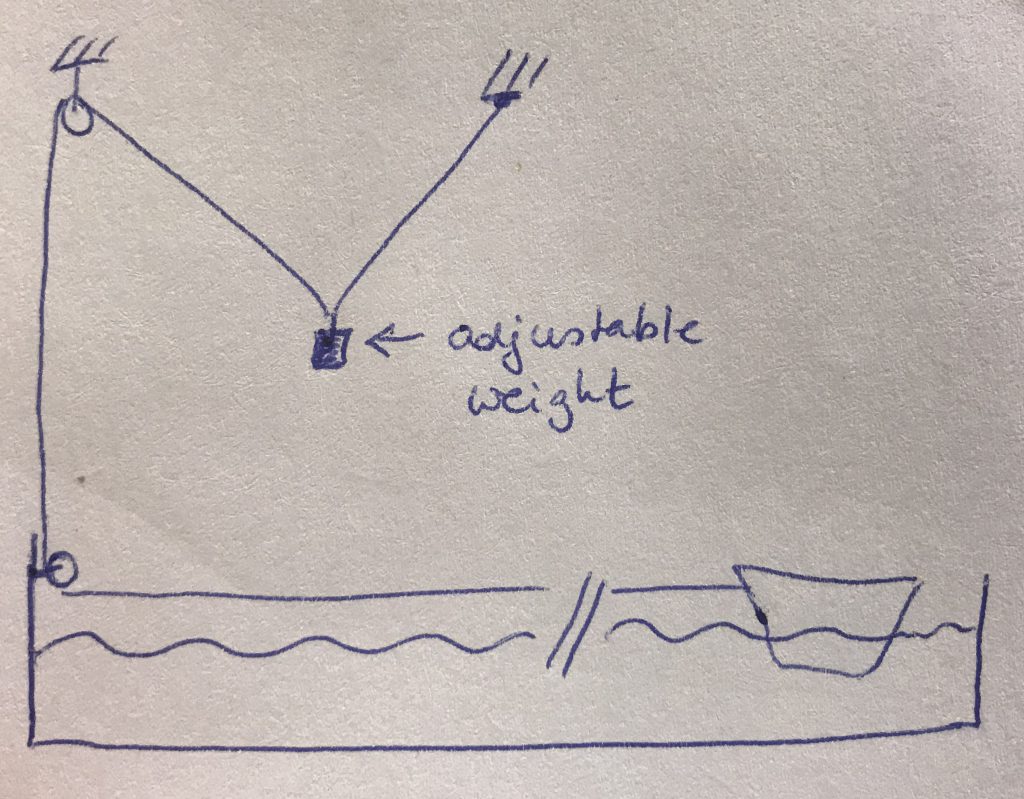
  1. “Dead water”, where a ship creates internal waves on a density interface (instructions)
  2. Internal lee waves & hydraulic jumps, where a mountain is moved at the bottom of the tank (instructions)
  3. Surface imprints of internal waves (example)
  4. Surface waves (example)
  5. Intrusions (example)
  6. Waves in a density stratification (example)
  7. Surface waves running up on a slope (I haven’t blogged about that yet, movies waiting to be edited)

If we want to be able to continue running these experiments, here is why we should not sacrifice the dimensions of the tank.

Why we need the tank length

The first reason for keeping the length of the tank is that the “mountains” being towed to create the lee waves are already 1 and 1.5m long, respectively. This is a length that is “lost” for actual experiments, because obviously the mountain needs space inside the tank on either end (so in its start and end position). Additionally, when the mountain starts to move, it has to move for some distance before the flow starts displaying the features we want to present: Initially, there is no reservoir on the “upstream” side of the mountain and it only builds up over the first half meter or so.

The second reason for keeping the length of the tank are wave reflections once the ship or mountain comes close to the other side of the tank. Reflected surface waves running against the ship will set up additional drag that we don’t want when we are focussing on the interaction between the ship and the internal wave field. Reflected internal waves similarly mess things up in both experiments

The third reason for keeping the length of the tank is its purpose: as teaching tank. Even if one might get away with a slightly shorter tank for experiments when you just film and investigate the short stretch in the middle of the tank where there are no issues with either the push you gave the system when starting the experiment or the reflections when you get near the end, the whole purpose of the tank is to have students observe. This means that there needs to be a good amount of time where the phenomenon in question is actually present and observable, which, for the tank, means that it has to be as long as possible.

Why we need the tank width

In the experiments mentioned above, with exception of the “dead water” experiment, the tank represents a “slice” of the ocean. We are not interested in changes across the width of the tank, and therefore it does not need to be very wide. However, if there is water moving inside the tank, there will be friction with the side walls and the thinner the tank, the more important the influence of that friction will become. If you look for example at the surface imprint of internal wave experiment, you do see that the flow is slowed down on either side. So if you want flow that is outside of the boundary layers on either side, you need to keep some width.

Secondly, not changing the tank’s width has the advantage that no new mountains/ships need to be built.

Another, practical argument for a wide-ish tank (that I feel VERY strongly about) is that the tank will need to be cleaned. Not just rinsed with water, but scrubbed with a sponge. And I have had my hands inside enough tanks to appreciate if the tank is wide enough that my arm does not have to touch both sides at all times when reaching in to clean the tank.

Why we need the tank depth

The first reason for keeping the height is that for the “dead water” experiment, even the existing tank is a lot shallower than what we’d like from theory (more here). If we go shallower, at some point the interactions between the internal waves and the ground will become so large that it will mess up everything.

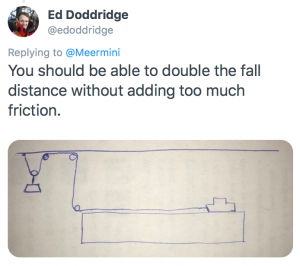
Another reason for keeping the depth is the “waves running up a slope” experiment. If you want waves running up a slope (and building up in height as they do), you have the choice between high walls of the tank or water spilling. Just sayin’…

And last not least: this tank has been used in “actual” research (rather than just teaching demonstrations, more on that on Elin’s blog), so if nothing else, those guys will have thought long and hard about what they need before building the tank…

Historical images of research on internal lee waves being done with the tank

Without getting too philosophical here about models and what they can and cannot achieve (and tank experiments being models of phenomena in the ocean), the problem is that scaling of the ocean into a tiny tank does not work, so “just use a mountain/boat half the size of the existing ones!” is actually not possible. Similarly to how if you build the most amazing model train landscape, at some point you will decide that tiny white dots are accurate enough representations of daisies on a lawn, if you go to a certain size, the tank will not be able to display everything you want to see. So going smaller and smaller and smaller just does not work. A more in-depth and scientific discussion of the issue here.

Other features of the tank

When building a new tank or setting up the existing tank in a new spot, there are some features that I consider to be important:

  • The tank needs a white, intransparent back wall (either permanently or draped with something) so that students can easily focus on what is going on inside the tank. Tank experiments are difficult to observe and even more difficult to take pictures of, the better the contrast against a calm background, the better
  • The tank should be made of glass or some other material that can get scrubbed without scratching the surface. Even if there is only tap water in the tank, it’s incredible how dirty tanks get and how hard they have to be scrubbed to get clean again!
  • The tank needs plenty of inlets for source waters to allow for many different uses. With the current tank, I have mainly used an inlet through the bottom to set up stratifications, because it allowed for careful layering “from below”. But sometimes it would be very convenient to have inlets from the side close to the bottom, too. And yes, a hose could also be lowered into the tank to have water flow in near the bottom, but then there needs to be some type of construction on which a hose can be mounted so it stays in one place and does not move.
  • There needs to be scaffolding above the tank, and it needs to be easily modifiable to mount cameras, pulleys, lights, …
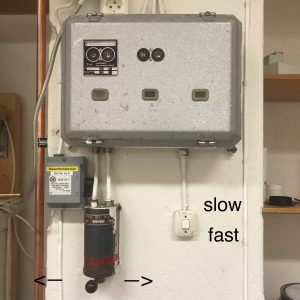
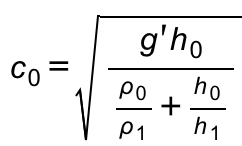
  • We need mechanism to tow mountains and ships. The current tank has two different mechanisms set up, one for mountains, one for ships. While the one for the ship is home-made and easily reproducible in a different setting (instructions), the one to tow the mountain with is not. If there was a new mechanism built, one would need to make sure the speeds at which the mountain can be towed matches the internal wave speed to be used in the experiment, which depends on the stratification. This is easy enough to calculate, but it needs to be done before anything is built. And the mechanism does require very securely installed pulleys at the bottom of the tank which need to be considered and planned for right from the start.

“Source” reservoirs

The “source” reservoirs (plural!) are the reservoirs in which water is prepared before the tank is filled. It is crucial that water can be prepared in advance; mixing water inside the tank is not feasible.

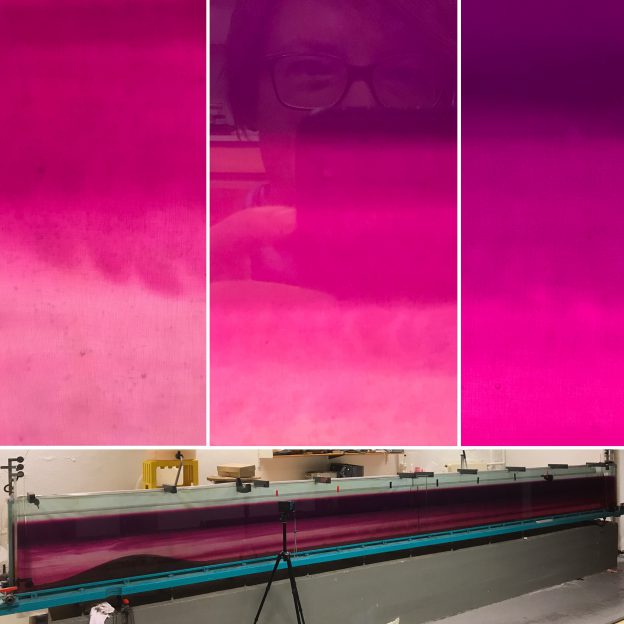
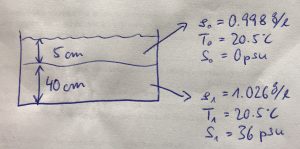
There should be two source reservoirs, each large enough to carry half the volume of the tank. This way, good stratifications can be set up easily (see here for how that works. Of course it works also with smaller reservoirs in which you prepare water in batches as you see below. But what can happen then is that you don’t get the water properties exactly right and you end up seeing stuff you did not want to see, as for example here, which can mess up your whole experiment)

Both reservoirs should sit above the height of the tank so that the water can be driven into the tank by gravity (yes, pumps could work, too, more on that below).

“Sink” reservoir

Depending on the kind of dyes and tracer used in the water, the water will need to be collected and disposed of rather than just being poured down the drain. The reservoir that catches the “waste” water needs to

  • be able to hold the whole volume of the tank
  • sit lower than the tank so gravity will empty the tank into the reservoir (or there needs to be a fast pump to empty the tank, more on that below)
  • be able to be either transported out of the room and the building (which means that doors have to be wide enough, no steps on the way out, …) or there needs to be a way to empty out the reservoir, too
  • be able to either easily be replaced by an empty one, or there needs to be some kind of mechanism for who empties it within a couple of hours of it being filled, so that the next experiment can be run and emptied out

If the waste water is just plain clear tap water, it can be reused for future experiments. In this case, it can be stored and there need to be…

Pumps

If reservoirs cannot be located above and below tank height to use gravity to fill and empty the tanks, we need pumps (plural).

  • A fast pump to empty out the tank into the sink reservoir, which can also be used to recycle the water from the sink reservoir into the source reservoirs
  • One pump that can be regulated very precisely even at low flow rates to set the inflow into the tank
  • Ideally, a second pump that can be regulated very precisely, so the double bucket method of setting up a stratification in a tank can be done automated rather than relying on gravity.

Preferable the first and the latter are not the same, because changing settings between calibrating the pump for an experiment, setting it on full power to empty the tank, and calibrating it again will cause a lot of extra work.

Inlets for dyes

Sometimes it would be extremely convenient if there was a possibility to insert dyes into the tank for short, distinct periods of time during filling to mark different layers. For this, it would be great to be able to connect syringes to the inlet

Hoses and adapters

I’ve worked for years with whatever hoses I could find, and tons of different adapters to connect the hoses to my reservoir, the tap, the tank. It would be so much less of a hassle if someone thought through which hoses will actually be needed, bought them at the right diameter and length, and outfitted them with the adapters they needed to work.

Space to run the experiment

The tank needs to be accessible from the back side so the experimenter can run the experiment without walking in front of the observers (since the whole purpose of the tank is to be observed by students). The experimenter also needs to be able to get out from behind the tank without a hassle so he or she can point out features of interest on the other side.

Also, very importantly, the experimenter needs to be able to reach taps very quickly (without squeezing through a tight gap or climbing over something) in case hoses come loose, or the emergency stop for any mechanism pulling mountains in case something goes wrong there.

Space for observers

There needs to be enough room to have a class of 25ish students plus ideally a handful of other interested people in the room. But not only do they need to fit into the room, they also need to be able to see the experiments (they should not have to stand in several rows behind each other, so all the small people in the back get to see are the shoulders of the people in front). Ideally, there will be space so they can duck down to have their eyes at the same height as the features of interest (e.g. the density interface). If the students don’t have the chance to observe, there is no point of running an experiment in the first place.

Filming

Ideally, when designing the layout of the room, it is considered how tank experiments will be documented, i.e. most likely filmed, and there needs to be space at a sufficient distance from the tank to set up a tripod etc..

Lighting

Both for direct observations and for students observing tank experiments, it is crucial that the lighting in the room has been carefully planned so there are minimal reflections on the walls of the tank and students are not blinded by light coming through the back of the tank if a backlighting solution is chosen.

Summary

In my experience, even though many instructors are extremely interested in having their students observe experiments, there are not many people willing to run tank experiments of the scale we are talking about here in their teaching. This is because there is a lot of work involved in setting up those experiments, running them, and cleaning up afterwards. Also there are a lot of fears of experiments “going wrong” and instructors then having to react to unexpected observations. Running tank experiments requires considerable skill and experience. So if we want people using the new room and new tank at all, this has to be made as easy as possible for them. Therefore I would highly recommend that someone with expertise in setting up and running experiments, and using them in teaching, gets involved in designing and setting up the new room. And I’d definitely be willing to be that person. Just sayin’ ;-)

Lee waves with an asymmetrical “mountain”

How will lee waves look differently if we are using the asymmetrical mountain instead of the symmetric one? And is symmetry actually important at all or are we just looking at different slopes downstream while the upstream slope doesn’t have an influence on the wave field?

After admitting I had only ever used the symmetrical mountain to generate lee waves in the long tank in the GFI basement, I had to try the asymmetrical one!

There are a couple of reasons why I had not done that before:

  • It’s longer (1.5 m instead of the 1 m of the other mountain), therefore the tank is, relatively speaking, shorter. And since being close to the ends of the tank leads to weird interferences, this limits the distance over which observations can be made
  • Since it’s asymmetrical, pulling one way or the other would likely show different wave fields, so you couldn’t just run it back and forth and have students observe the same thing several times in a row

But then it would be really interesting to see what the difference would be, right?

I tried two different stratifications.

Weak stratification, shallow water

Since I just wanted a quick idea of what this mountain would do, I used leftover water I had prepared for the moving mountain experiment. Since there wasn’t a lot left, I ended up with 11.5 cm fresh water, but only 4 cm salt water at approximately 20 psu (since I stretched the 35 psu a little).

What I noticed: A LOT more mixing than with the other mountain! Stratification is pretty much destroyed after the first run, usually we run back and forth a lot. This can be for several reasons:

  • The water is very shallow, meaning mixing is happening over the whole water column. It might not actually be more mixing than in the other case, but since it’s affecting the whole water column, it might just seem like more because no clearly visible stratification is left above and below the layer which is mixed by the mountain?
  • The left side of the mountain was bent up a little (as in 2 or 3 cm), meaning that especially on the way back it was flapping up and down on the upstream side, doing a lot of mixing that wasn’t due to the shape of the mountain, just of bits of it being loose.

And the shape of the “reservoir” that is being built up upstream of the mountain is different to what I have observed before: Running in either direction, the reservoir didn’t built up smoothly, but as a hump that was pushed in front of the mountain. Maybe because the internal wave speed in this case was very close to the speed of the mountain, something like 7cm/s, so the disturbance created by the mountain couldn’t propagate upstream. Is that an upstream hydraulic jump we are seeing there?!

What’s also cool: Lee waves are now not only happening as internal waves, but you see a very clear signature in surface waves! Usually all we see are surface convergences and divergences, adjusting the surface layer to the internal waves underneath. That we now see surface waves is, I am assuming, mainly due to the shallow water relative to the height of the obstacle.

Since I was not satisfied with this at all, I ran a second experiment:

Strong stratification, deep water

First, I tried to set up the same stratification as for this lee wave experiment with the symmetrical mountain because I thought that would be easiest to compare. But I aborted that after having moved the mountain just a little because it was mixing so much that there stratification was destroyed completely and nothing could be seen. I ended up putting more dense water in and ended up with 12 cm pink (35 psu) and 4 cm clear freshwater. And this is what this looked like:

You now see a wave train with wave lengths longer than in the symmetrical case. Probably due to the longer length of the obstacle (even thought the waves are still shorter than the obstacle)? Or what sets the wavelength?

This time, with a faster internal wave speed of around 10cm/s while the mountain is still pulled with 7cm/s, we don’t see the “hump” in the upstream reservoir — the signal can propagate faster than the mountain and thus smoothes out.

So that is what I think is going on here. While the first experiment mainly showed effects of the stratification compared to previous experiments, the second one might provide some insight on the different slopes of the mountain, although I am not sure in what way. Do you see something I didn’t observe? How would you expect the different slopes to influence the lee waves?

I am so glad I tried this and I’m looking forward to thinking about this more! :-) Any insights you’d care to share with me?

Instructions: Dead water demonstration in the GFI basement

This blog post is meant as guidelines if someone other than me might have to set up this demonstration at some point… Have fun! :-)

Setting up the stratification

If I am working fast and nothing goes wrong, this takes almost 2.5 hours. Make sure you have enough time to set this up! Filling the tank takes time and there is not much you can do to speed up the process once you’ve started…

  • Fill in what will end up being the top layer: 5 cm at 0 psu. For this, connect the tap to the bottom inlet in the left corner of the mountain with one of the hoses. When you are done, make sure to close the lock at the tank!
  • Move “mountain” over inflow to contain mixing to the volume underneath the mountain (better for your nerves, trust me)
  • Prepare the future bottom layers one by one (37,5 cm at 35 psu). We will need four full fillings of the 80l barrel (which doesn’t empty all the way because the tap is slightly elevated from the bottom, in case you were calculating ;-)), each with 2.8kg salt dissolved in it. To prepare that, connect the hose from the tap to the outlet of the barrel, put in the salt, put in the dye, use a paddle while you fill the barrel with water to stir. This way the salt will be pretty much dissolved by the time the barrel is full.
  • Note: Make sure the barrel is located high enough so that gravity will pull the water down in the tank from the barrel!
  • Note: When the barrel is filled, close the lock at the barrel before disconnecting the hose to reconnect it to the tank!
  • Fill in the bottom layers into the tank one by one. While one layer is slowly running into the tank, you have time to measure the salt for the next one.

Pulling the boat

Here is a sketch of the contraption that pulls the boat:

  • Put 4 or 5 gram in the little zip lock bag (called “weight” in the sketch above). This only works  when the ship is still on the far left end of the tank
  • Set up bumper to stop the ship before weights reach the floor (too much slack on the line, line might come off pulleys)
  • Stern rope on one of the tank’s braces is set up so the line is stretched as far as it can safely go
  • Check that there are marks on the tank which help measuring the speed of the boat (6 marks over 3 meters work well)

Trouble shooting

  • If there is suddenly too much friction in the system, check: Did the pulley on the left edge of the tank fall down? Did the rope come off the pulleys (sometimes happens if there was too much slack in the system, e.g. if the bag has been lifted or the bumper is too far left)
  • If the boat is moving a lot faster in the beginning than in the end, even though waves haven’t caught up with it, and it bothers you, move the two fixtures that hold the line at the ceiling closer together. Ideally, they should be in the same place, but this didn’t work for us because of tangling lines. Compromise between “constant” force and being able to run the experiment at all…

Observations

Ask students to observe:

  • Speed of the boat (actually take the time for a set distance)
  • Development of the boat’s speed over time, especially when waves are catching up with it
  • Generation of internal waves. Is there one, are there many? What are their wavelengths and speeds?
  • Generation of surface waves and their size relative to the internal waves. Why?

Movies

Below are movies of a couple of experiments which you could use in teaching instead of running the experiment for real (if for some reason running the experiment is not possible. But I would totally 100% recommend doing the experiment!). For a fun video, watch the one above (the ones below are cut to only show the tank so might be a little boring less exciting ;-))

Experiment 1

Ship pulled with 5g in the bag

Experiment 2

Ship pulled with 4g in the bag (for a repeat, see experiment 4!)

Experiment 3

Ship pulled with 3g in the bag

Experiment 4

Ship pulled with 4g in the bag (again, because we like repeat experiments ;-))

Instructions: Lee wave demonstration in the GFI basement

This blog post is meant as guideline if someone other than me might have to set up this demonstration at some point… Have fun! :-)

Lee waves

Lee waves are the kind of waves that can be observed downwind of a mountain in the clouds, or downstream of an obstacle in a current as a series of undulations with crests parallel to the disturbance.

Why move the mountain?

Students sometimes find it hard to imagine that a moving mountain should be equivalent to flow across a ridge. It helps to discuss how it would be really difficult to set up a flow in a tank: A huge amount of water would need to be moved without too much turbulence. Instead, it’s a lot easier to imagine the water is moving by moving a mountain through the tank, so the water is moving relative to it if not relative to the lab.

Dimensions

The size of the tank is 60×1.5×5 dm, so it can hold a total of 450l of water.

The mountain we use is 10.5 cm high and 1 m long and it’s symmetric, so pulling it either way shows similar lee waves (which is why I’ve always used it). There is a second, asymmetrical mountain on the shelf that I have never used*.

Setting up the stratification

The stratification that we’ve found works well is 10 cm at 35 psu (here dyed pink) and 9 cm at 0 psu. This leads to an internal wave speed of approximately ~11cm/s.

Prepare the dense water in a barrel that sits high enough so gravity will bring the water down into the tank (see picture below). For the 80l barrel, you need 2.8kg of salt and 1/3 tea spoon of dye MAX.

Elin's GEOF213 class observing lee waves

Elin’s GEOF213 class observing lee waves

You achieve the stratification by filling in the fresh water first through the bottom left inlet, moving the mountain over it, and filling in the dense water. That way the mixing is contained to the volume underneath the mountain which will be a lot better for your nerves (believe me!).

Moving the mountain

The system that pulls the mountain can go at two speeds: “fast” and “slow”, “slow” meaning 5m in 1:11min (7cm/s) and “fast” meaning 5m in 0:36min (14cm/s).

Here is where you run the mountain from:

Troubleshooting if the mountain doesn’t move:

  • you might be trying to pull the mountain in the wrong direction (into the wall)
  • the mountain might not be located on the sledge well. There is a tongue on the sledge that needs to sit in the groove in the mountain
  • the mountain might not be sitting well in the tank so an edge digs into the side
  • the belt that pulls the tank might not be tight enough (always make sure the two weights at both ends of the tank are actually hanging down to put tension on the belt!)
  • the belt might have come off the axle that drives it (the white plastic above the left end of the tank)

Elin's GEOF213 class observing lee waves

Elin’s GEOF213 class observing lee waves

Observations

As you see in the pictures above (or the movie below), there is a lot to observe!

  • Lee waves (not one, but a whole train!)
  • Different flow regimes: supercritical shooting down the lee side of the mountain, then a hydraulic jump, and then a normal flow
  • The reservoir upstream of the mountain that builds up as the mountain is moving
  • Even after the mountain has stopped, you see waves travelling through the tank and being reflected at the ends
  • Turbulence!

Movie

Here is a movie of the lee wave experiment. Feel free to use it in teaching if you like! And let me know if you need the movie in a higher resolution, I am happy to share!

*Yes, this was true at the time of writing. But I am setting up that experiment as we speak. Write. Read. Whatever. Will post movies tomorrow!

Demonstration: Nansen’s “dead water” in a tank!

A ship that is continuously pulled with a constant force suddenly slows down, stops, and then continues sailing as if nothing ever happened? What’s going on there? We will investigate this in a tank! And in order to see what is going on, we have dyed some of the water pink. Can you spot what is going on?

The phenomenon of “dead water” is probably well known to anyone sailing on strong stratifications, i.e. in regions where there is a shallow fresh or brackish layer on top of a much saltier layer, e.g. the Baltic Sea, the Arctic or some fjords. It has been described as early as 1893 by Fridtjof Nansen, who wrote, sailing in the Arctic: “When caught in dead water Fram appeared to be held back, as if by some mysterious force, and she did not always answer the helm. In calm weather, with a light cargo, Fram was capable of 6 to 7 knots. When in dead water she was unable to make 1.5 knots. We made loops in our course, turned sometimes right around, tried all sorts of antics to get clear of it, but to very little purpose.” (cited in Walker,  J.M.; “Farthest North, Dead Water and the Ekman Spiral,” Weather, 46:158, 1991)

When observing the experiment, whether in the movie above or in the lab, the obvious focus is on the ship and the interface between the clear fresh water layer (the upper 5cm in the tank) and the pink salt water layer below. And yes, that’s where a large-amplitude internal wave develops and eats up all the energy that was going into propulsion before! Only when looking at the time lapse of the experiments later did I notice how much more was going on throughout the tank! Check it out here:

The setup for this experiment is discussed here and is based on the super helpful website by Mercier, Vasseur and Dauxois (2009). In the end, we ended up without the belt to reduce friction, and with slightly different layer depths than we had planned, but all in all it works really well!

Accidental double-diffusive mixing

When setting up the stratification for the Nansen “dead water” demo (that we’ll show later today, and until then I am not allowed to share any videos, sorry!), I went into a meeting after filling in layer 4 (the then lowest). When I came back, I wanted to fill in layer 5 as the new bottom layer. For this experiment we want the bottom four layers to have the same density (so we would actually only have one shallow top layer and then a deep layer below [but we can’t make enough salt water at a time for that layer, so I had to split it into four portions]), and I had mixed it as well as I could. But two things happened: a) my salinity was clearly a little fresher than the previous layer, and b) the water in the tank had warmed up and the new water I was adding with layer 5 was cold tap water. So I accidentally set up the stratification for salt fingering: warm and salty over cold and fresh! Can you spot the darker pink fingers reaching down into the slightly lighter pink water? How cool is this??? I am completely flashed. Salt fingering in a 6 meter long tank! :-D


Please discuss: Experimental setup for Nansen’s “dead water”

During my last visit to Bergen in August, we set up a nice “dead water” experiment. However, there are nice experiments, and then there are awesome experiments, and since Elin wants to use this experiment in her teaching of the ocean and atmosphere dynamics class, we are going for the latter!

So I’ve done some reading and this is what I have come up with (and I am posting this before we’ve actually run the experiment as basis for discussion with Elin and anyone else who might be interested in discussing this. If you have any comments to share, please do! This is by no means final and I am really happy about any kind of input I am getting!)

Why we want to do an experiment

The ocean & atmosphere dynamics course is really theoretical. It would be nice to add something practical! At least for me it really helps to raise motivation to buckle down and think about the theory if I have observed something and I learn theory in order to understand or manipulate what I observed rather than just for the sake of learning theory.

What I want students to get out of the activity

Yay, learning outcomes! I know, people hate it when I start talking about those, but I really think they are the best starting point. So here we go:

  • Read (authentic) scientific literature, extract relevant information, apply it to an experiment and modify parameters accordingly
  • Get an intuitive understanding of the behaviour of internal waves
  • Explain qualitatively (and quantitatively?) how the speed of the boat and the phase velocity of internal waves relate to the drag on the boat

Why this experiment

  • Internal wave experiments get complex very very quickly. This is a two-layer system that should be comparatively easy to both control (Ha! I wish…) and interpret (Ha!! Yes. I know…).
  • This is a very nice historical example, too, going back to Nansen’s Fram expeditions. Nansen is a national hero in Norway, the Bjerknes Centre for Climate research which I am currently visiting is named after Bjerknes, who was involved in figuring this out. So lots of local references!

Setup of the experiment

Stratification

John Grue’s (2018) article “Calculating Fram’s Dead Water” uses the historical observations described by Nansen in “Farthest North” (1897) to quantify the conditions that led to Nansen’s observations: Nansen found a reduction of speed down to 1/5th of the expected speed, and Grue relates this to a density stratification, specifically a pycnocline depth. I’m using the Grue (2018) article as basis for our stratification in the tank, which we set up to best resemble the one the Fram experienced.

Layer depths

Grue describes a strong wave wake and force for a ratio of the ship’s draught (b0) to upper layer depth (h0) close to 1. For our model “Fram”, b0 is 5cm, which leads to an h0 of 5cm, too.

Grue used a ratio of h0/h1 of 1/18, which would lead to h1 of 90 cm. This is unfortunately not possible since our tank is only 50cm deep (of which the upper two cm cannot be used because of braces needed to stabilise the tank, and the water level needs to be another 3 or so cm lower because the ship will need to be able to pass below the braces. Hence our max h1 is approximately 40cm, leading to a ratio of h0/h1 of 1/8. No idea if this makes a difference? Something for students to discuss…

We could obviously also use a smaller model ship with half the drought and we’d be fine. Maybe we should do that just to figure out if it makes a difference.

Density stratification

To set up the density, we can manipulate both temperature and salinity of the water we are using.

For practical reasons, the temperature the water in our tank should be room temperature (so the tank can sit all set up, waiting for class, without equilibration with the room messing things up). Temperature in the teaching lab was T0=20.5°C when I checked this morning.

To minimize the amount of salt we need to use, we’ll use the freshest possible setup, with the upper layer having a salinity of S0=0g/l.

Grue describes a density difference between the layers of ρ0/ρ1 = 1/1.028. Using the density ρ0=0.998 g/l (calculated from T0 and S0 as above), this ratio leads to a density of ρ1=1.026g/l. For T1=T0=20.5°C, S0 thus needs to be 36g/l. (Phew! And seeing that I typically use 0 for “fresh” and 35 for “salty” anyway, this was a lot of thinking to come to pretty much the same result ;-))

How to move the boat

After just pulling it by hand in previous experiments (which was surprisingly difficult, because you need to pull veeery slowly, without jerking on the string), we’ve been thinking about different ways to move the boat.

First we thought we should program an Arduino to really slowly pull the ship through the tank, and use a dynamometer (you know, one of those spiral feathers that shows you how much force is applied by how far it stretches. Or the easy version, a rubber band) to figure out the drag of the ship.

But as I looked a little more into the experiment, and I found a really neat website by Mercier, Vasseur and Dauxois (2009) describing the experiment and the weight drop setup they used. They make the point that the dead water phenomenon is actually not about a constant speed evolution, it’s about applying a constant force and seeing how the boat reacts to that. Which I find convincing. That way we see the boat being slowed down and accelerating again, depending on its interactions with the internal waves it is creating which is a lot more interesting than seeing a feather or rubber band stretch and contract.

Mercier et al. have the boat strapped to a belt with constant tension on it, which they then force via a pulley system with a drop weight of a few milligrams (I think our friction might be higher then theirs was, so we might need a little more weight!).

Only problem here (and I am not quite sure how big a problem this really is): We can only pull the boat for a distance as long as the ceiling in the basement is high, and that’s definitely nowhere near the length of our 6m tank. That seems a waste, but maybe a shorter distance is still enough to see all we want to see (and at least we won’t have reflections from the ends of the tank interfering if we pick the stretch in the middle of the tank)? Or is there an easy way to use pulleys or something to have the weight seem to fall deeper? Any ideas, anyone?

10.10.2018 — Edited to include this idea I got on Twitter. This is so obvious yet I didn’t think of it. Thanks a lot, Ed, I will definitely try that! Also, is anyone still doubting the usefulness of social media?

11.10.2018 — Edited: Wow, as a sailor it’s really embarrassing that people have to point me to all kinds of different pulley systems to get this problem done! Only two issues I have now: 1) What I’ve been ignoring so far but can’t ignore any longer: The weight of the rope will increase with the length of the rope, hence the force won’t be constant but increasing, too. Since we are expecting to be working with weights of the order of a couple of paper clips, even a thin yarn might contribute substantially to the total force. Will definitely have to weigh the yarn to figure out how large that effect is! 2) Since we are expecting such tiny weights to be enough, all the blocks needed in a pulley system are already way too heavy, so we’ll have to figure out some light weight fix for that!

Mercier et al. also used a magnet at the back of the ship and one outside the tank to release the boat, which is a neat idea. But, as they point out, one could also just release the ship by hand, which is what I think we’ll opt for.

What we could ask students to do

Figure out the experimental setup

We could ask them to do basically what I did above — figure out, based on the Grue (2018) article, how to run a tank experiment that is as similar as possible to the situation Nansen described having experienced on the Fram.

Discuss layer depths

In the setup I described above, our ration of layer depths is 1/8 instead of the 1/18 assumed in the Grue (2018) article. Does that actually make a difference? Why would it? Do we think the differences are large enough to warrant running the experiment with the 1/18 ratio, even though that means changing the stratification and getting a new boat?

Check on how close we are to theory

For the density stratification as described above, the relationship

gives a phase velocity of the internal wave of c0=0.1m/s, meaning that it would take a wave crest 1min to cross our 6m long tank. We’ll see how that holds up when we do the experiment! And we could ask the students to do those calculations and compare them to the observations, too.

Compare dead water, deep water and shallow water cases

In their 2011 article, Mercier, Vasseur and Dauxois show the drag-speed relationships for dead water, deep water and shallow water (in Figure 1). The resistance will obviously be different for our setup since we’ll likely have a lot more friction, but qualitatively the curves should be similar. Might be fun to test! And also fun to interpret.

Even if we concentrate on the dead water case only (so we don’t have to empty and refill the tank), there is a lot to think about: Why is there a maximum in the resistance in the dead water case with both lower and higher speeds having a lower resistance? Probably related to how the ship interacts with the internal waves, but can we observe, for example, which Froude number that happens at, i.e. how fast the ship is moving relative to the phase velocity of the internal wave (which we both calculate and observe beforehand)?

Now it’s your turn!

What do you think? What’s your feedback on this? My plan is to go down to the lab tomorrow to figure out how to pull the boat with a drop weight. If you think that’s a really bad idea, now would be the time to tell me, and tell me what to do instead! :-)

Really, I welcome any feedback anyone might have for me! :-)

Fun notes that didn’t fit anywhere else

11.10.2018 — Edited: My former colleague Robinson pointed me to a research project he is involved in related to dredging the Elbe river (to make it possible for large container ships to reach the port of Hamburg) where they actually also look at how much ships are being slowed down, not by internal waves necessarily, but by the turbulence and turbidity they cause in the muddy river bed! That’s really cool! But the scaling is completely off from our experiment so their setup is unfortunately not transferable (they drag big objects with constant speed through the actual Elbe and measure the force that is needed).

Waves in a density stratification. One of the most beautiful tank experiments I’ve ever seen.

It’s pretty impressive when a mountain moves through a stratification and generates lee waves. But what I find even more impressive: The waves that travel behind the mountain when the mountain is long gone. See here:

This kind of stuff looks more like a numerical simulation than something actually happening in a tank, doesn’t it? I am pretty stoked that we managed to set up such a nice stratification! Those are the things that make me really really happy :-)

(The setup of this experiment is the same as in this post)

Dead water — the fancy experiment including Nansen himself

Now that we do have a really awesome 12-layer 6-color stratification, we obviously had to do the dead water experiment again. This time we chose to include a not-too-happy-looking Nansen on the ship, too!

I love this even more than the one we did yesterday!

“Coriolis fountain”

We’ve been thinking about Coriolis deflection a lot recently (see links at the end of this post). But this weekend, at Phaenomenta Flensburg, I came across a so-called “Coriolis fountain”. A fountain that you can put into spin and that then changes shape like so:

Uta, remember we talked about this a couple of years ago? Nice puzzle for anyone interested in fluid dynamics…

Watch the movie and be amazed :-)