Tag Archives: students

Need your help! “Wish list” for a student lab for tank experiments?

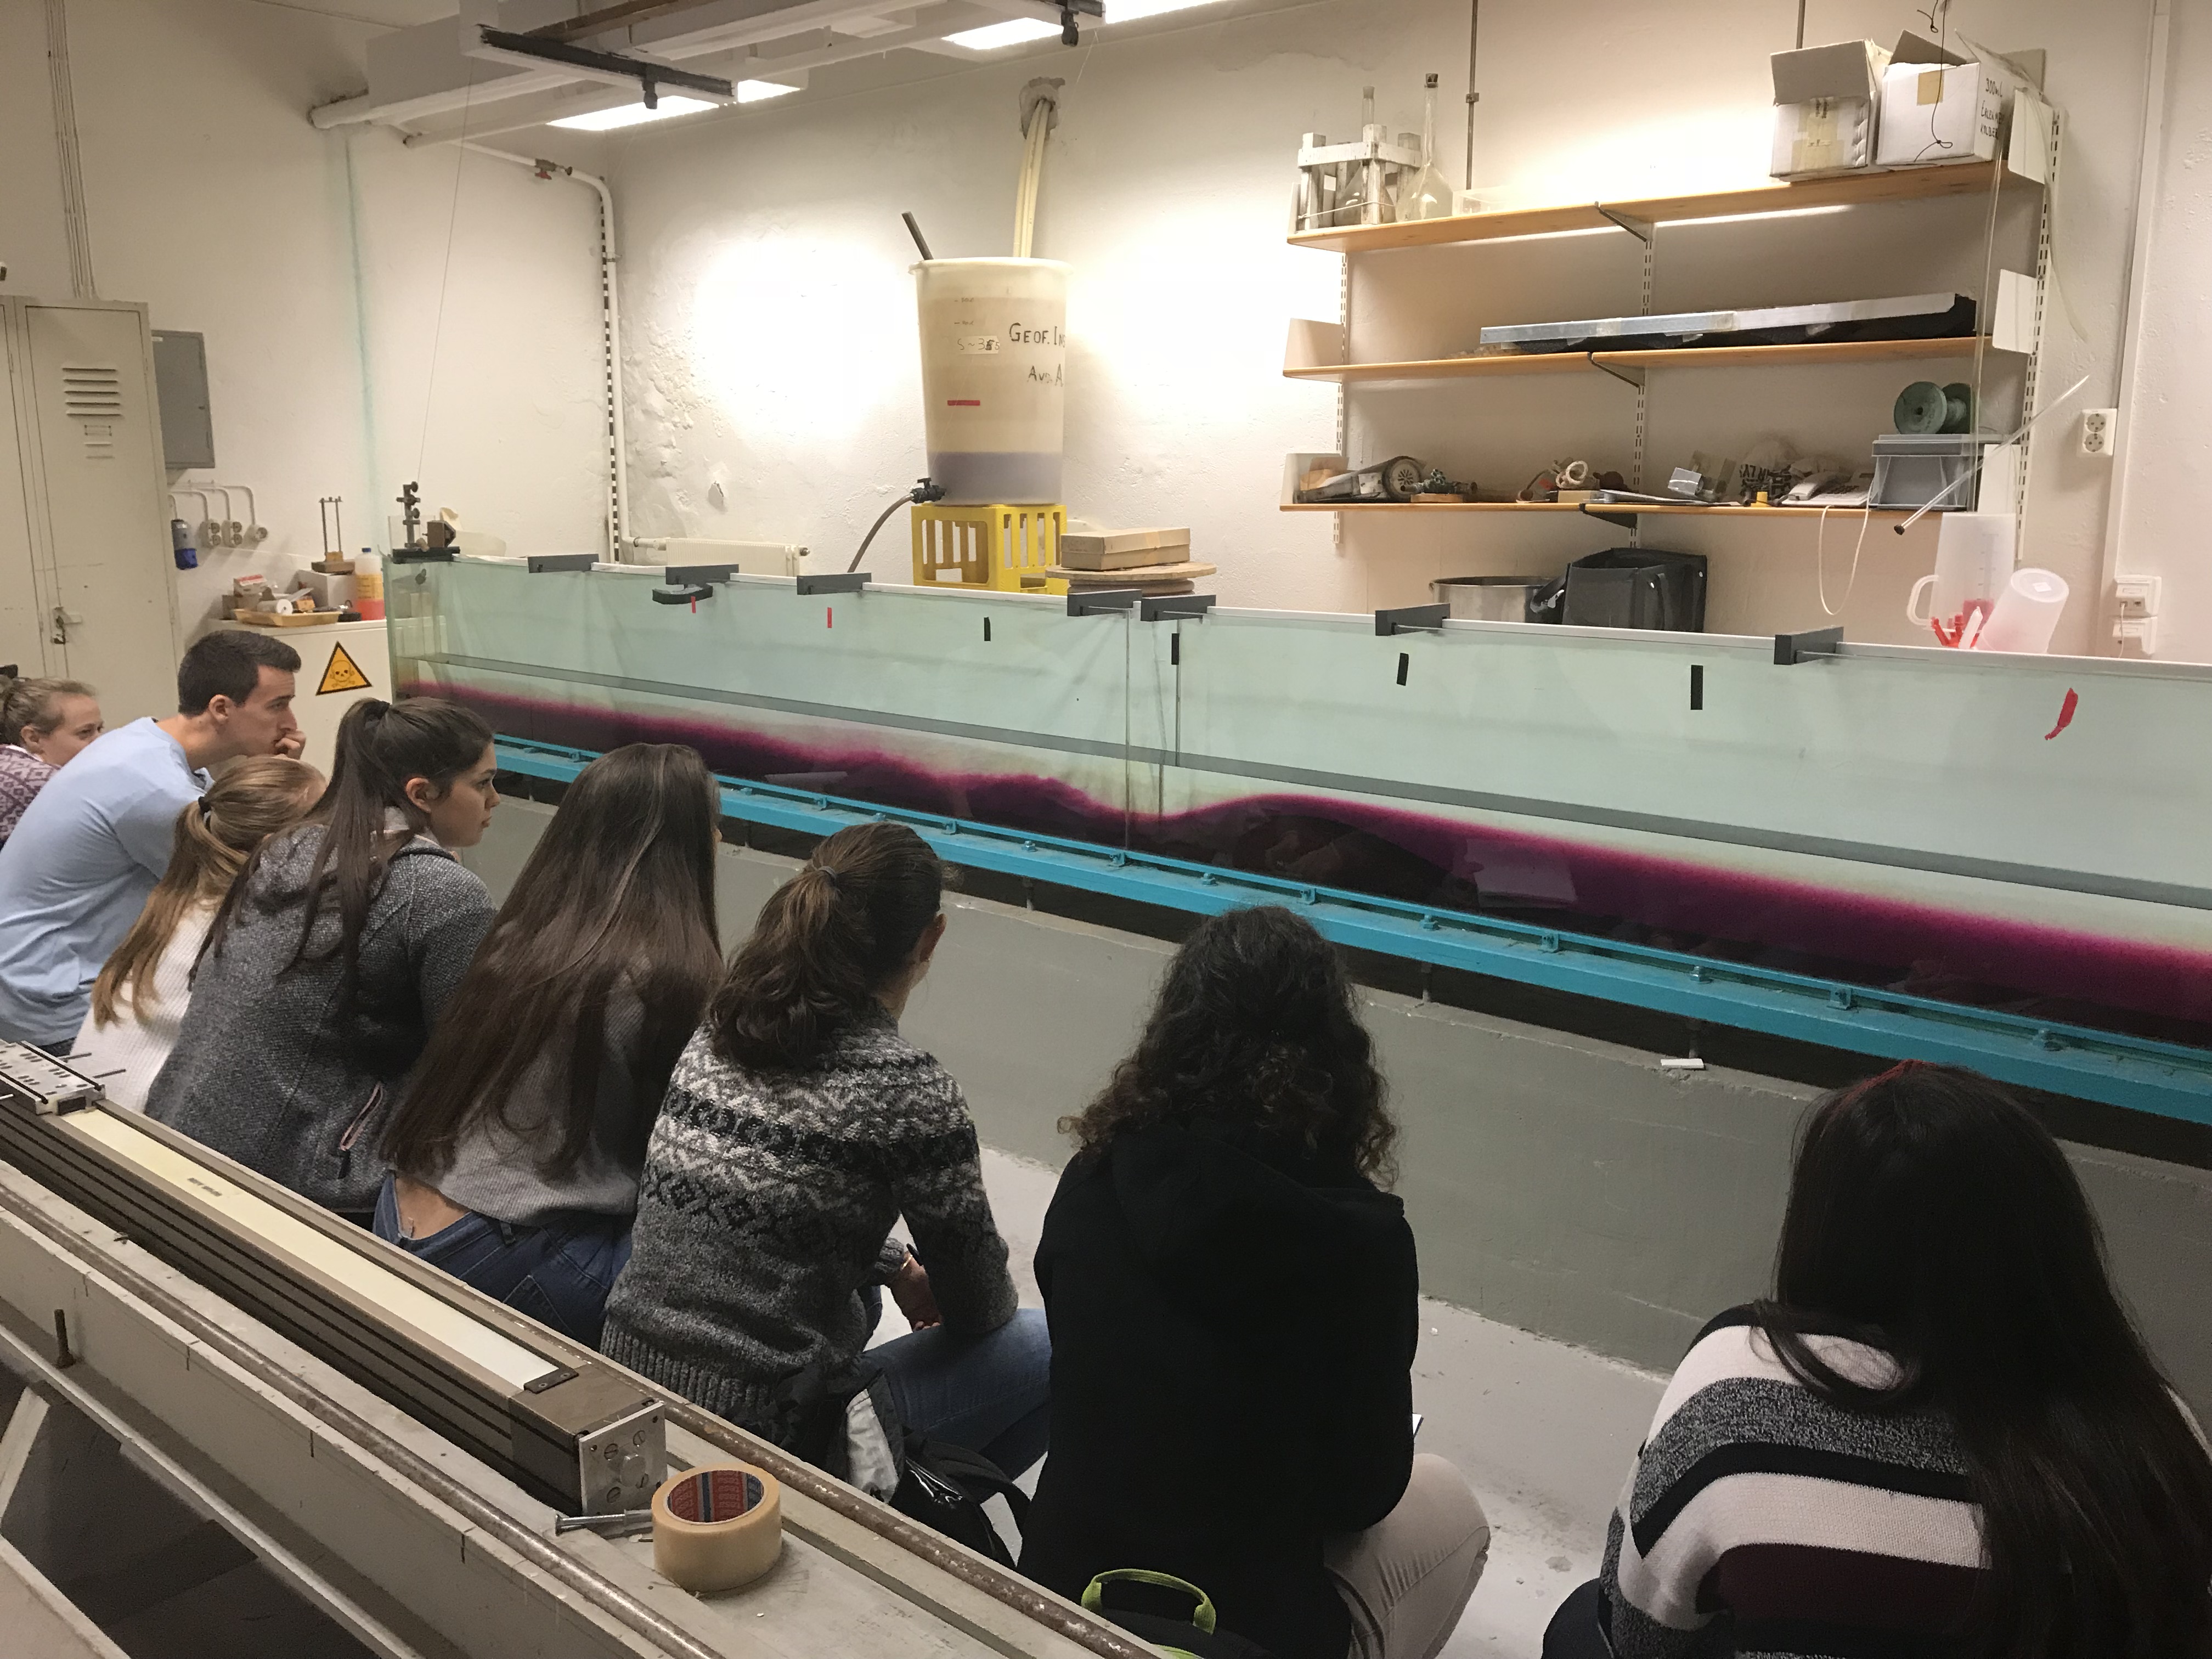
I’d love your input: If your student lab for GFD tank experiments had to downsize, but you had to present a “wish list” for a smaller replacement, what would be on that list? Below are my considerations, but I would be super grateful for any additional input or comments! :-)

Background and “boundary conditions”

The awesome towing tank that you have come to love (see picture above) will have to be removed to make room for a new cantina. It might get moved into a smaller room, or possibly replaced all together. Here are some external requirements, as far as I am aware of them:

  • the (new) tank should ideally be movable so the (small) room can be used multi-purpose
  • since the new room is fairly small, people would be happy if the new tank was also smaller than the old one
  • the rotating table is kept (and a second, smaller one, exists in the building)
  • There are other, smaller tanks that will be kept for other experiments, dimensions approximately 175x15x40cm and smaller
  • the whole proposal needs to be inexpensive enough so that the likelyhood that it will actually be approved is moderate to fair ;-)

Here are a couple of things I think need to be definitely considered.

Dimensions of the tank

If the tank was to be replaced by a smaller one, how small could the smaller one be?

The dimension of the new tank depend, of course, on the type of experiment that should be done in the tank. Experiments that I have run in the tank that is to be replaced and that in my opinion should definitely be made possible in the new location/tank include

  1. “Dead water”, where a ship creates internal waves on a density interface (instructions)
  2. Internal lee waves & hydraulic jumps, where a mountain is moved at the bottom of the tank (instructions)
  3. Surface imprints of internal waves (example)
  4. Surface waves (example)
  5. Intrusions (example)
  6. Waves in a density stratification (example)
  7. Surface waves running up on a slope (I haven’t blogged about that yet, movies waiting to be edited)

If we want to be able to continue running these experiments, here is why we should not sacrifice the dimensions of the tank.

Why we need the tank length

The first reason for keeping the length of the tank is that the “mountains” being towed to create the lee waves are already 1 and 1.5m long, respectively. This is a length that is “lost” for actual experiments, because obviously the mountain needs space inside the tank on either end (so in its start and end position). Additionally, when the mountain starts to move, it has to move for some distance before the flow starts displaying the features we want to present: Initially, there is no reservoir on the “upstream” side of the mountain and it only builds up over the first half meter or so.

The second reason for keeping the length of the tank are wave reflections once the ship or mountain comes close to the other side of the tank. Reflected surface waves running against the ship will set up additional drag that we don’t want when we are focussing on the interaction between the ship and the internal wave field. Reflected internal waves similarly mess things up in both experiments

The third reason for keeping the length of the tank is its purpose: as teaching tank. Even if one might get away with a slightly shorter tank for experiments when you just film and investigate the short stretch in the middle of the tank where there are no issues with either the push you gave the system when starting the experiment or the reflections when you get near the end, the whole purpose of the tank is to have students observe. This means that there needs to be a good amount of time where the phenomenon in question is actually present and observable, which, for the tank, means that it has to be as long as possible.

Why we need the tank width

In the experiments mentioned above, with exception of the “dead water” experiment, the tank represents a “slice” of the ocean. We are not interested in changes across the width of the tank, and therefore it does not need to be very wide. However, if there is water moving inside the tank, there will be friction with the side walls and the thinner the tank, the more important the influence of that friction will become. If you look for example at the surface imprint of internal wave experiment, you do see that the flow is slowed down on either side. So if you want flow that is outside of the boundary layers on either side, you need to keep some width.

Secondly, not changing the tank’s width has the advantage that no new mountains/ships need to be built.

Another, practical argument for a wide-ish tank (that I feel VERY strongly about) is that the tank will need to be cleaned. Not just rinsed with water, but scrubbed with a sponge. And I have had my hands inside enough tanks to appreciate if the tank is wide enough that my arm does not have to touch both sides at all times when reaching in to clean the tank.

Why we need the tank depth

The first reason for keeping the height is that for the “dead water” experiment, even the existing tank is a lot shallower than what we’d like from theory (more here). If we go shallower, at some point the interactions between the internal waves and the ground will become so large that it will mess up everything.

Another reason for keeping the depth is the “waves running up a slope” experiment. If you want waves running up a slope (and building up in height as they do), you have the choice between high walls of the tank or water spilling. Just sayin’…

And last not least: this tank has been used in “actual” research (rather than just teaching demonstrations, more on that on Elin’s blog), so if nothing else, those guys will have thought long and hard about what they need before building the tank…

Historical images of research on internal lee waves being done with the tank

Without getting too philosophical here about models and what they can and cannot achieve (and tank experiments being models of phenomena in the ocean), the problem is that scaling of the ocean into a tiny tank does not work, so “just use a mountain/boat half the size of the existing ones!” is actually not possible. Similarly to how if you build the most amazing model train landscape, at some point you will decide that tiny white dots are accurate enough representations of daisies on a lawn, if you go to a certain size, the tank will not be able to display everything you want to see. So going smaller and smaller and smaller just does not work. A more in-depth and scientific discussion of the issue here.

Other features of the tank

When building a new tank or setting up the existing tank in a new spot, there are some features that I consider to be important:

  • The tank needs a white, intransparent back wall (either permanently or draped with something) so that students can easily focus on what is going on inside the tank. Tank experiments are difficult to observe and even more difficult to take pictures of, the better the contrast against a calm background, the better
  • The tank should be made of glass or some other material that can get scrubbed without scratching the surface. Even if there is only tap water in the tank, it’s incredible how dirty tanks get and how hard they have to be scrubbed to get clean again!
  • The tank needs plenty of inlets for source waters to allow for many different uses. With the current tank, I have mainly used an inlet through the bottom to set up stratifications, because it allowed for careful layering “from below”. But sometimes it would be very convenient to have inlets from the side close to the bottom, too. And yes, a hose could also be lowered into the tank to have water flow in near the bottom, but then there needs to be some type of construction on which a hose can be mounted so it stays in one place and does not move.
  • There needs to be scaffolding above the tank, and it needs to be easily modifiable to mount cameras, pulleys, lights, …
  • We need mechanism to tow mountains and ships. The current tank has two different mechanisms set up, one for mountains, one for ships. While the one for the ship is home-made and easily reproducible in a different setting (instructions), the one to tow the mountain with is not. If there was a new mechanism built, one would need to make sure the speeds at which the mountain can be towed matches the internal wave speed to be used in the experiment, which depends on the stratification. This is easy enough to calculate, but it needs to be done before anything is built. And the mechanism does require very securely installed pulleys at the bottom of the tank which need to be considered and planned for right from the start.

“Source” reservoirs

The “source” reservoirs (plural!) are the reservoirs in which water is prepared before the tank is filled. It is crucial that water can be prepared in advance; mixing water inside the tank is not feasible.

There should be two source reservoirs, each large enough to carry half the volume of the tank. This way, good stratifications can be set up easily (see here for how that works. Of course it works also with smaller reservoirs in which you prepare water in batches as you see below. But what can happen then is that you don’t get the water properties exactly right and you end up seeing stuff you did not want to see, as for example here, which can mess up your whole experiment)

Both reservoirs should sit above the height of the tank so that the water can be driven into the tank by gravity (yes, pumps could work, too, more on that below).

“Sink” reservoir

Depending on the kind of dyes and tracer used in the water, the water will need to be collected and disposed of rather than just being poured down the drain. The reservoir that catches the “waste” water needs to

  • be able to hold the whole volume of the tank
  • sit lower than the tank so gravity will empty the tank into the reservoir (or there needs to be a fast pump to empty the tank, more on that below)
  • be able to be either transported out of the room and the building (which means that doors have to be wide enough, no steps on the way out, …) or there needs to be a way to empty out the reservoir, too
  • be able to either easily be replaced by an empty one, or there needs to be some kind of mechanism for who empties it within a couple of hours of it being filled, so that the next experiment can be run and emptied out

If the waste water is just plain clear tap water, it can be reused for future experiments. In this case, it can be stored and there need to be…

Pumps

If reservoirs cannot be located above and below tank height to use gravity to fill and empty the tanks, we need pumps (plural).

  • A fast pump to empty out the tank into the sink reservoir, which can also be used to recycle the water from the sink reservoir into the source reservoirs
  • One pump that can be regulated very precisely even at low flow rates to set the inflow into the tank
  • Ideally, a second pump that can be regulated very precisely, so the double bucket method of setting up a stratification in a tank can be done automated rather than relying on gravity.

Preferable the first and the latter are not the same, because changing settings between calibrating the pump for an experiment, setting it on full power to empty the tank, and calibrating it again will cause a lot of extra work.

Inlets for dyes

Sometimes it would be extremely convenient if there was a possibility to insert dyes into the tank for short, distinct periods of time during filling to mark different layers. For this, it would be great to be able to connect syringes to the inlet

Hoses and adapters

I’ve worked for years with whatever hoses I could find, and tons of different adapters to connect the hoses to my reservoir, the tap, the tank. It would be so much less of a hassle if someone thought through which hoses will actually be needed, bought them at the right diameter and length, and outfitted them with the adapters they needed to work.

Space to run the experiment

The tank needs to be accessible from the back side so the experimenter can run the experiment without walking in front of the observers (since the whole purpose of the tank is to be observed by students). The experimenter also needs to be able to get out from behind the tank without a hassle so he or she can point out features of interest on the other side.

Also, very importantly, the experimenter needs to be able to reach taps very quickly (without squeezing through a tight gap or climbing over something) in case hoses come loose, or the emergency stop for any mechanism pulling mountains in case something goes wrong there.

Space for observers

There needs to be enough room to have a class of 25ish students plus ideally a handful of other interested people in the room. But not only do they need to fit into the room, they also need to be able to see the experiments (they should not have to stand in several rows behind each other, so all the small people in the back get to see are the shoulders of the people in front). Ideally, there will be space so they can duck down to have their eyes at the same height as the features of interest (e.g. the density interface). If the students don’t have the chance to observe, there is no point of running an experiment in the first place.

Filming

Ideally, when designing the layout of the room, it is considered how tank experiments will be documented, i.e. most likely filmed, and there needs to be space at a sufficient distance from the tank to set up a tripod etc..

Lighting

Both for direct observations and for students observing tank experiments, it is crucial that the lighting in the room has been carefully planned so there are minimal reflections on the walls of the tank and students are not blinded by light coming through the back of the tank if a backlighting solution is chosen.

Summary

In my experience, even though many instructors are extremely interested in having their students observe experiments, there are not many people willing to run tank experiments of the scale we are talking about here in their teaching. This is because there is a lot of work involved in setting up those experiments, running them, and cleaning up afterwards. Also there are a lot of fears of experiments “going wrong” and instructors then having to react to unexpected observations. Running tank experiments requires considerable skill and experience. So if we want people using the new room and new tank at all, this has to be made as easy as possible for them. Therefore I would highly recommend that someone with expertise in setting up and running experiments, and using them in teaching, gets involved in designing and setting up the new room. And I’d definitely be willing to be that person. Just sayin’ ;-)

Facilitating student group work

Grouping students together for collaborative work is easy, but how do we make them work as a team?
Collaborative learning is often propagated as the ultimate tool to increase learning outcomes, help students learn at a deeper level and remember what they learned for longer, and become better team players as professionals. But many people I work with perceive “group work” as a hassle that costs a lot of time, lets weak or lazy students hide behind others, breeds conflict, and is deemed more of a “kindergarten” method than worthy of being used at a university.
I recently found a paper that addresses all those issues and – even better – provides instruction on how to organize student team work! “Turning Student Groups into Effective Teams” by Oakley et al., 2004. I’ll give a brief summary of their main points below.


Should you even form teams?
Do you form them or let them form themselves? The authors are clear on this point:
“Instructors should form teams rather than allowing students to self-select.” As we’ve seen over and over, if students are allowed to find themselves together in the groups they’d like to work in, weak students will likely end up working together, and strong students will end up working together. This is, for obvious reasons, not optimal for the weak groups, but also the strong groups don’t benefit as much from the assignments as they could when working in mixed groups: Strong students tend to divvy up the work among themselves and put pieces together in the end without much discussion of how the individual pieces fit, ignoring the bigger picture. Forming student groups rather than having them self-select will raise objections from the students, but it is probably worth facing that discussion anyway.


Then how do you form groups?
The authors present two guidelines, based on previous research:
1. Make sure groups are diverse in ability and that they have common free time slots outside of class so they have a chance to meet up.
2. Make sure at-risk minority students are well included in their groups
Team sizes, they say, are optimally between 3 and 5 members.
The second guide line on at-risk minority students is interesting: In the case of women being the minority you are currently concerned about, they suggest to form groups with all men, all women, two of each, two or three women and one man, but not one woman and two or three men, because the isolation that woman might feel within her team could reinforce the feeling of isolation at university.


And what data do you need to form groups?
This is where I am not sure the authors’ advice can be applied to our situation. Of course, it is desirable to know grades in previous courses etc, but collecting that data is problematic in our legal system.


And what if I want to re-form groups?
The authors announce that they will re-shuffle after 4-6 weeks unless they get individual signed requests to stay together from all team members. Which they report they do from most teams except the really dysfunctional ones. They also report that difficult (domineering or uncooperative) team members usually behave a lot better in the new teams.


So now we have groups. But how do we build effective teams?
The authors say “With a group, the whole is often equal to or less than the sum of its parts; with a team, the whole is always greater.”, so investing into team building is definitely worthwhile. The fist thing they recommend is to


-> establish expectations
This consists of two steps: Set out clear guidelines and have team members formulate a common set of expectations of one another. The authors provide forms to help guide the process, a statement of policies and an agreement on expectations. The former gives guidelines of how good teamwork should be done, the latter is a form that students sign and hand in.
A nice tip is to have students name their teams, maybe based on common interests, to help build identity in the team.


-> give instructions on effective team practices
In order for students to learn to work in teams effectively, the authors give several pieces of advice that they tell students:
– Stick to your assigned roles! It will make teamwork run more smoothly, plus each roles comes with a skill set that you are expected to practice while filling that role, so don’t cheat yourself out of that learning experience
– Don’t “divide and conquer”. If you split up the work and only stick it back together in the end, you won’t learn enough about all parts of the project to fully understand what we want you to understand.
– Come up with solutions individually and then discuss them as a team. If you are always listening to the fastest person on your team coming up with ideas, you won’t get the practice yourself that you need later.


Dealing with problematic team members
Have you ever been on a team where everybody pulled their fair share of the weight, nobody tried domineering the group, nobody refused to work in the team, and everybody had the same goal? Right, me neither. So what can you do?
The authors suggest handing out a short text on “coping with hitchhikers and couch potatoes on teams” and ask students to write a short essay on it. Having them write something about the text makes sure they have actually read it – and maybe even thought about it. The authors state – and I find this super interesting even though not surprising – that “probably the best predictor of a problematic team member is a sloppy and superficial response to this assignment.”


-> firing students from teams, or students quitting
The authors present a model of “firing” problematic students from teams, or individual students resigning, where the whole group has to go through a counseling session with the instructor. Both parties learn to actively listen, repeating the complainer’s case back to the complainer. This, the authors say, almost always resolves the problem because by verbalizing someone else’s position, a reflexion process sets in. If things are not resolved, however, a week later a letter is sent notifying everybody on the team and the instructor of the intention of firing or quitting. A week later, if things haven’t improved, a second letter is sent, again to everybody on the team plus the instructor, finalizing the decision. Apparently this hardly ever happens because things have resolved themselves before.


For those students that do get fired there are several possible models: They can either get zeros on the team assignments for the rest of the year, or find another team that is willing to take them on. The authors point out the importance of having those rules written out in the time and age of lawsuits.


-> the crisis clinic
Another measure that the authors suggest is to occasionally run “crisis clinics”, i.e. short sessions on problematic behaviors, like for example hitchhiking, and putting students together to brainstorm how to deal with those issues. Collecting ideas serves two purposes: To show hitchhikers how frustrated the rest of the group might get with their behavior, and also to equip everybody with the strategies to deal with that kind of behavior.

But it is also important to point out to students that if they continue putting a hitchhiker’s name on the group assignment, they can’t complain later.


Puuuuh. The authors continue on, talking about peer grading and going through a long list of FAQs, but I think for today I’ve written enough. But check out the paper, there is so much more in there than I could talk about here!

Barbara Oakley, Rebecca Brent, Richard M. Felder, & Imad Elhajj (2004). Turning Student Groups into Effective Teams New Forums Press, Inc., P. O. Box 876, Stillwater, OK