Category Archives: hands-on activity (easy)

Ostfriesentee — Double diffusion in a tea cup

Showing double-diffusive mixing in tank experiments is a pain if you try to do it the proper way with carefully measured temperatures and salinities. It is, however, super simple, if you go for the quick and dirty route: Cream in tea! Even easier than the “forget the salt, just add food dye” salt fingering experiment I’ve been recommending until now.

The result of double-diffusive mixing of cream in tea is probably familiar to most (see above), but have you ever looked closely at the process?

Below, we pour cold cream into hot tea. The cream initially sinks to the bottom of the tea cup, but then quickly heats up and fingers start raising to the surface of the cup. They are visible as fingers because while the heat has quickly diffused into the cream, the actual mixing of substances takes longer and the opaque milk stays visible in the clear tea. Only when the fingers have risen to the surface the substances begin to mix due to shear and diffusion of substances. Hence the name “double diffusion”: First diffusion of heat, then of particles afterwards.

Pretty cool, isn’t it?

If you happened to stir the tea before pouring the cream, it looks even more awesome. Home-made galaxies :-)

And isn’t it fascinating how the blob of cream in the middle of the cup stays intact for quite some time?

So now you know the only reason why I am drinking black tea: So I can do salt fingering experiments with it! :-)

#kitchenoceanography or #bathtubphysics? Playing with cool phenomena, water and dye

Some bathtub magic today!

Let’s take a paper kitchen towel and an empty glass.

Squish the paper towel into the empty glass, submerge it upside down into the water aaand…

…when you take it up again, the paper towel is still completely dry! Surprise!

And then my all time favourite, of course:

Guest post: Alice shows magic tricks and explains refraction of light in water

My friend Alice Langhans runs a super cool science communication Instagram (@edu_al_ice), where she posts about her experiences as PhD student in physics education research. And there is a lot more going on on that Instagram than just pretty (but oh so pretty!) pictures. I make sure to read all her posts, because there are always interesting, motivating, inspiring thoughts hidden behind that “read more” button. And now she’s even started a new series of physics experiments on #experimentalfriday, and I am super excited that she wrote this guest post for me!

But now look at the picture below, and then read about some magic! :-)

Alice writes:

Magic! One of the arrows changes its direction and here is why:

Click for large picture. Picture by Alice Langhans.

First, the arrows are unchanged and visible through the glass.

Click for large picture. Picture by Alice Langhans.

Adding water to the glass, the image of the arrow gets bigger and appears mirrored!

Click for large picture. Picture by Alice Langhans.

With even more water even the second arrow appears bigger and mirrored.

Click for large picture. Picture by Alice Langhans.

The waterglass I used is round and the refraction of light in water is different than in air, which makes the water glass act like a positive (converging) lens. This is why the image of the arrow appears bigger and mirrored.

Think of the arrow as many points, each of which is the source of a divergent bundle of light. The light coming from the point that is the arrowhead on the right, is refracted through the waterglass and reaches our eye to the left. The light from the left end of the arrow refracts in such a way that it now enters our eye on the right side.

Notice, how you can also see how the upper arrow appears even bigger? The glass is more wide at that height, magnifying properties of the water glass lens are therefore increased.


Isn’t that a super nice demo? I love it! Thank you for writing this guest post, Alice! :-)

P.S.: Alice has just been interviewed for a podcast. Curious what she’s talking about on there? Me too, but that’s why I follow her Instagram (@edu_al_ice) — to never miss out on all the cool stuff she’s up to! :-)

Bottom Ekman layer without a rotating table

Can you do a bottom Ekman layer demonstration without a rotating table? That’s the kind of challenge I like :-)

The way I’ve previously showed bottom Ekman layers is by spinning up a cylindrical tank on the rotating table until it reaches solid body rotation, adding dye crystals to visualise the circulation later, and then stopping the tank to create friction at the bottom (and the sides, but we are mainly interested in the bottom since we want a bottom Ekman layer) as the water continues moving but comes under the influence of friction. But what if we just invert the whole thing?

Move the “bottom”, not the water

My initial idea was to use a Lazy Susan (you know, the kind of tray on a swivel base that you can use for your jam and honey etc on your breakfast table, but which you shouldn’t turn too rapidly (ask me how I know)) and to have a cylindrical vase sit on it, which will then be put in rotation and will rotate around and under the (initially still stagnant) water. The friction with the moving vase will then lead to a bottom-intensified circulation.

Problem here: While I have a Lazy Susan at home as well as a vase that would work as “tank”, I am currently in Bergen where I don’t have access to my own equipment. Instead, though, I have access to a rotating table in GFI’s basement which I used to simulate my Lazy Susan idea (Cool, eh? Simulating a non-rotating-table situation on a rotating table ;-)).

That worked quite well, didn’t it?

This, btw, is what the setup looked like:

So how would that work as kitchen oceanography without an actual rotating table?

The physics themselves obviously work in this setup. However, they will be really difficult to observe for several reasons:

  • Scales. A small dish (like the one I used; for comparison see the usual tank in the background in the picture above) makes it a lot more difficult to see what’s going on, and in my case the circulation is quickly influenced by the sides of the dish (which is obviously not what we wanted).
  • Rotation. It’s not difficult to set a Lazy Susan into rotation, but I imagine it will be quite difficult to keep it at a constant rotation for any length of time. But you will only see the nice spiral for as long as you keep the rotation constant. As soon as it changes, so will your currents and that will be clearly visible in the dye (which is why you put it in in the first place).
  • Documentation. If you want to document your experiment, if want to have your cameras co-rotating with the Lazy Susan, it’s going to be quite difficult to install them (but maybe you would just want one that sits stationary above the center of rotation? That would obviously be easy to do with a tripod)

So all in all: it was a nice idea, but either I haven’t thought it through well enough, or it is a whole lot easier to do with a rotating table. I would imagine that it’s quite hard to observe when you don’t know very well what you are looking for, so it is unfortunately not useful as a demonstration to introduce people to the topic. What do you think? Any suggestions on how to improve this and make it work at home?

Update on freezing ice cubes and the temperature distribution in our freezer

After writing the blog post on sea ice formation, brine release and what ice cubes can tell you about your freezer earlier today, I prepared some more ice cubes (because you can never have too many ice cubes for kitchen oceanography!), and then happened to look into the freezer a couple of hours later. And this is what I found:

Isn’t that beautiful?

Top pic shows the ice cubes “in situ”, clearly showing the cold back wall of the freezer where they were sitting.

Bottom left pic shows a top view of those ice cubes and it is very obvious that they have been starting to freeze from the back wall of the freezer forward: The upper row of ice cubes in the pic has formed clear ice in the direction towards that wall and has pushed the dye forward, whereas the bottom row in the pic is still not completely frozen and ice cubes seem to be freezing from all sides towards the middle and not as distinctly from back to front.

Bottom right pic: The rest of the water I prepared for the ice cubes that I left sitting on the counter for future use — still looks well mixed, no sinking of the dye to be observed!

And with these exciting updates I’ll leave you for now, so start playing with your own ice cubes! :-)

Sea ice formation, brine release, or: What ice cubes can tell you about your freezer

Many of my kitchen oceanography experiments use dyed ice cubes, usually because it makes it easier to track the melt water (for example when looking at how quickly ice cubes melt in freshwater vs salt water, or for forcing overturning circulations).

But the dyed ice cubes tell interesting stories all by themselves, too!

Salt water doesn’t freeze

“Salt water doesn’t freeze”? Then how do we get sea ice in the Arctic, for example?

When freshwater freezes, the water molecules arrange in a hexagonal crystal structure. If there is salt (or anything else) in the water, however, the ions don’t fit into the regular structure. Ice freezes from the water molecules, and all the disturbances like salt get pushed in the last remaining bits of liquid water, which therefore gets higher and higher concentrations of whatever was dissolved in it. As those little pockets with high concentrations of salt get cooled further, more and more water molecules will freeze to the surrounding freshwater ice, leading to even higher concentrations of salt in the remaining liquid water. So the freshwater is freezing, while rejecting the salt.

Of course if you cool for long enough, also the last bit of remaining water will freeze eventually, but that takes surprisingly long (as you can try by freezing salt water in some of the cups ice cube trays and freshwater in others, for comparison. Also the structures of freshwater vs saltwater ice look very different and are interesting to look at, see how here).

“Brine release”

When the ocean freezes, this rejection of high-salinity water leads to interesting phenomena: Even when you melt it again to include all the pockets of high salinity water, sea ice will have salinities way lower than the water it froze from. This is because of a process called brine release. Since you are cooling the ocean from above, sea ice also forms from the surface downwards. This means that it is easy for the salty water to be pushed, “released”, or “rejected”, downwards, into the liquid ocean below. That ocean will then of course get more salty right below the ice!

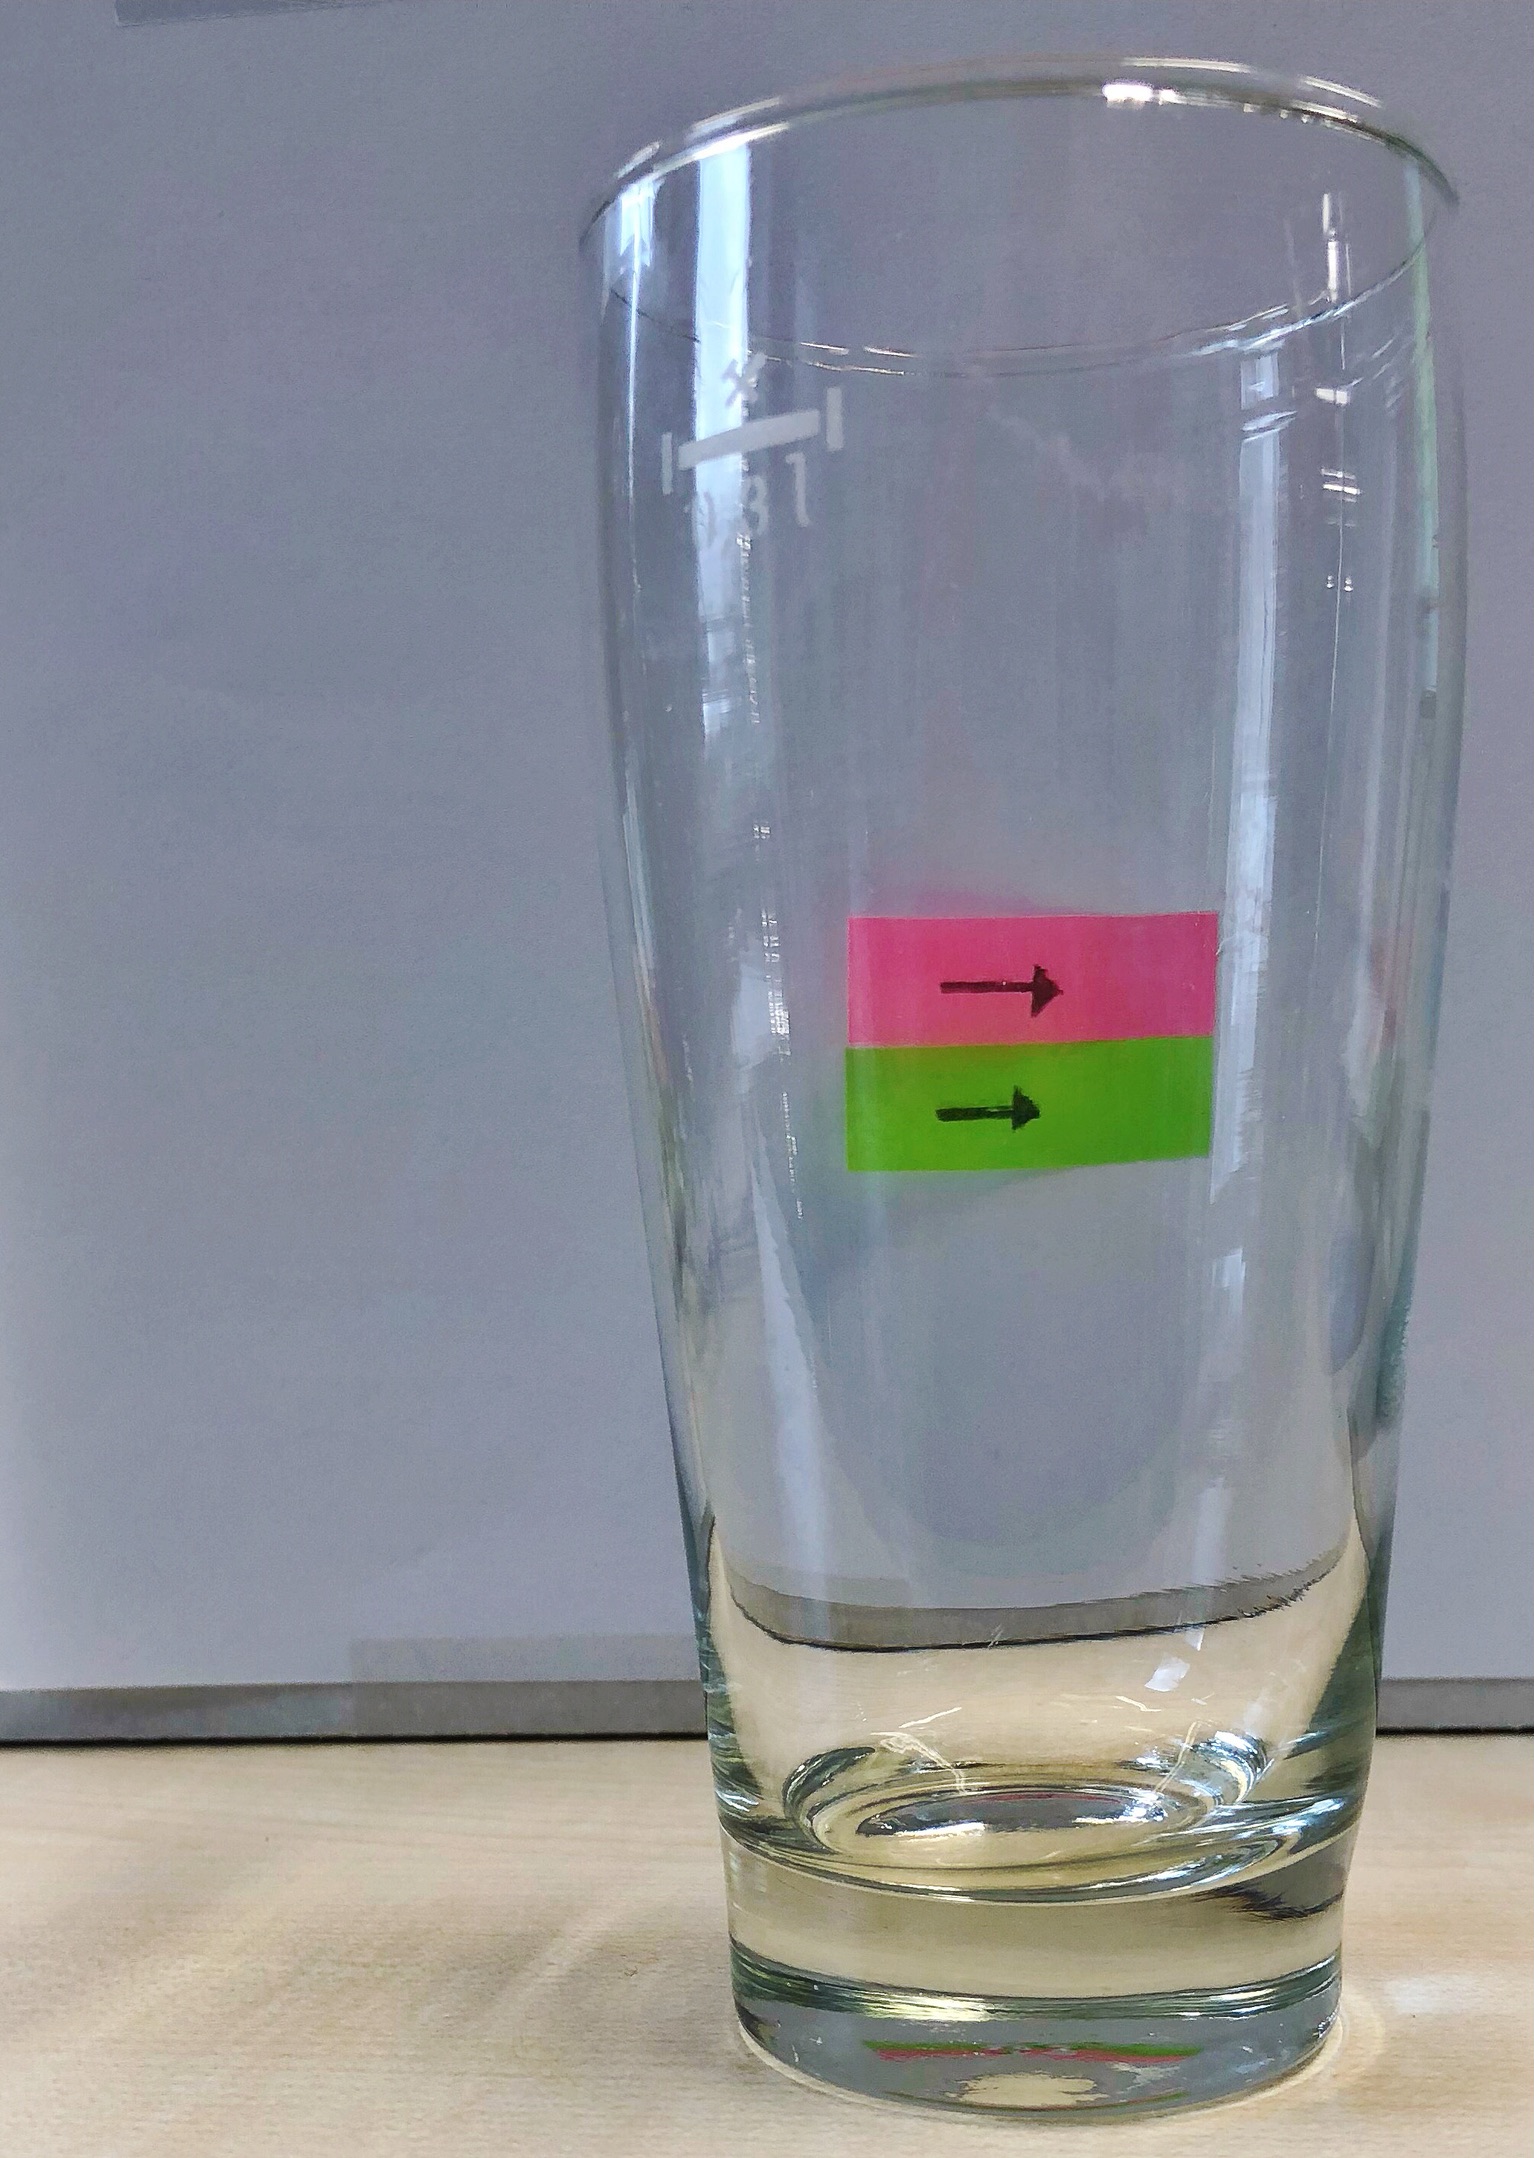
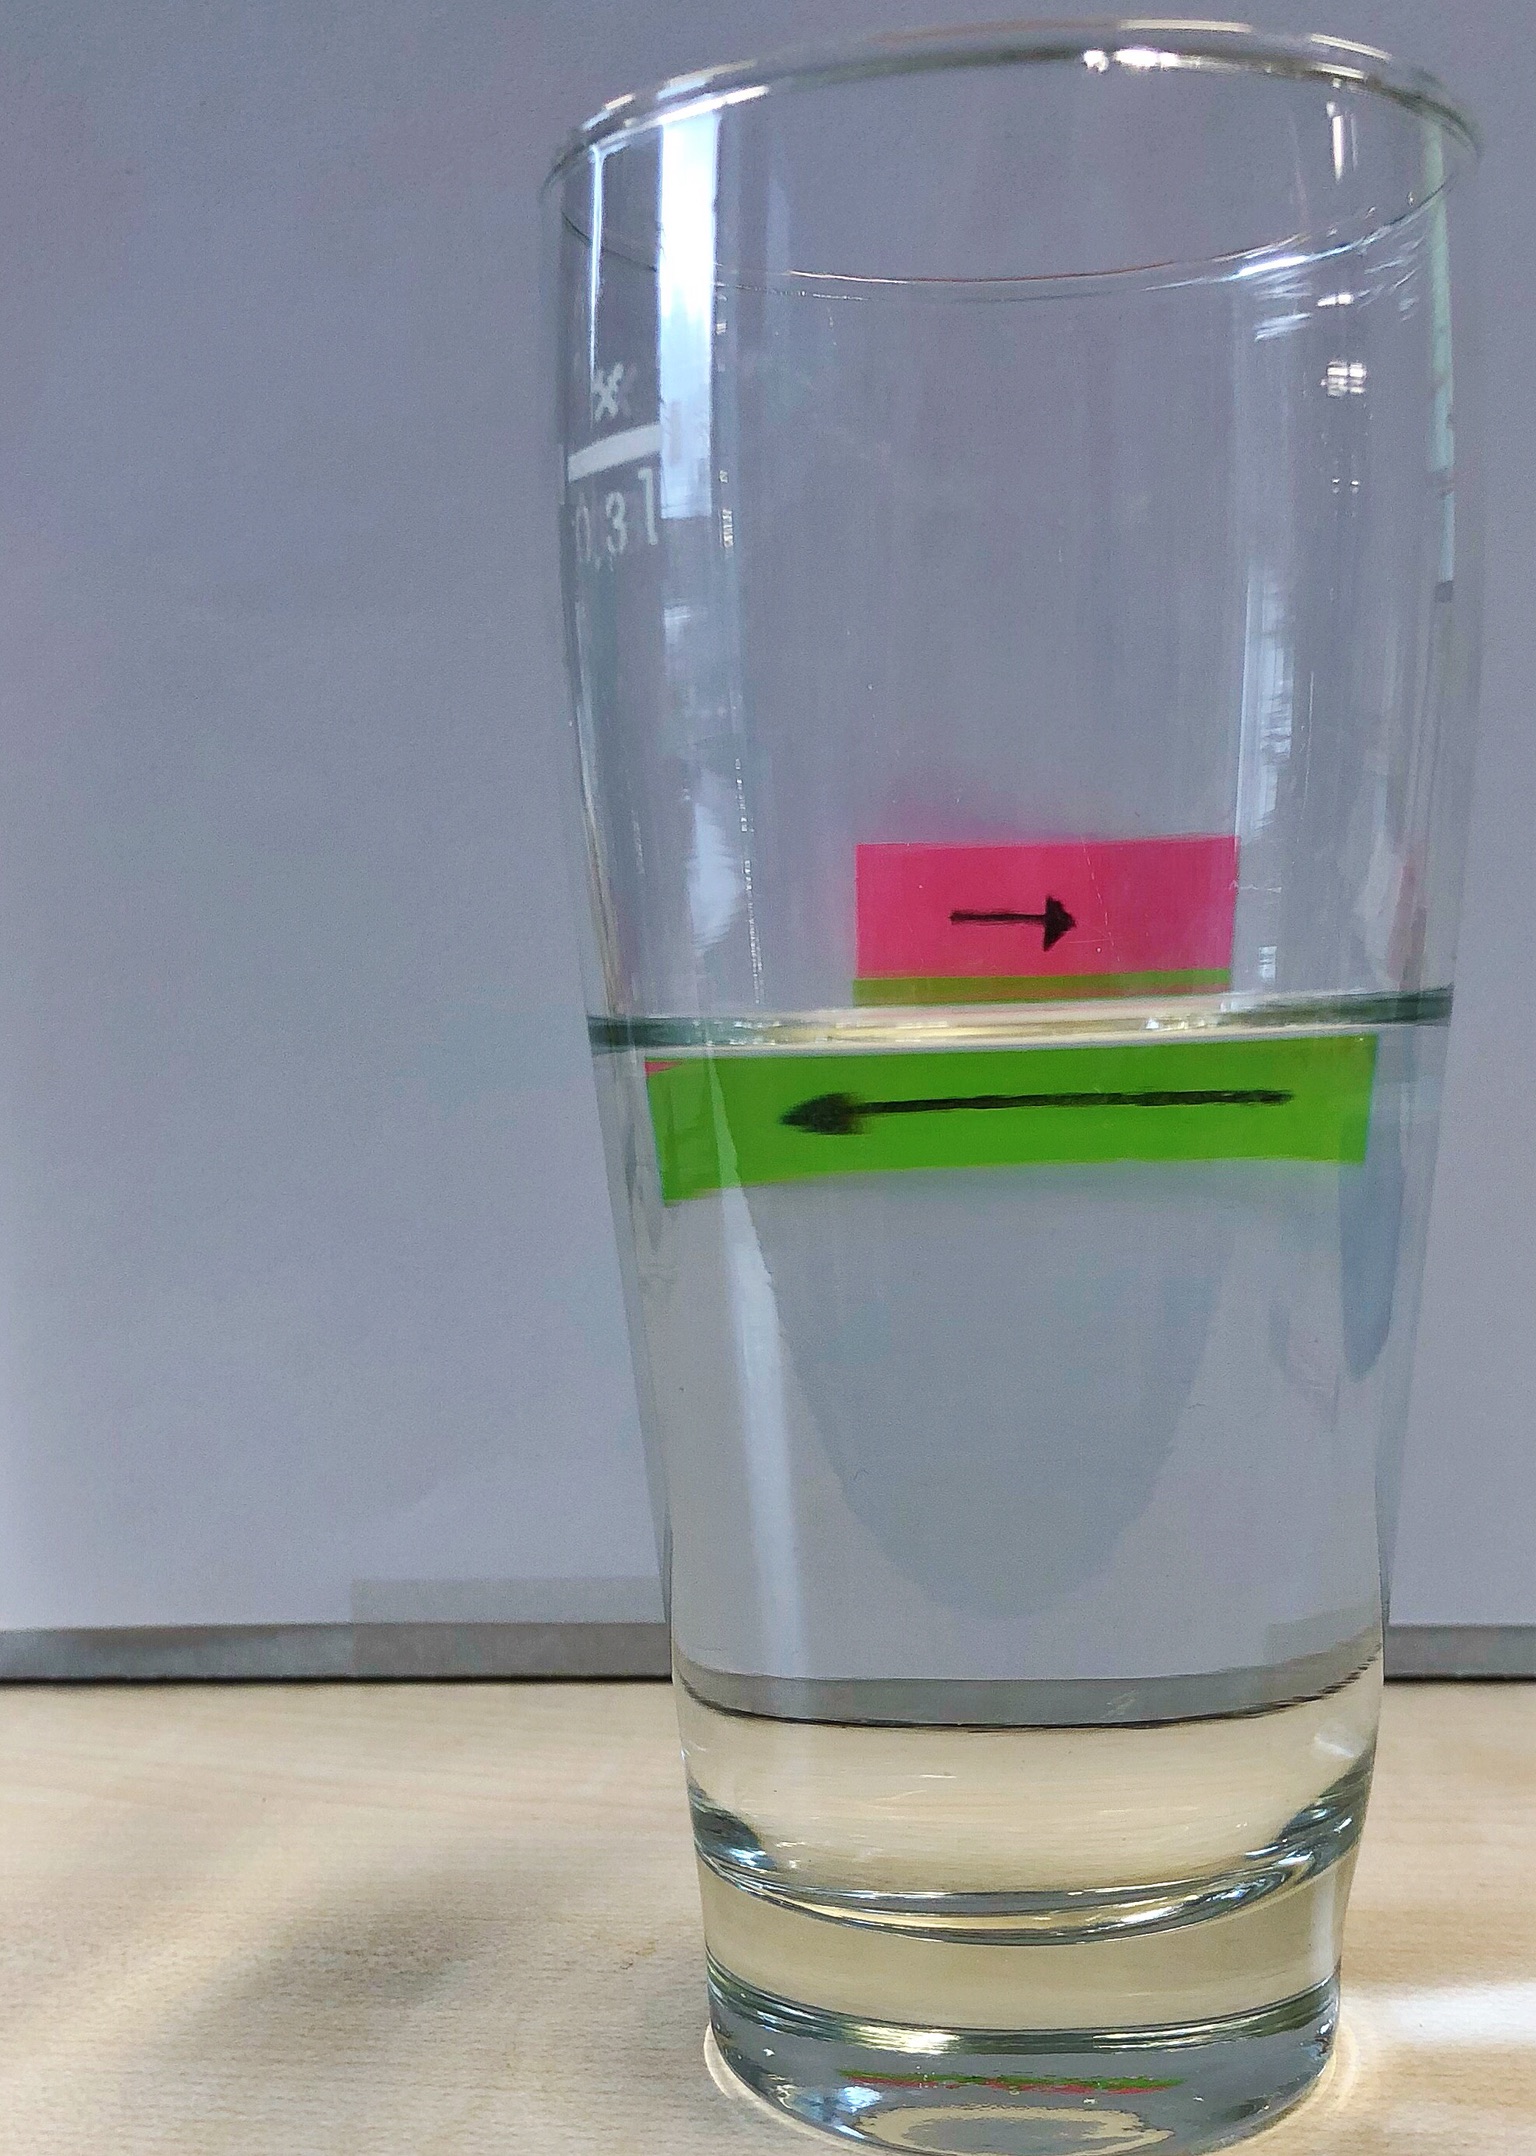
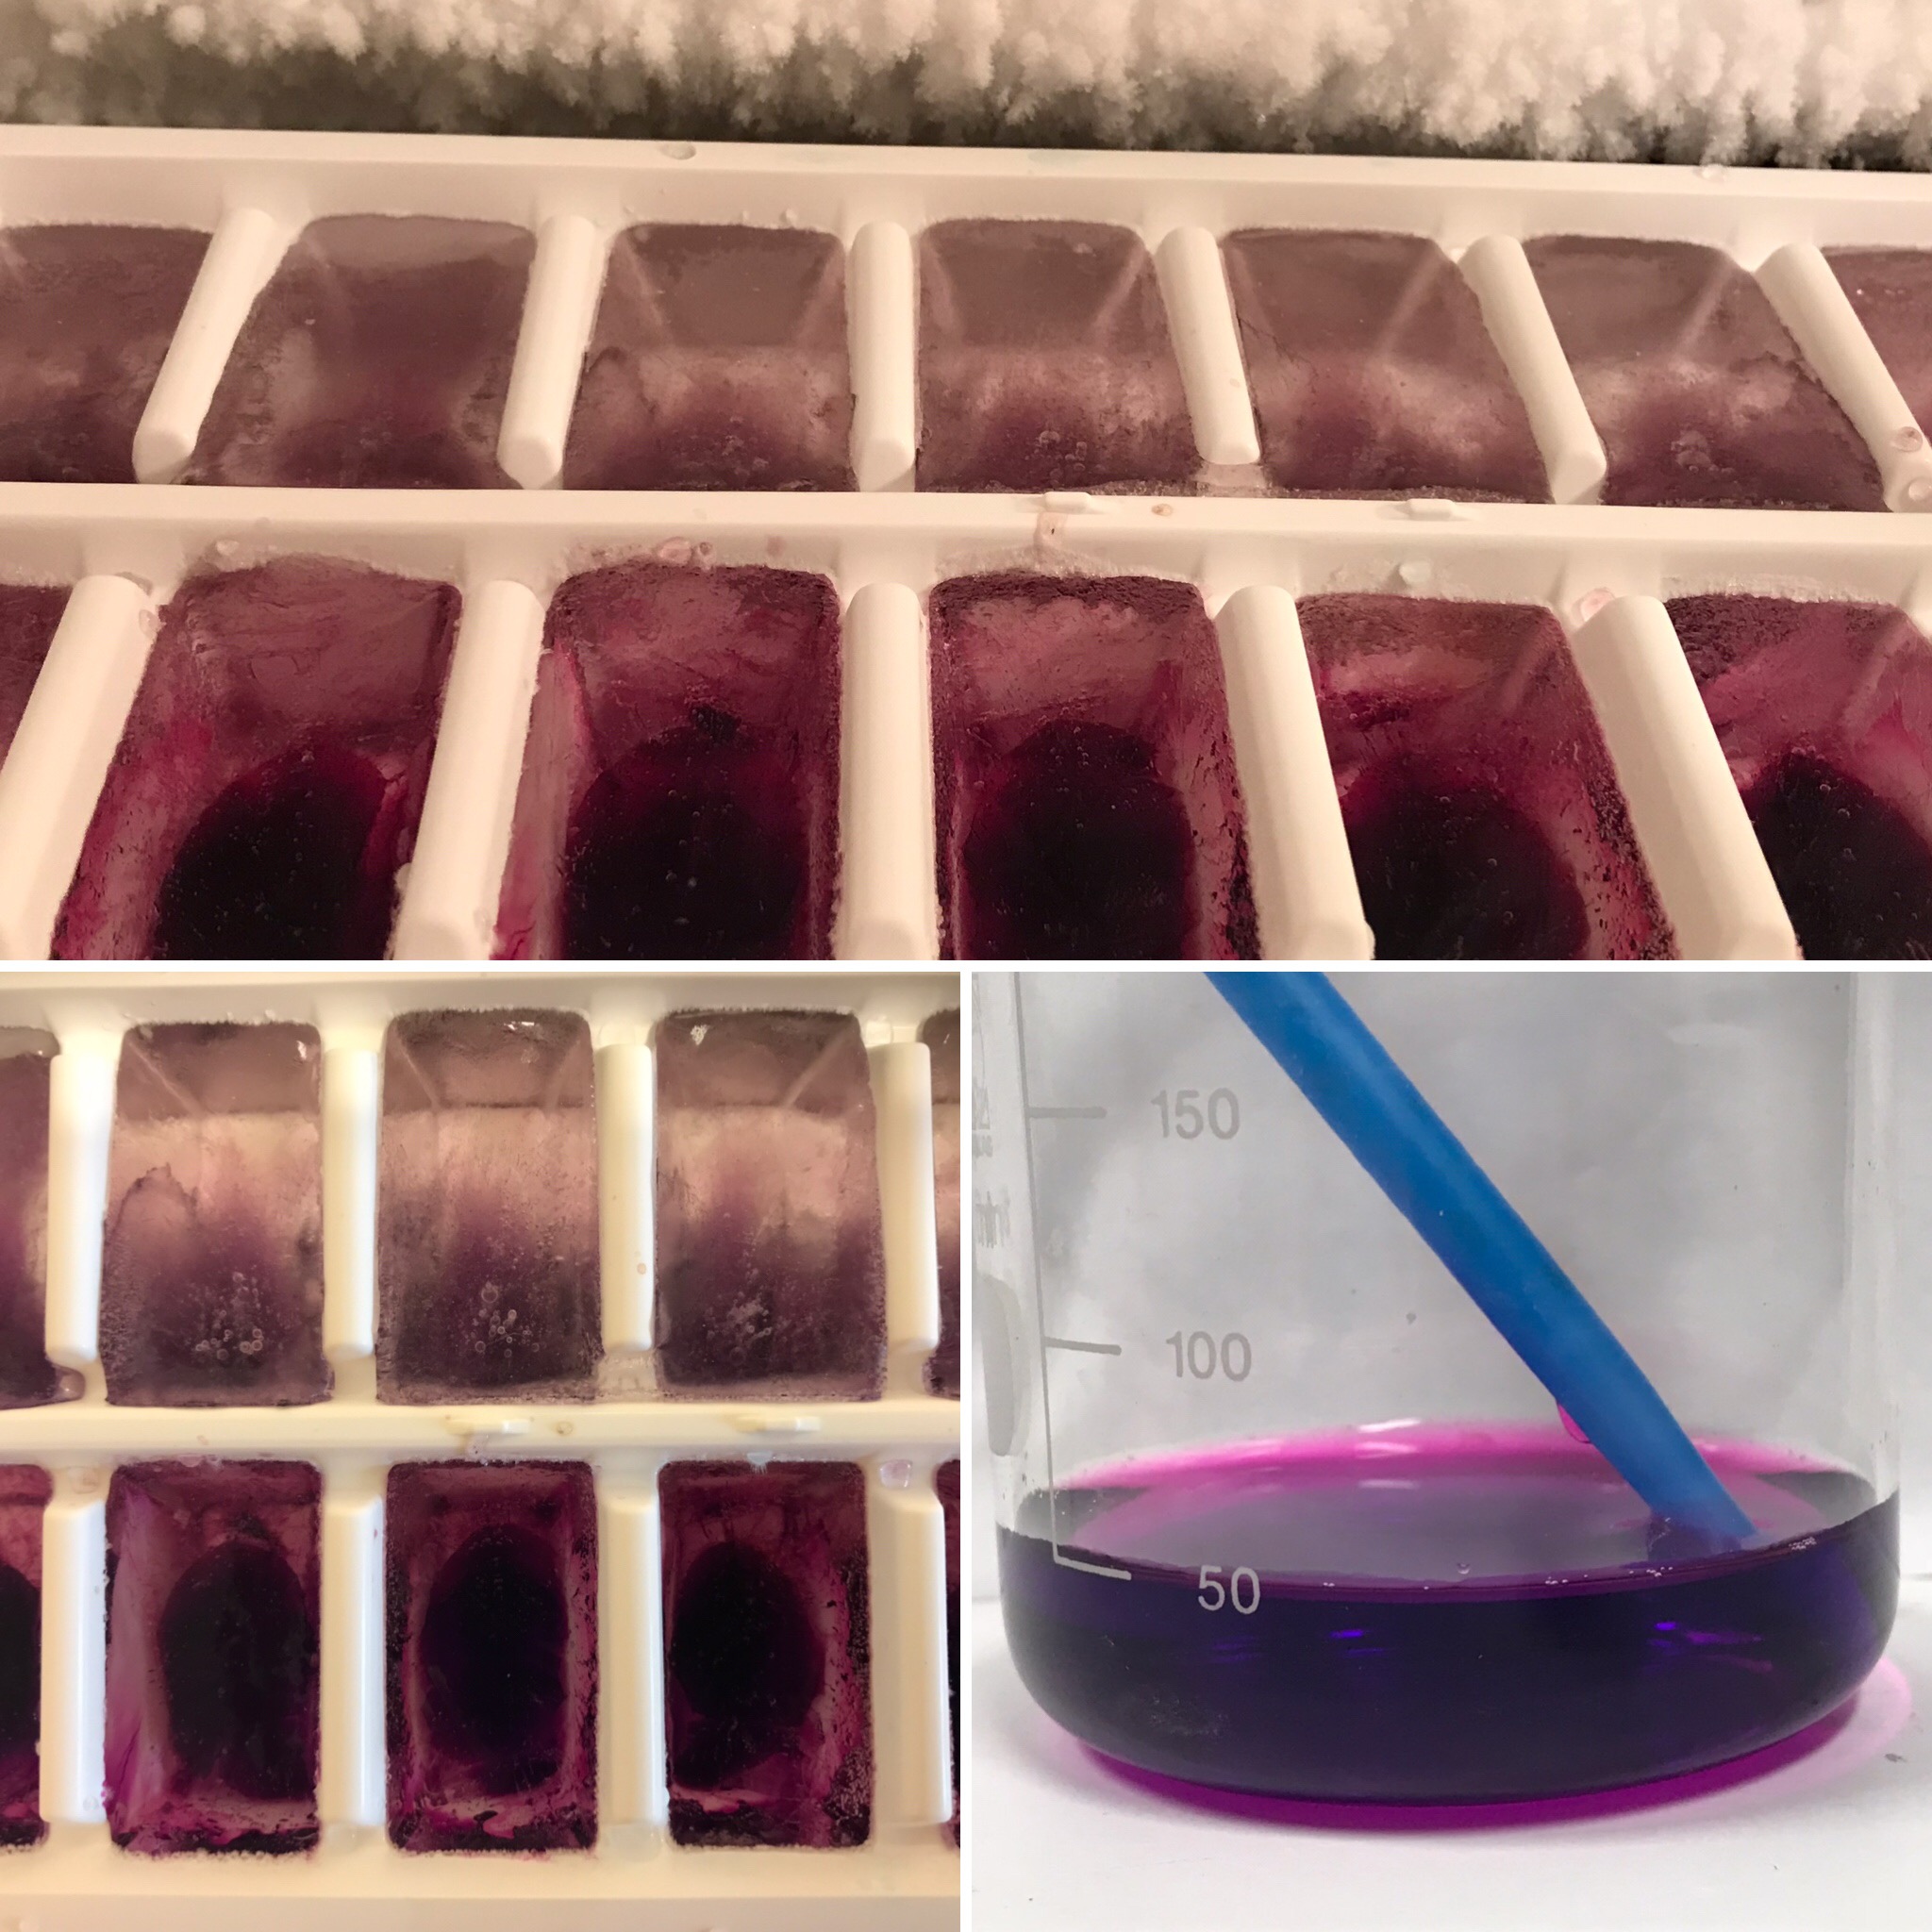
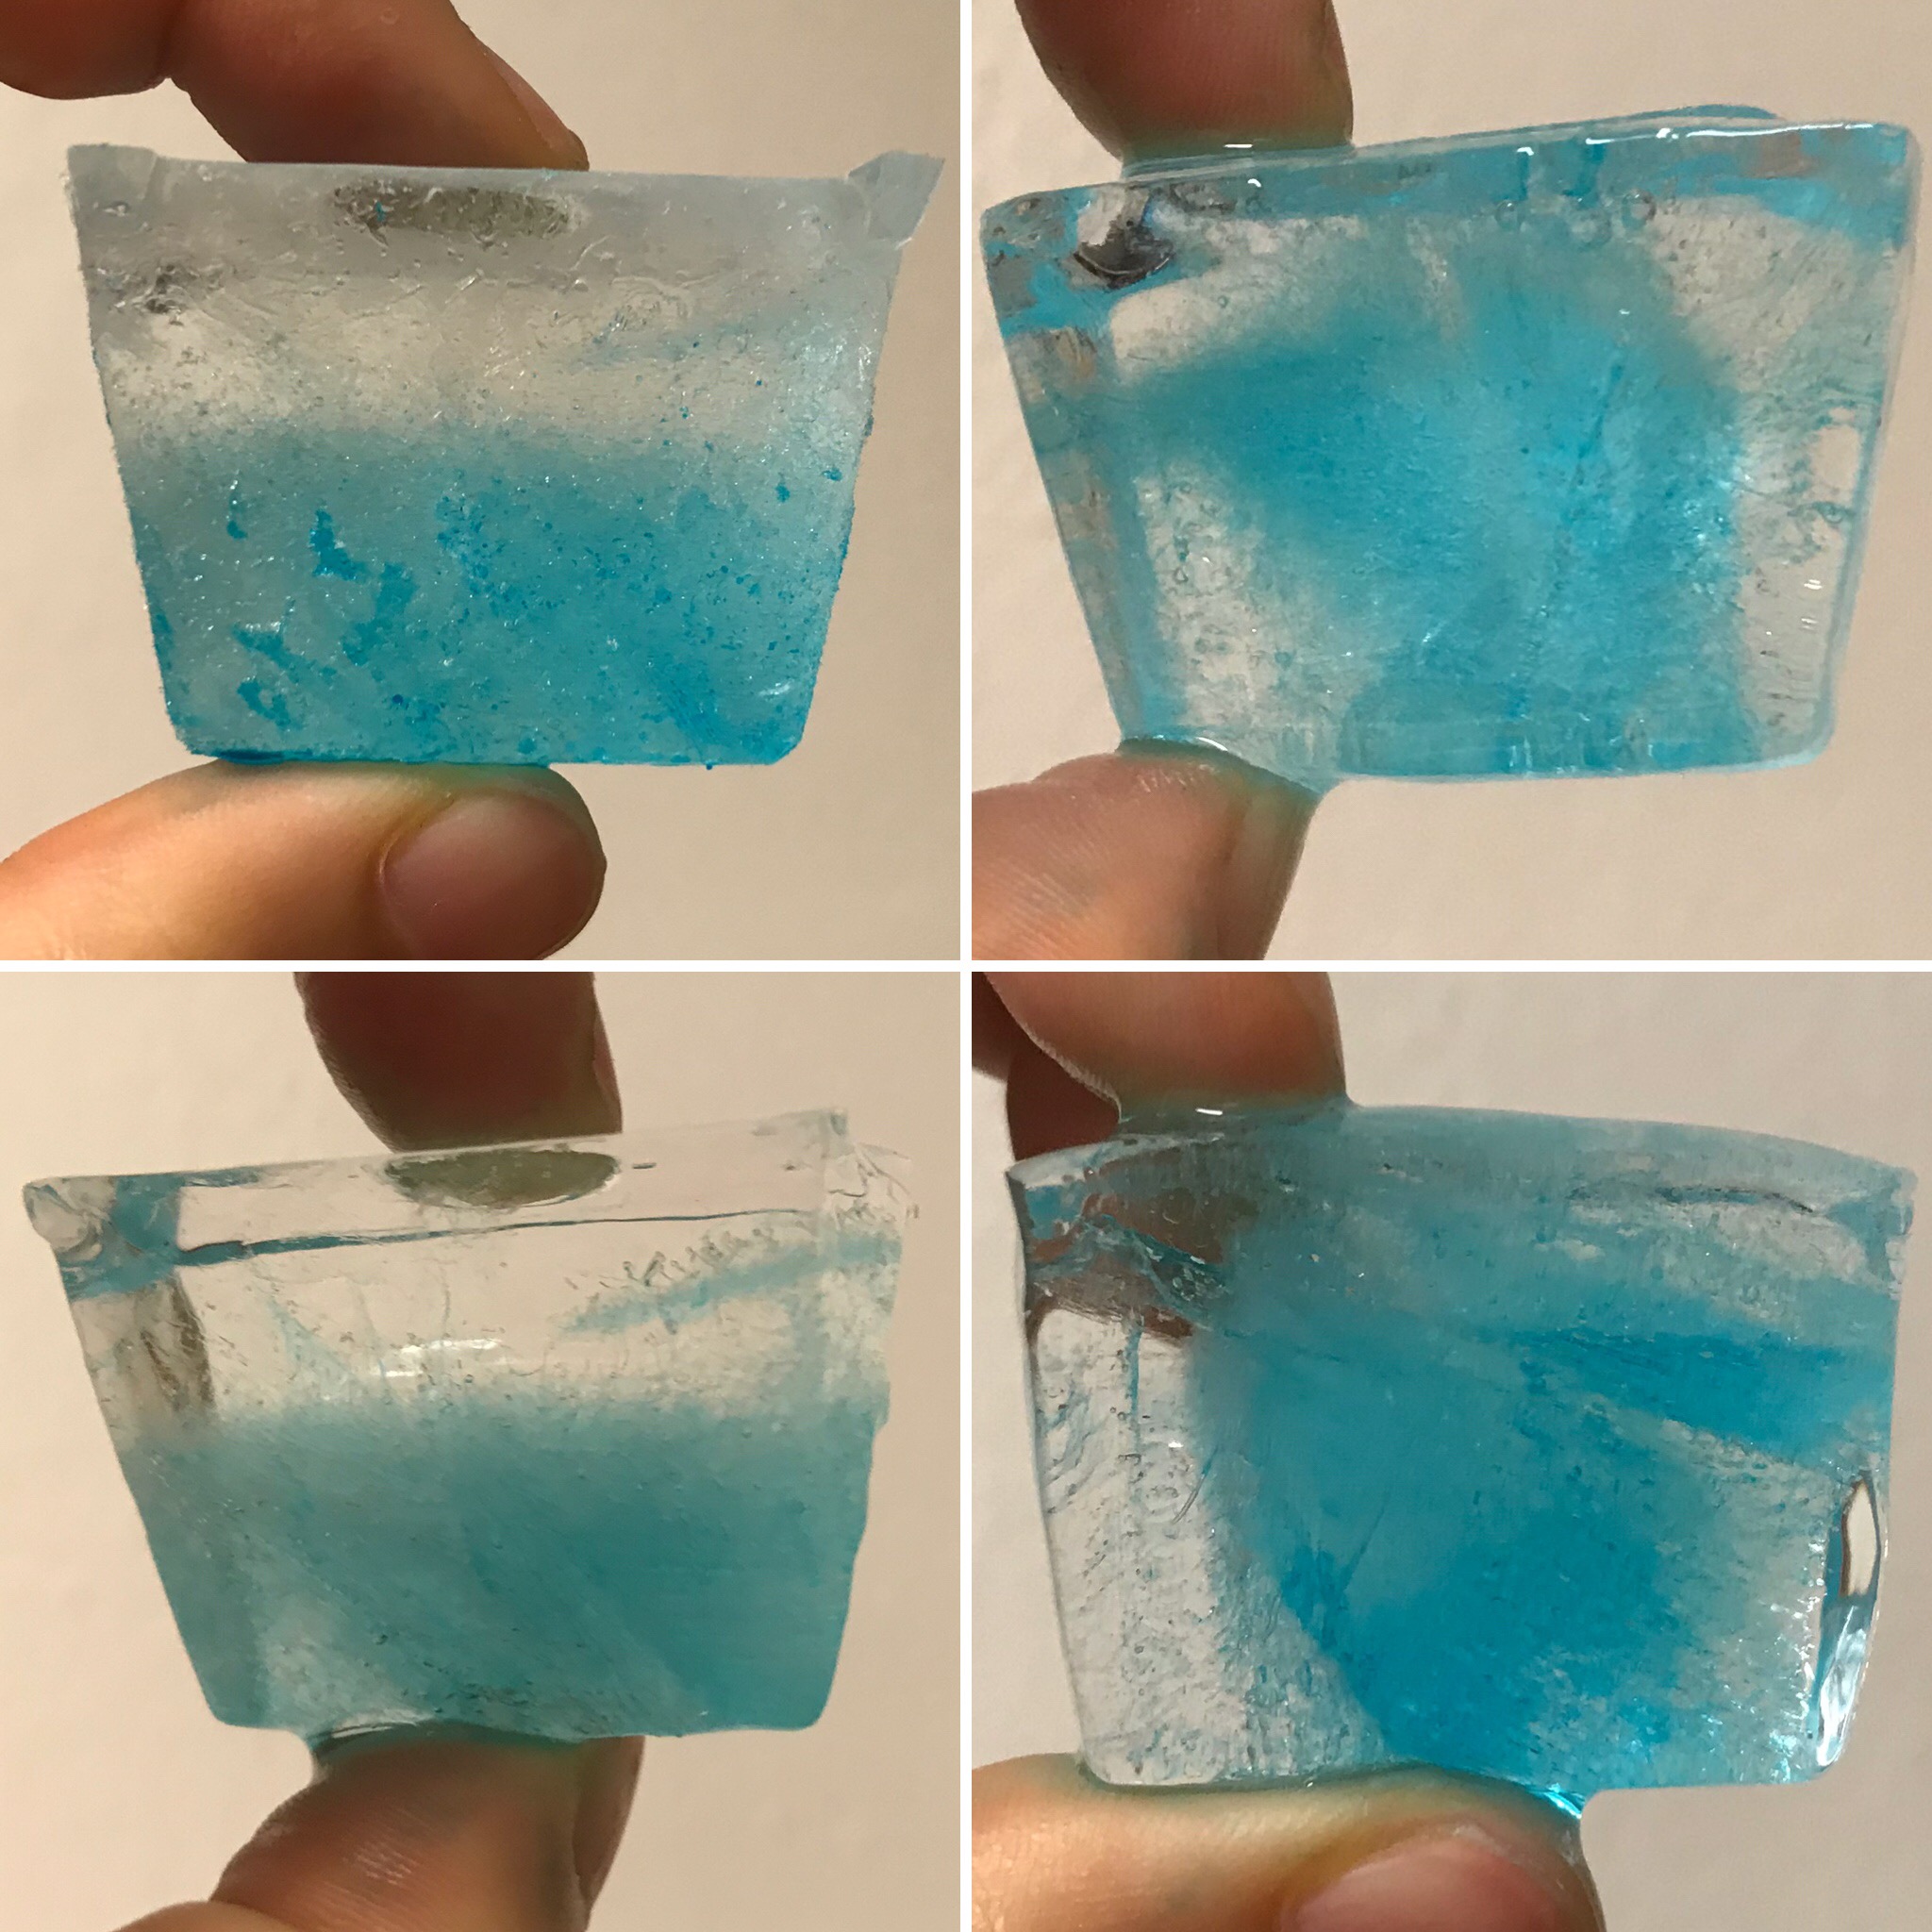
In the picture below you see something similar happening in the left pictures. Instead of salt, I have used blue food dye for visualization purposes. In the top left, you see an ice cube exactly as it looked when I took it out of the ice cube tray it froze in, and in the bottom left you see the same one after I let it melt a little bit so the surface got smoother and it got easier to look inside (a lot more difficult to hold on to, though!).

Do you see how the top part of the ice cube is pretty much clear, while the bottom part is blue? That’s because it froze top-to-bottom and the dye got pushed down during the initial freezing process!

Stuck in an ice cube tray

Something else that you see in the top left picture is the effect of the ice cube being stuck in the ice cube tray as it froze: Pores filled with blue dye that had nowhere to escape!

Had I taken out those ice cubes earlier, when they had just frozen half way through, we would have found a clear ice layer floating on a cold, blue ocean. Maybe I should do that next time!

Checking on the temperature distribution of your freezer

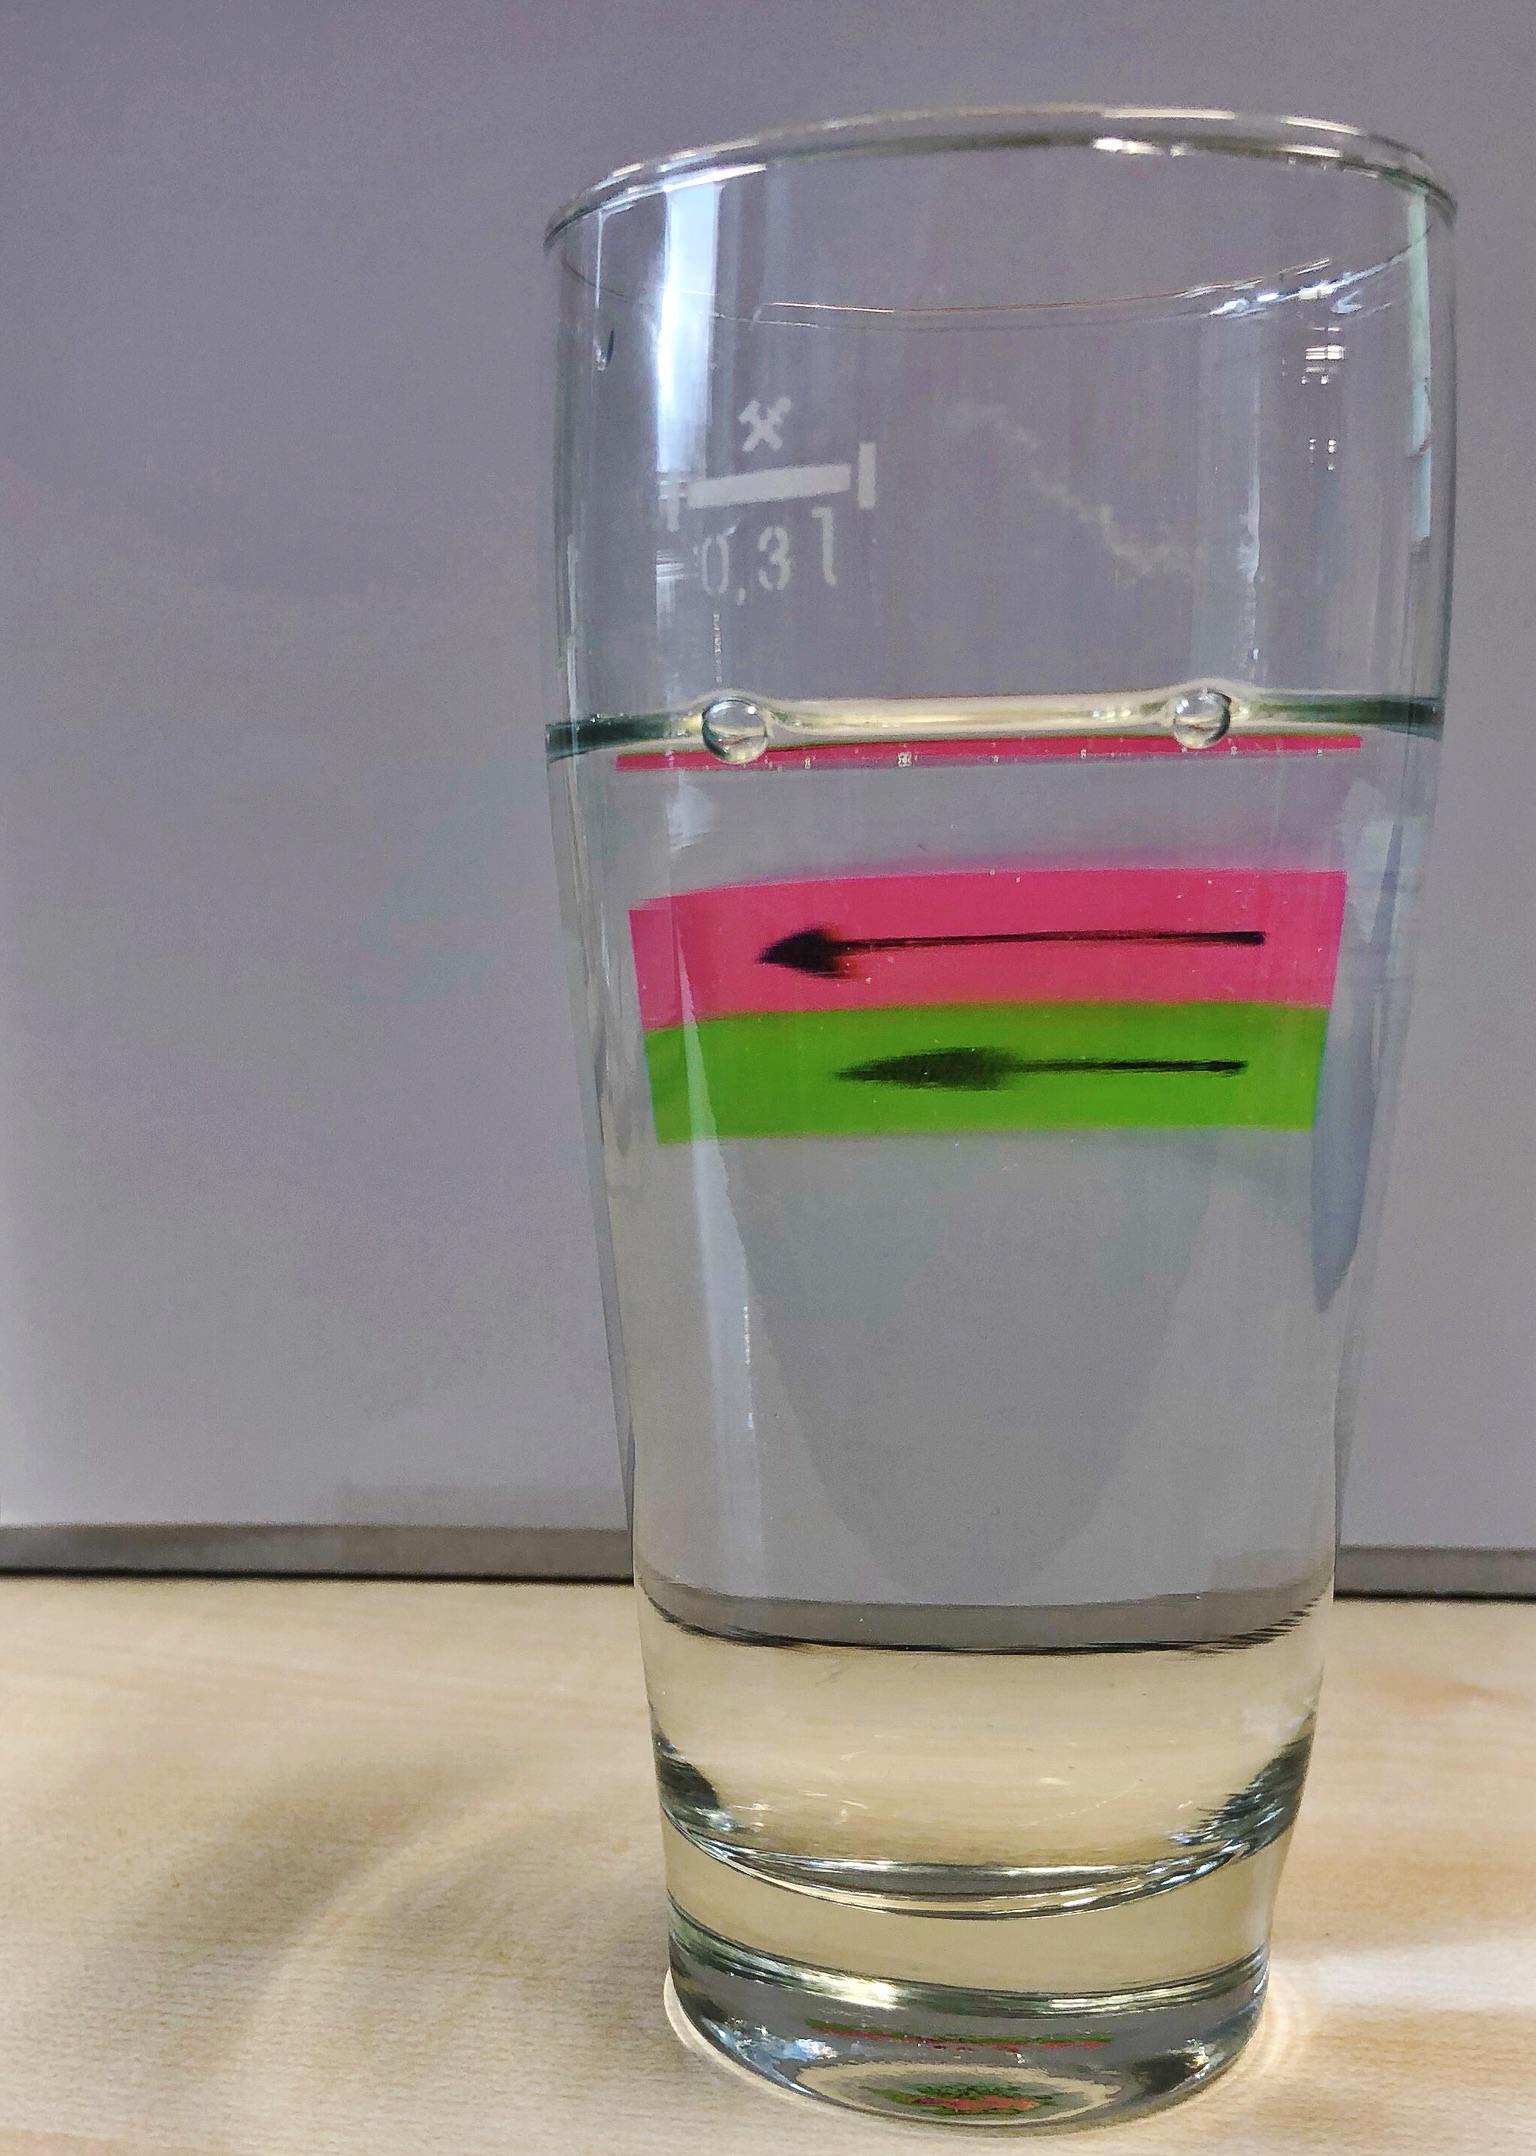
Something else fun we can observe from the right pictures: Here, the dye was concentrated towards the center of the ice cube rather than the bottom! How did that happen?

My theory is that those ice cubes were located in an area of the freezer that was cooling from all sides (more or less) equally, whereas the ones shown on the left must have been placed somewhere where cooling happened mainly from the top.

So if you ever want to know where the cooling in your freezer happens, just put lots of dyed little water containers everywhere and check from which side the dye gets rejected — that’s the cooling side! Actually, I might check that for the freezer below just for fun. Would you be interested in seeing that done?

Now it’s your turn!

Let’s look back at the ice cubes I froze yesterday in the picture above. I’ve now written about a lot of things I see when I look at them. What else do you see? Do you think it’s interesting to use with kids, for example? I’ve used those experiments with first year university students, too, I think there is plenty to observe and explain here!

Thinking about the Doppler effect as of a boat sailing against the waves!

I can’t believe I haven’t written about this on my blog before, thanks Markus Pössel for reminding me of this great way to understand the Doppler effect!

Doppler effect, or why ambulances change their sound as they race past you

Doppler shift is everywhere, but it’s maybe not obvious how to imagine what’s going on if you think of sound waves.

But look at the picture below. Can you imagine the sound of those waves lapping against the shore?

Now imagine taking a speed boat riding out on the water. Can you feel how you are bouncing over the wave crests, and notice how you are meeting them a lot more often than when you were standing on the beach, looking out on the water?

Or imagine being a surfer, riding that perfect wave. You are staying with the same wave crest for a really long time, while in front of you creat after crest breaks on the beach.

Yes, the Doppler effect is as easy as this! As you are moving with or against the waves, their frequency changes. Totally obvious when you think about waves on water, right? But the same happens with sound waves, and in their case, a changed frequency means that the sound appears to change pitch. If the ambulance is coming towards you, the sound gets higher and higher, and then as it races away, it gets lower again. So now you don’t even have to look when you hear an ambulance, you know whether it’s coming or going! (Just kidding! Please definitely look out, anyway, and don’t get run over!)

A #scicommbookforkids for #scicommchall

I hope by now you have heard about my pet project of the moment: #scicommchall! For #scicommchall, I give myself (and quite a few other people by now) monthly challenges related to trying out new science communication formats. And this month, we are doing science communication books for kids! (For more instructions, see #scicommchall’s post. And everybody is welcome to join!).

My book deals with learning to observe where the wind is coming from (English version at the end of this post, too).

I think it turned out quite nicely!

I did struggle a little with the very short format — only six pages inside the book, plus a cover — but quite liked the challenge of having to come to the point.

The flag on the cover, in case you were wondering, is that of my hometown Hamburg.

I hope this book is actually useful and fun for kids (I did include some kids’ humor, or at least I tried ;-))

And I know what I would include if I wasn’t too lazy to re-draw the images: A question about on which side of some kind of structure one would sit down if one wanted shelter from the wind. Bummer I forgot to include that!

Anyway, here is the download (German & English). Please let me know what you think, I’d love to get some feedback!

Click to download

Layered latte: A great real-life example of double-diffusive mixing!

Sometimes sitting in a café for a work meeting with #lieblingskollegin Julia can lead to unexpected discoveries of oceanographic processes — in my latte! It’s those little things that inspire blog posts…

“Kitchen oceanography” brings the ocean to your house or class room!

Oceanography is often taught in a highly theoretical way without much reference to students’ real life experience. Of course a sound theoretical basis is needed to understand the complexity of the climate system, but sometimes a little “kitchen oceanography” — doing experiments on oceanographic topics with household items — goes a long way to raise interest in the kind of processes that are not easily observed in the real world. I’ve previously written a lot about simple experiments you can perform just using plastic cups, water, ice cubes, and a little salt. But sometimes it’s even easier: Sometimes your oceanography is being served to you in a cafe!

Oceanic processes can be observed in your coffee!

Have you ever looked at your latte and been fascinated by what is going on in there? Many times you don’t just see a homogenous color, but sometimes you see convection cells and sometimes even layers, like in the picture below.

Layers in a latte.

Layers in a latte.

But do you have any ideas why sometimes your latte looks like this and other times it doesn’t?

When you prepare latte in the right way, many layers form

Layers forming in latte (and in the ocean or in engineering applications) are an active research field! In the article “laboratory layered latte” by Xue et al. (2017), the authors describe that the “injection velocity” of espresso into the warm milk has to be above a critical value in order for these pretty structures to form in a latte. They even provide a movie where you can watch the layers develop over a period of several minutes.

The homogeneous layers with sharp boundaries are caused by double-diffusive mixing

Double-diffusive mixing, which is causing the formation of these layers, is the coolest process in oceanography. In a nutshell, double diffusive mixing is caused by two properties influencing density having different rates of molecular diffusion. These different rates can change density in unexpected ways and an initially stable stratification (high density at the bottom, low density on top) can, over time, become statically unstable. And static instability leads to adjustment processes, where water parcels move in order to reach the position in the fluid where they are statically stable — the fluid mixes.

Layers in half a glass of latte.

Layers in half a glass of latte.

But there are more fascinating things going on with the latte. Would you expect this stratification to remain as clearly visible as it is in the picture above even though the glass is now half empty? I did not! And then check out what happens when you move the glass: Internal waves can travel on the boundaries between layers!

You can use this in class to teach about mixing!

Mixing in the ocean is mostly observed by properties changing over time or in space, and even though (dye) tracer release experiments exist, they are typically happening on scales that provide information on the large-scale effects of mixing and not so much on the mixing itself. And they are difficult to bring inside the classroom! But this is where kitchen oceanography and experiments on double-diffusive mixing come in. If you need inspiration on how to do that, I’ve recently published an article on this (unfortunately only in German), but there are plenty of resources on this blog, too. Or shoot me an email and we’ll talk!

P.S.: Even though the coffee company is displayed prominently in the pictures above, they did not pay for my coffee (or anything else). But if they’d be interested and make me a good offer, I’d definitely write up some fun stuff on learning oceanography with coffee for them ;-)