(If you are impatient, scroll to the second-to-last video of this post for my best example, otherwise stay with me as I walk you through different scenarios…)
First, I tested with movies I already had on my phone, for example storm waves in Kiel. Which might not be the nicest test case as wave crests break and thus new “particles” appear, but then vanish in a trough behind another wave etc.. So even though the app tracks them, it all seems a bit messy. The movies always start with a short glimpse of the original movie and then the tracking begins…
Then, I tried the “soap protects you from Corona” demo that my adorable nieces are presenting for you. There is water on the plate sprinkled with pepper (or something), and they dip their fingers in with a little bit of dish soap, break the surface tension, and the particles all get pushed to the edge of the plate. (Spoiler alert: Kids’ hands — no matter how cute — will be recognized as particles…. :-D)
At this point I decided that it was definitely time for my parents and me to go for a walk to film some flows.
Below: Laminar flow towards the edge, then turbulent flow at the bottom. Interesting observations here (beside the super cool flow field that is captured surprisingly well): Where there is a lot of foam and everything appears white, it’s not easy for the app to find “particles” to trace. And when reflections on the water move (like the handrail when there are waves) that looks like “particles” to the app.
Here is one example where there are plenty of bubbles passing by on the other side of the river (which are tracked very nicely) and my dad threw in some leaves on our side so there were particles that showed the recirculation. Nice! (No idea what the app sees in the top left corner, though)
Then I had the brilliant idea to film the large scale flow field with lots of bubbles in it. But, as you, dear reader, will probably have guessed already, the reflected trees are the much more dominant signal. That’s what happens when you film tons of things and only process them afterwards…
But here is a very nice example for you: Fast, laminar flow upstream of the weir, then a waterfall, a submerged hydraulic jump and turbulence at the bottom. Nice!
Back home, I decided I wanted to test some tank experiments. Below I’m first showing a couple of seconds of the original “thermal overturning circulation” movie (because I knew my hands would mess up the particle tracking when I’m dripping dye into the tank) and then cut to the processed one.
I thought that this was one of my better movies with few reflections on the tank, a nice background, etc.. Turns out: Still waaaay too much going on! Reflections on the glass, shadows on the wall behind it as we are watching… I’m sure there are settings in the app that would lead to much better results (if I knew how to use it) but for now I know that using the app is a little more difficult than I thought.
In any case, I think it’s a brilliant app, and I am looking forward to playing with it some more and figuring out how to use it best! There are so many settings that I haven’t figured out yet, so I know what I’ll be doing over the next couple of days… ;-) And I can’t wait to use it on our DIYnamics rotating tank experiments!
Check out today’s episode of Treibholz Podcast, where Maxie, Ronja and I talk about the oceanic overturning circulation and #KitchenOceanography (in german), while each of us is doing a similar experiment in her own home. Is podcasting a good format to convey what’s going on with our water, ice and dye? We’ll know soon! :D
I just wanted to quickly clean my tank… But then it was too pretty, so I guess the rheoscopic (“current showing”) fluid gets to stay a little longer. What an amazing toy :-)
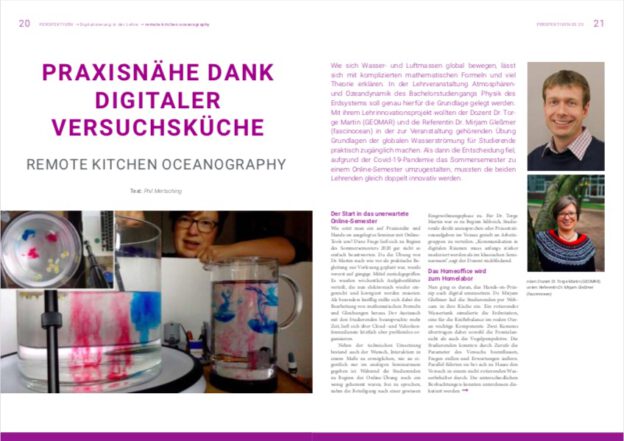
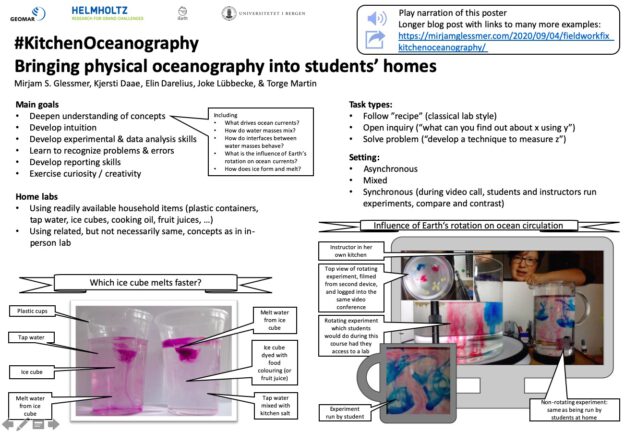
This is the longer version of the (A4!) poster that I am presenting on behalf of myself, Kjersti Daae, Elin Darelius, Joke Lübbecke and Torge Martin at the #FieldWorkFix conference next Tuesday (September 8, 2020). If you would rather listen to the voiceover than read the transcript below, please feel free to do that below! (Thanks to Torge, the voice over is about 1/3rd the length of the blogpost that I originally wrote to use as script :-D)
#KitchenOceanography: Bringing physical oceanography into students’ homes
Welcome to our virtual poster! I want to tell you about #KitchenOceanography: experiments that students can do at home, using common household items. Whether due to Covid-19, or institutional constraints like the lack of laboratory spaces or instructors, or simply because a hands-on experience would be useful with a certain concept, but it’s not on the syllabus – #KitchenOceanography is a great substitute for doing experiments in a laboratory course when that isn’t possible.
We use #KitchenOceanography when teaching physical oceanography and climate sciences. But the concept of home experiments can easily be transferred to other fields, and I therefore want to present the learning outcomes we can achieve on a fairly abstract level. If you would like to learn about #KitchenOceanography experiments in detail rather than just the general concept which I am presenting here, please follow the link on our poster to a blog post in which I have linked to tons of examples of different learning outcomes and experiments (and to all the experiments mentioned here, as well as 24 easy starter experiments).
One typical learning outcome in laboratory courses is the deepening of understanding of concepts that are theoretically dealt with in a lecture. If the concept itself cannot easily, affordably or safely be transformed into a home experiment, you could ask students to come up with a demonstration of an analogy with the concept instead. We have done that when teaching about processes that govern the El-Niño-Southern-Oscillationpattern in the Pacific Ocean. Of course, students cannot build a physical model that represents all the processes in the ocean and atmosphere that are relevant, but they can come up with demonstrations that show analogies of the cycle.
Another learning outcome in a laboratory might be developing intuition on the one hand, but also checking intuition against observations and explaining counterintuitive results. A great experiment here is to ask students to place ice cubes in two beakers with room-temperature water, one salt water and one freshwater. Asking students to predict which of the ice cubes will melt faster leads to 90% wrong predictions, and because it is really difficult to come to terms with a wrong intuition, it will lead to a lot of learning around experimental skills. Students will ask themselves if they maybe accidentally swapped the beakers because they didn’t take notes of which one was which. They might try to taste the water to test which of the beakers contains salt water (tasting in a lab of course being a big no-no). Even if the course is on a subject that is not related to ocean physics at all, this experiment still holds a huge potential to practice – and gaining appreciation for – laboratory skills.
A third common learning outcome in laboratory courses is for students to exercise curiosity and practice creativity. Using an experiment like the melting ice cubes one I just described ALWAYS works to do just that. Students will always come up with questions that they want to investigate. What would happen if the ice cubes weren’t floating in the water, but were forced down to the bottom of the beaker? Or if the ice cubes weren’t frozen fresh water, but had been made from salt water? In my experience, even students from other subjects that rolled their eyes when I told them they were going to do an experiment with water and ice in plastic cups get hooked and want to understand why their intuition was wrong and what more there is to explore.
Another learning outcome often connected to laboratory courses is to develop reporting skills. With the ice cube experiment I already showed the importance of taking notes even when experimenting only in your kitchen, and #KitchenOceanography lends itself to practicing writing lab reports: now many of the materials and conditions need to be described in a lot more detail because the cooking salt that I use in my kitchen might not have the same composition as the one that you are using, which might be kosher, or enriched in iodine, or reduced in sodium. So if we want to be able to compare results later on, all these things need to be written down. And of course, reporting skills might take a different form than a conventional lab report, especially when students are socially isolated, using for example social media or blogs as an outlet might provide them with community, feedback and recognition.
Lastly, a common learning outcome is to recognize problems and errors during experimentation. Since #KitchenOceanography is less supervised than a typical laboratory class, students will inevitably trouble-shoot more independently, and it’s a good idea to explicitly include reflection on what went wrong and how it was fixed in both documentation and discussion of the experiments.
So what would it look like to use #KitchenOceanography as #FieldWorkFix?
We have run #KitchenOceanography experiments in different instructional settings. Back in the day when we were still teaching in-person classes, in addition to using them as hands-on experiments within class, we gave them as homework. One task was to find a way to measure the salinity of a water sample the students were given, and came up with many surprising and creative solutions. In this setting, #KitchenOceanography was already done asynchronous: students did the experimental work whenever it suited them and report back. It can be done in exactly the same way, and reporting back can happen either in writing or in the class’ video call.
What we have had a lot of success with last semester, though, was a synchronous setup. In a video call, students did simplified versions of an experiment, and the instructor showed the full version of the experiment that students would have run in class, had that been possible. In our case, the experiments would ideally have been conducted on a rotating table to simulate Earth’s rotation. And while I have one in my home, not many students do. So we asked students to do the non-rotating version at home, while I presented the rotating version. The added benefit was that we took time to compare and contrast the two different versions and were thus able to isolate the effects of Earth’s rotation – something we would not have spent time on had students had the opportunity to work hands-on with the rotating tables themselves.
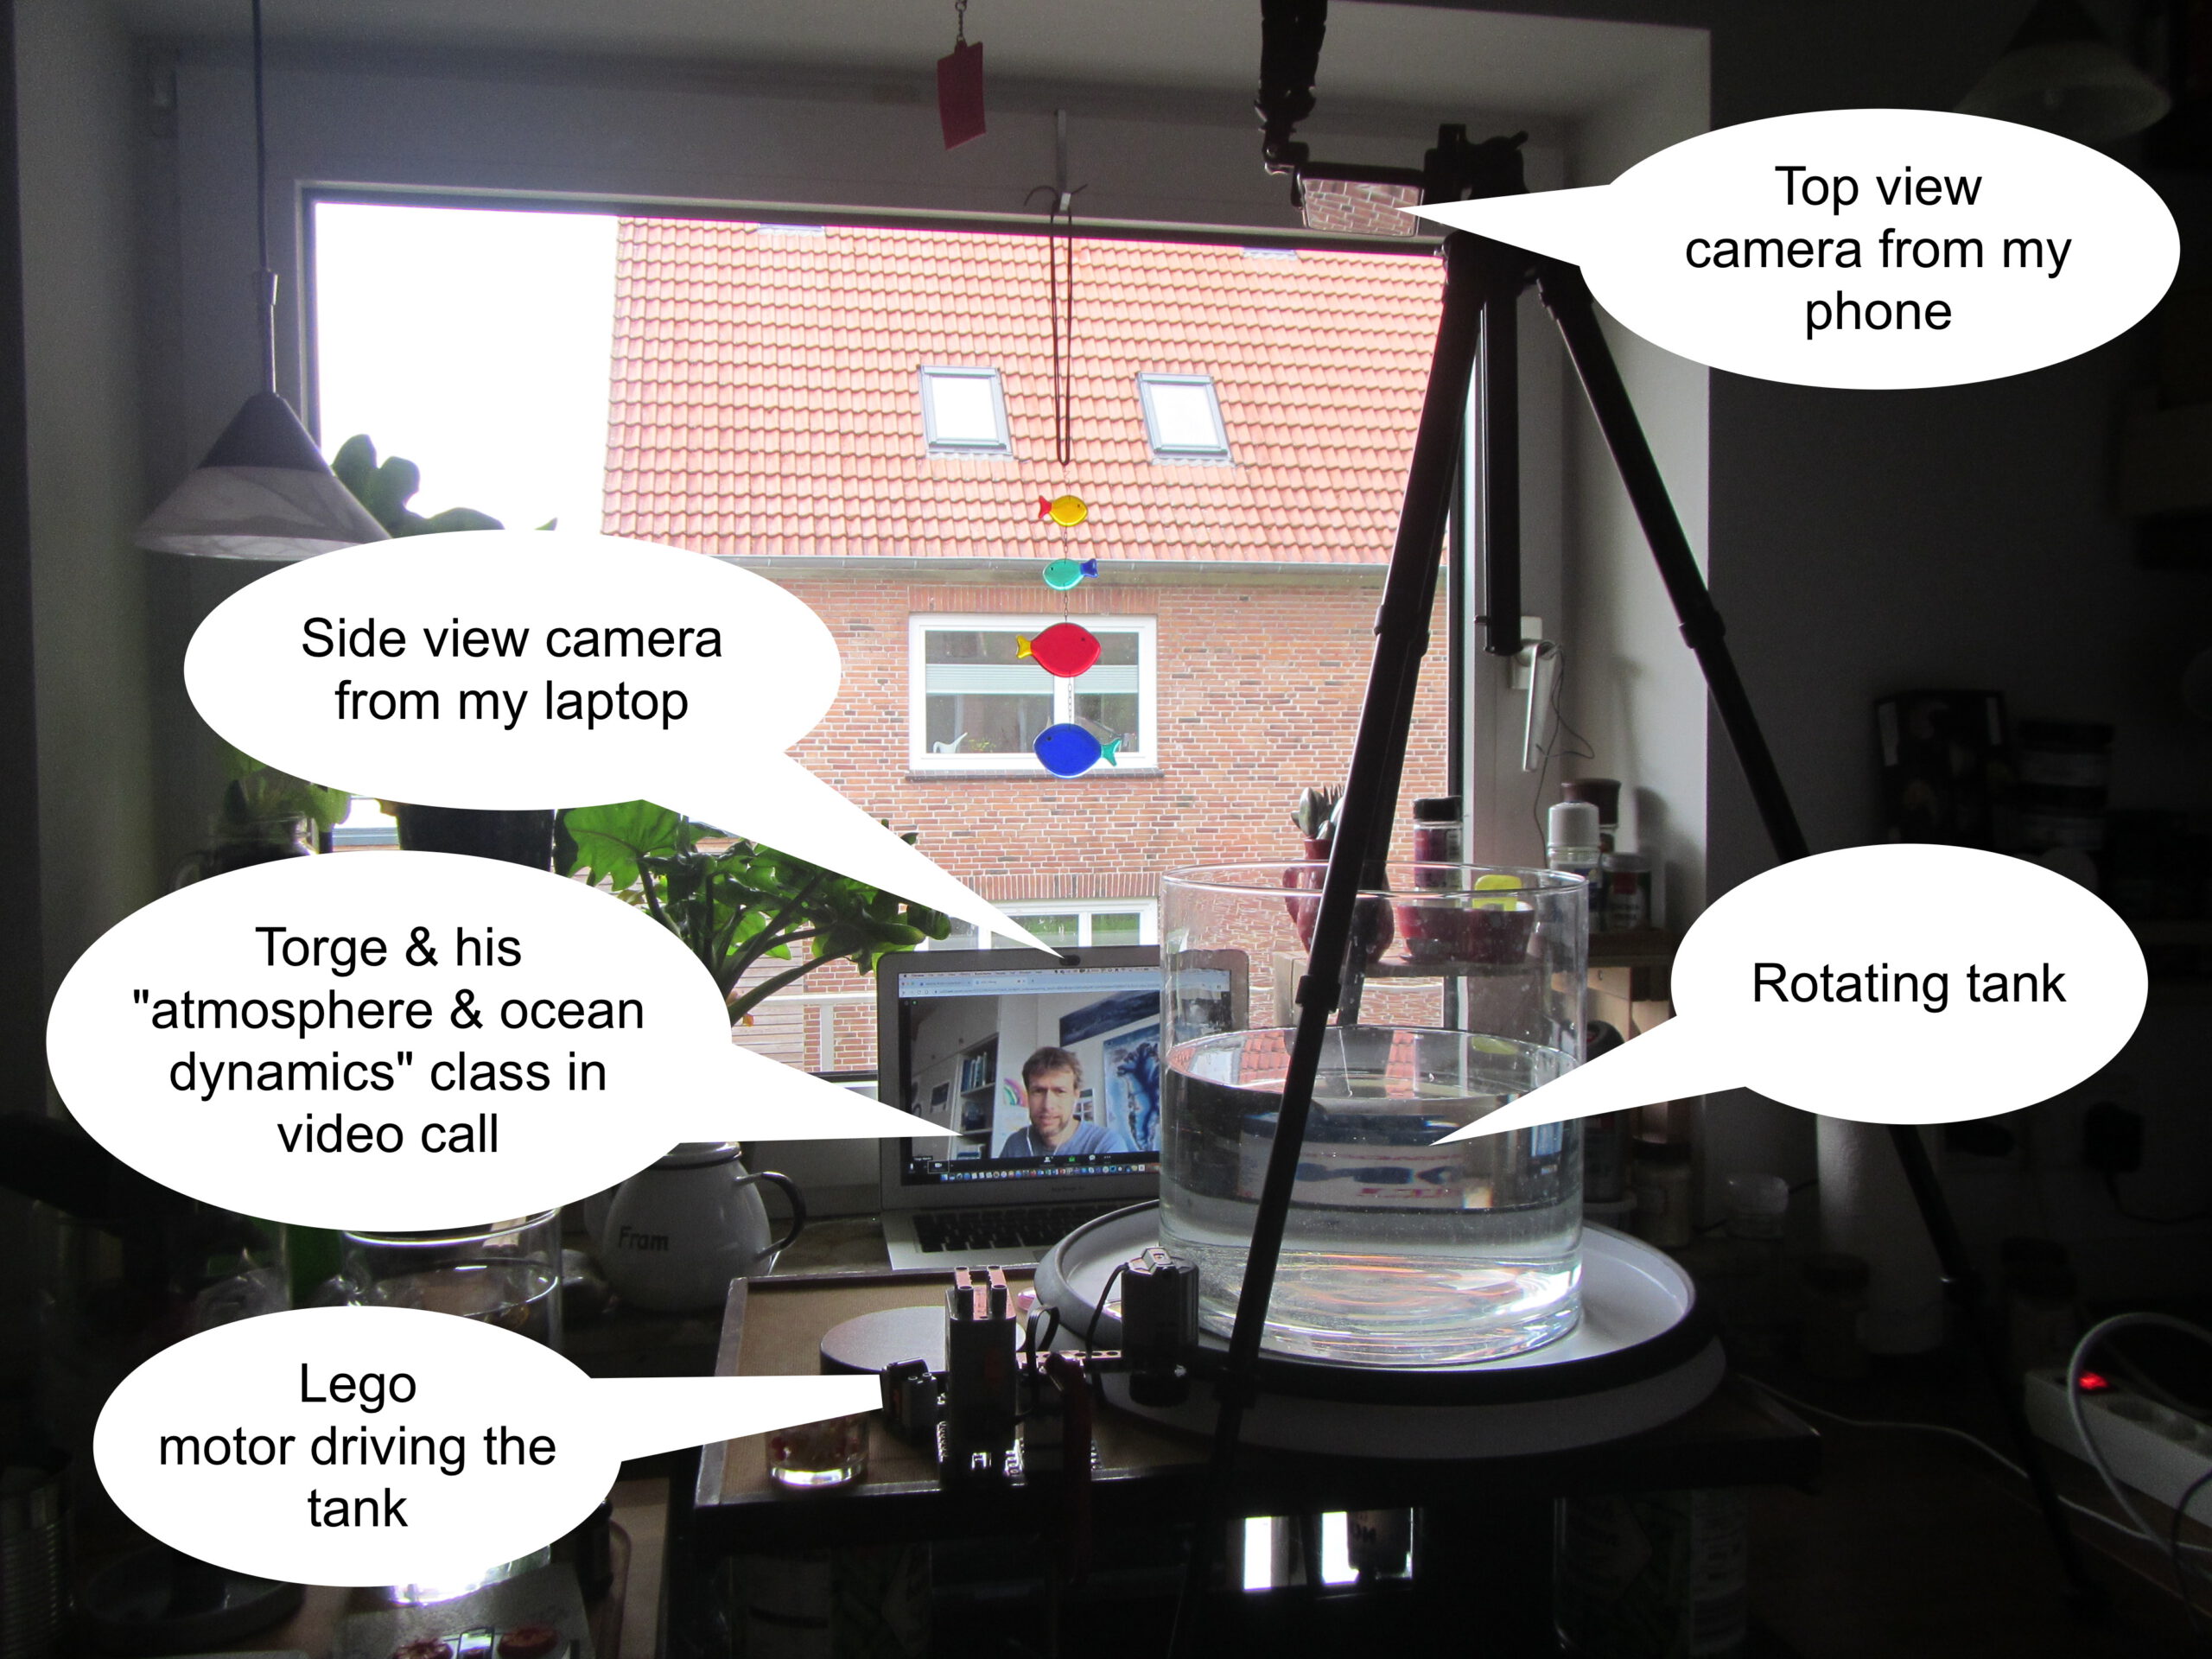
We had three modes of presenting the “full” version of the experiment: using pre-recorded videos (which is definitely the more error-proof way to do it!), running the experiments as a demonstration in real time, or asking students to “remotely control” me doing the experiment by telling me what parameters to modify to which values. This worked by me joining the video call with two devices: One that was recording myself and my experimental setup, looking into the tank from the side, and one that was mounted above the experimental setup and showed the top view (which was relevant for the experiment we were doing). Students shared their experiments via video stream when they chose to. The class was taught by a second instructor, which is what we would definitely recommend: Having one person host the meeting and deal with questions and difficulties as they arise, and have a second person focus on doing the experiment.
All in all, despite the unavoidable tech problems, doing these video conferences where we all did experiments together, were a lot of fun for all involved, and definitely helped make the somewhat sad and lonely experience of learning alone at home, instead of hands-on with a nice group of people, less lonely and a lot more fun.
„Meeresströmungen im Wassertank“: Lehre, die Wissenschaft begreifbar macht
Über eine Lehrinnovation, die auf Kleingruppenarbeit und „hands-on“-Praxiselemente setzte – und was in Zeiten von Covid-19 daraus wurde.
In der Lehrveranstaltung „Atmosphären- und Ozeandynamik” im Bachelorstudiengang Physik des Erdsystems wird das theoretische Grundgerüst zum Verständnis der globalen Bewegung von Luft- und Wassermassen erarbeitet, welches zum Beispiel Wetter- und Klimavorhersagen ermöglicht.
Vor der Lehrinnovation von Dr. Torge Martin (GEOMAR) und Dr. Mirjam Gleßmer (fascinocean) geschah dies vorwiegend theoretisch auf Papier und an der Tafel. Die Verknüpfung der Theorie mit beobachtbaren Phänomenen der realen Welt kam dabei oft zu kurz. Um die Theorie begreifbar zu machen, haben wir praktische Experimente in rotierenden Wassertanks und am Computer eingebettet. Diese werden von den Studierenden gemeinsam durchgeführt und das Verständnis durch in Gruppenarbeit erarbeitete Blogposts vertieft. So zumindest im ersten Semester der zweisemestrigen Lehrinnovation…
Das erste Semester – der Plan geht auf
Schon in Vorbereitung der Antragstellung bei PerLe konnten wir nicht länger warten – wir mussten uns einfach privat einen rotierenden Tank für zuhause anschaffen und die Experimente schon mal probieren! Was normalerweise viele Hundert Euro kostet, ist Dank der Bauanleitung des DIYnamics Teams und der Verwendung einfachster Bauteile (wie zum Beispiel eines LEGO Motors) auf einmal erschwinglich. Und das Wissen, dass eventuelle Fehler nicht furchtbar teuer werden, lässt uns – und auch unsere Studierenden – viel unbeschwerter und kreativer experimentieren!
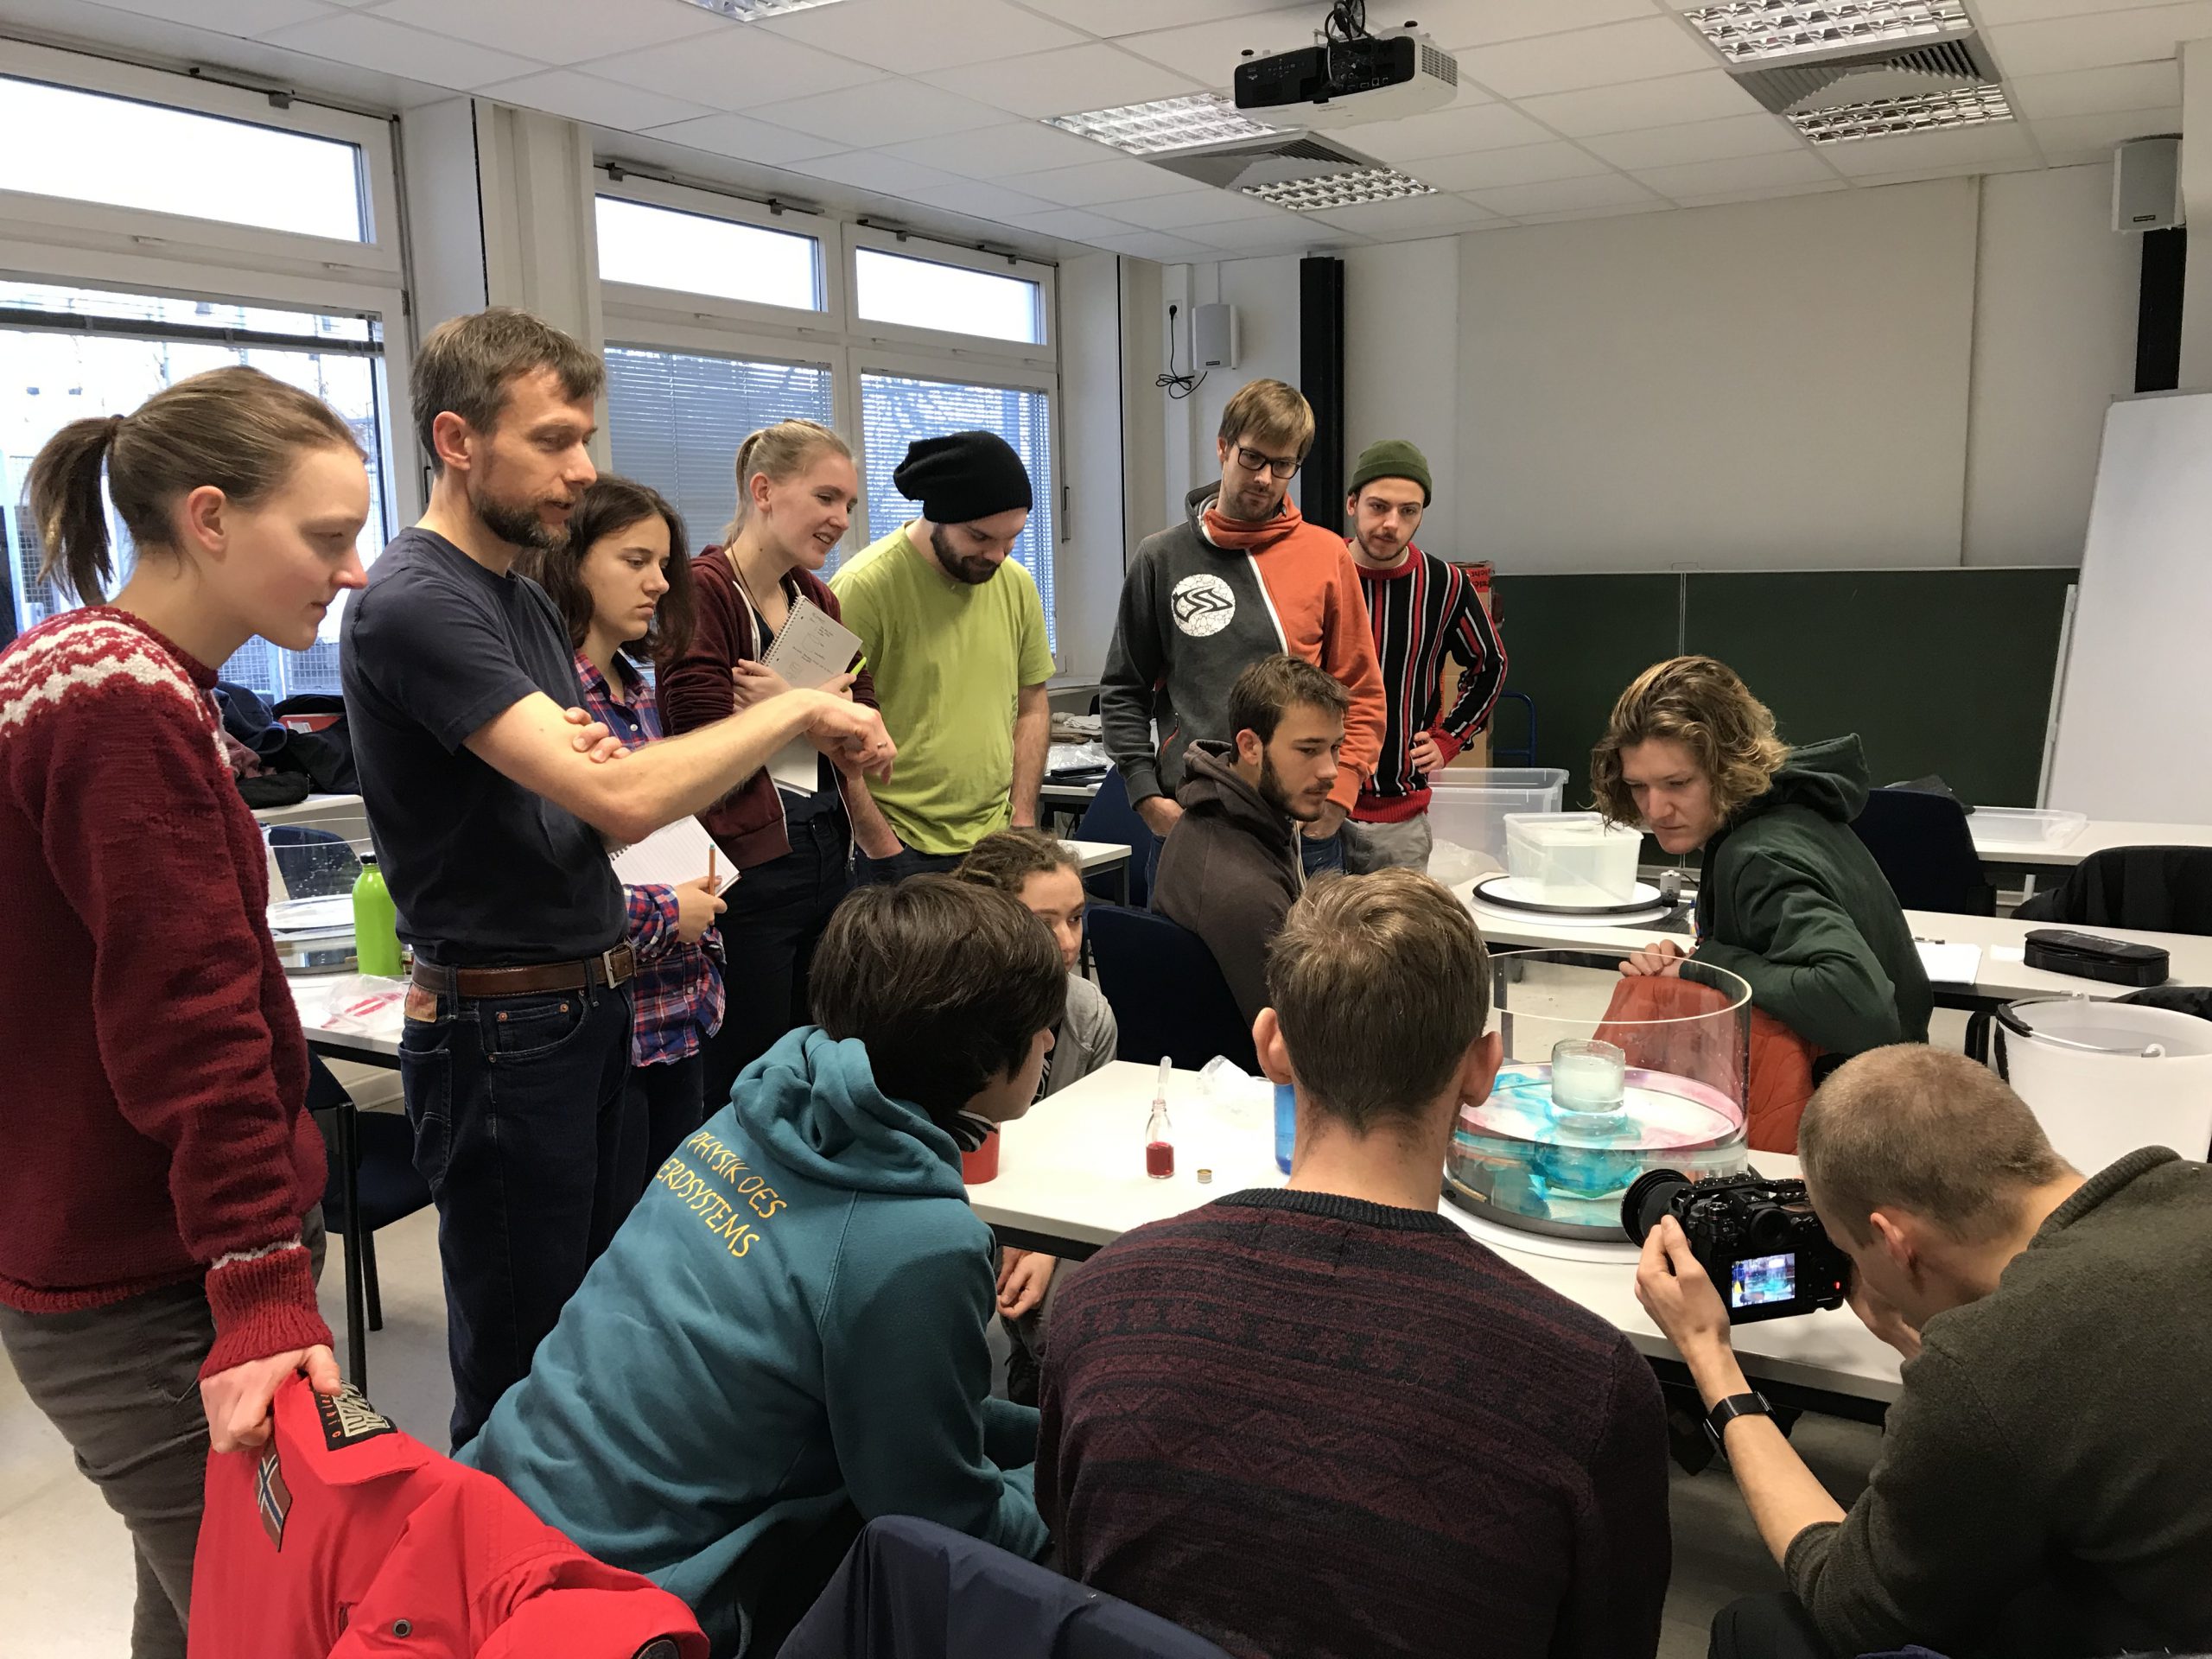
Rotierende Tankexperimente durchzuführen ist zeitaufwendig: Bis der gesamte Wasserkörper in gleichmäßiger Drehung ist und die Durchführung des eigentlichen Experimentes starten kann, vergehen schon mal 30 Minuten. Die Finanzierung unseres Lehrinnovationsprojektes durch PerLe ermöglichte uns, vier rotierende Tanks anzuschaffen – genug, dass Studierende in Kleingruppen experimentieren können und so vier Experimente gleichzeitig vorbereitet und je nach Anwendung direkt oder nacheinander durchgeführt werden können. So können Entscheidungen über Parameter individuell in den Gruppen oder gemeinsam besprochen und getroffen. Im Seminarraum entsteht so eine angeregte Diskussion über Effekte und Theorie, wie sie zuvor durch Vorrechnen an der Tafel nie entstand. Und noch etwas haben wir gemeinsam erfahren: Bloß weil zwei Gruppen die gleichen Parameter ausgewählt haben, werden zwei Experimente noch lange nicht gleich aussehen! Diese Erfahrungen zu machen und zu diskutieren war sehr wertvoll und nur durch die vier parallellaufenden Tanks möglich.
Dr. Torge Martin und die Studierenden seines Kurses zur „Atmosphären- und Ozeandynamik” diskutieren ein rotierendes Tankexperiment, das von einer Gruppe vorgeführt wird.
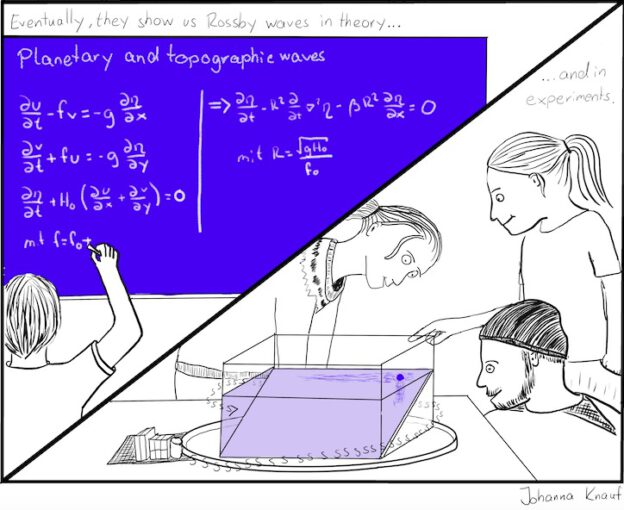
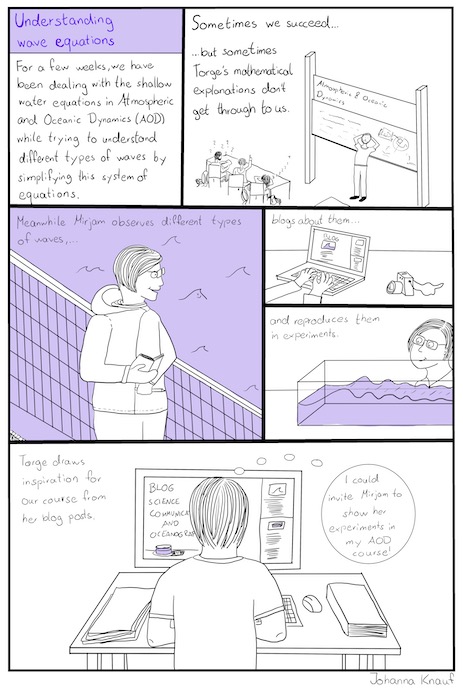
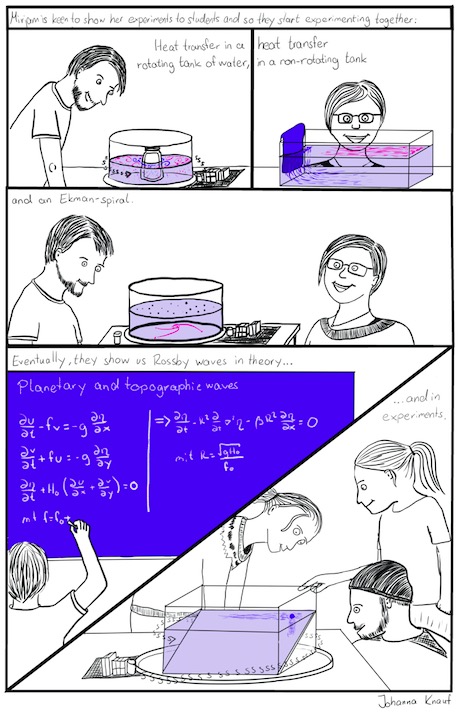
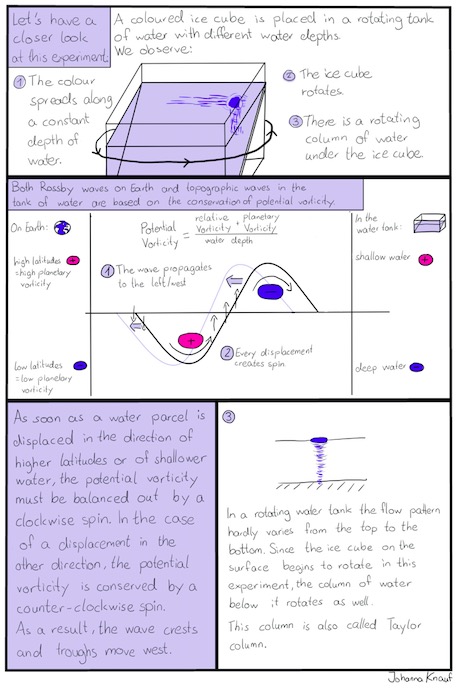
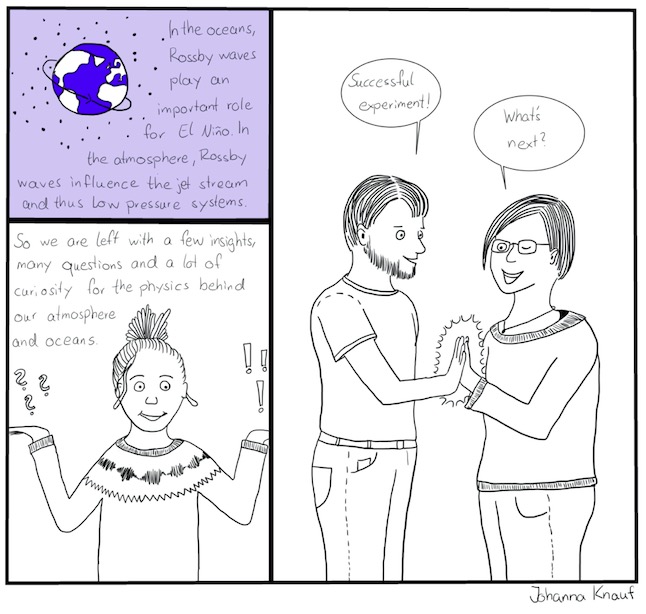
Der zweite Aspekt unserer Lehrinnovation – frei nach dem Motto „Lernen durch Lehren“ – war ein Kurs zum populärwissenschaftlichen Schreiben, den Dr. Yasmin Appelhans durchgeführt hat. Die unglaublich kreativen Ergebnisse kann man auf unserem Blog „TeachingOceanScience“ bewundern! Es sei nur ein Beispiel herausgehoben: der beeindruckende Comic von Johanna Knauf. In dem Comic behandelt Johanna nicht nur fachlichen Inhalte, sondern hebt auch hervor, dass wir auf Lehrenden- wie Studierenden-Seite die Lehrinnovation mit Enthusiasmus und Spaß – und ganz viel Spielen! – durchgeführt haben.
Ein Bild aus dem Comic der Studentin Johanna Knauf, das zeigt, dass auch in der Wahrnehmung der Studierenden die beiden Lehrenden mit Enthusiasmus und Spaß bei der Sache waren.
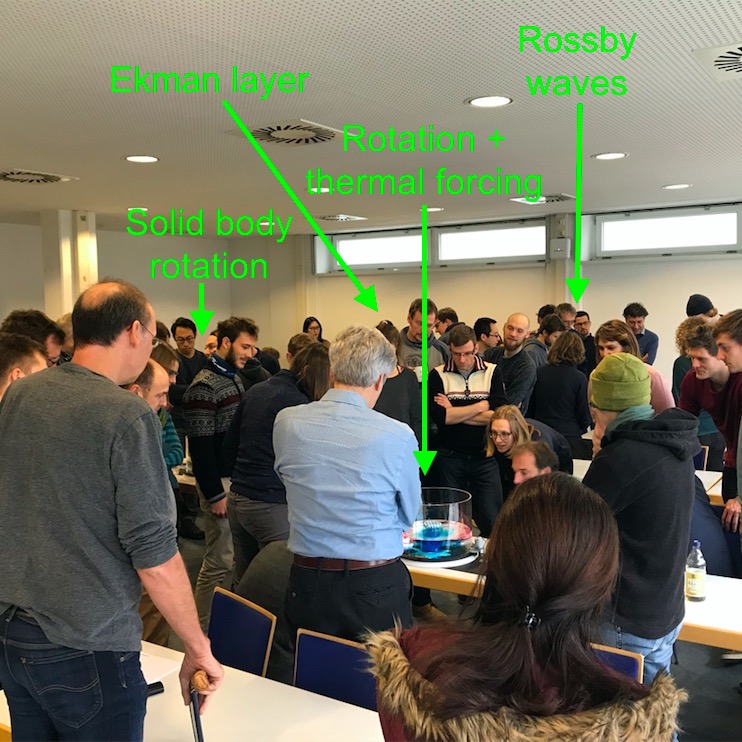
Unser inoffizielles Motto „Man sollte einfach viel mehr spielen!“ haben wir sogar offiziell und zum Titel eines Seminars gemacht — natürlich immer unter dem Verständnis, dass „spielen“ die Art des explorativen, kreativen Herangehens an neue Fragestellungen bedeutet und sich nicht nur auf die LEGO-Bauteile beschränkt, bei dem wir alle Kolleg*innen des Instituts eingeladen haben, nach einer sehr kurzen Einführung zu den möglichen Versuchen einfach selbst mal mit unseren vier rotierenden Tanks zu „spielen“. Und wie das angenommen wurde? So dass wir den Hörsaal erst unter viel Gegrummel geräumt haben, als die nächste Lehrende nun aber wirklich anfangen wollte!
Auf vier rotierenden Tanks werden durch Studierende im Forschungsseminar unter großem Anklang vier unterschiedliche Experimente durchgeführt.
Alles Feedback, das wir bekamen, war also uneingeschränkt positiv. Doch dann kam Covid-19.
Das zweite Semester – hands-on und digital
Was tun, wenn auf ein Mal genau der enge Kontakt zwischen Studierenden, das gemeinsame Spielen und Beobachten, die das Herzstück unserer Lehrinnovation waren, nicht mehr möglich sind und alle Lehre digital stattfindet? Idealerweise hätten wir allen Studierenden einen eigenen rotierenden Tank zur Verfügung gestellt, aber das ging natürlich nicht. Aber da war doch ein privater Tank irgendwo zuhause…?
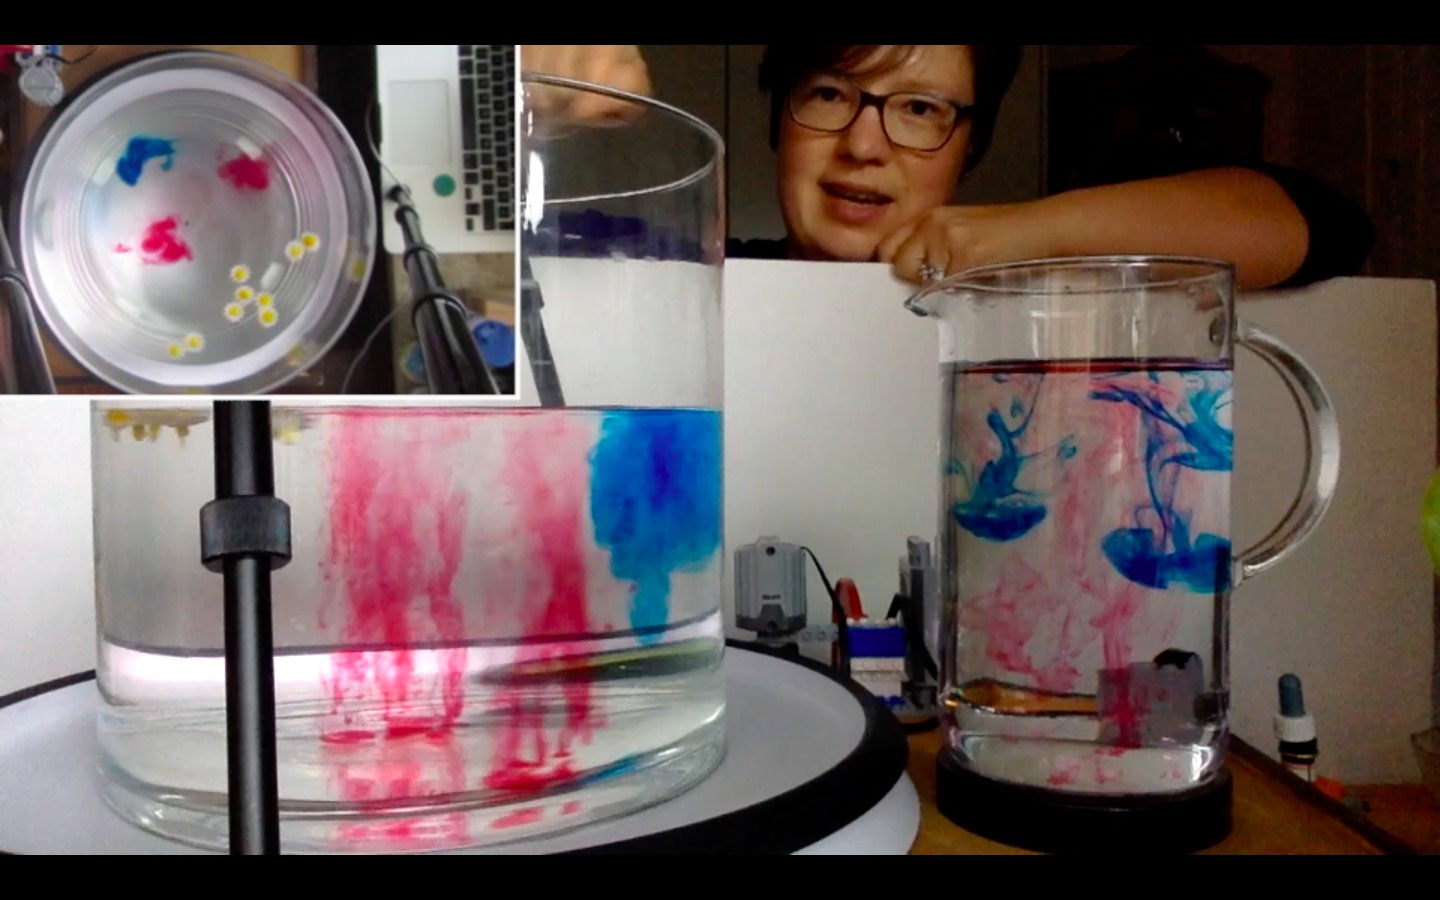
Dr. Martin verdeutlicht am Vergleich des rotierenden Experiments mit dem nicht-rotierenden Fall, welchen Einfluss die Erdrotation auf Meeresströmungen und atmosphärische Winde hat.
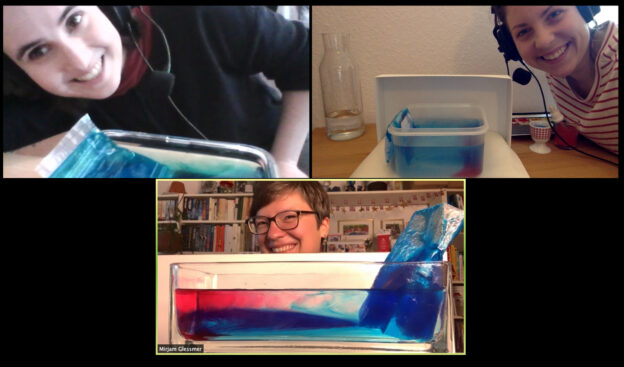
Der Einfluss der Erdrotation auf Meeresströmungen und atmosphärische Winde ist nicht gerade intuitiv. Um diesen gut zu verstehen, ist es oft hilfreich, ihn direkt mit dem analogen nicht-rotierenden Experiment zu vergleichen. Und so gelang es uns, auch in der virtuellen Lehre die hands-on Komponente zu erhalten: Die Studierenden führten bei sich zuhause die einfachen, nicht-rotierenden Fälle durch, und für die rotierenden Experimente kamen sie kurzerhand virtuell in Dr. Gleßmers Küche.
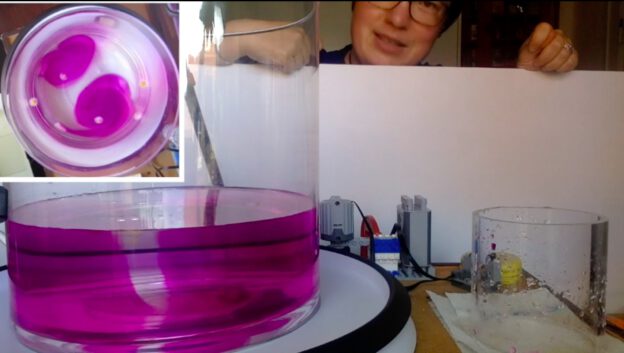
Abbildung 5: Ferngesteuerte Tankexperimente: In der Küche von Dr. Gleßmer steht der rotierende Tank, der mit zwei Endgeräten, die ihn von der Seite und von oben zeigen, an einer Zoom-Konferenz mit Dr. Martin und den Studierenden teilnimmt. Auf Zuruf kann Dr. Gleßmer jetzt Parameter verändern und die Studierenden können den Effekt aus der ersten Reihe beobachten und in der Konferenz diskutieren.
Bei dieser virtuellen Exkursion konnten Studierende durch Zuruf direkt das rotierende Experiment beeinflussen. Über zwei Endgeräte konnten sie das Experiment von der Seite und von oben beobachten und die Ergebnisse mit ihren eigenen, nicht-rotierenden Experimenten vergleichen. Als Backup, Vor- und Nachbereitung haben wir die Experimente mit dem gleichen Setup gefilmt und online zur Verfügung gestellt.
Abbildung 6: Dr. Gleßmer zeigt in diesem Video den Einfluss von Rotation auf Turbulenz (links im Bild der rotierende Tank in Seiten- und Aufsicht, rechts der nicht-rotierende Fall)
Unser Fazit? Für eine spontane Lösung ist uns das ziemlich gut geglückt. Auch hier steht am Ende die Erfahrung, dass es für einige Studierende eine wichtige, in der Vergangenheit oftmals vernachlässigte Komponente ist, Theorie tatsächlich „begreifen“ zu können. Mit einfachsten Mitteln lässt sich zuhause zumindest die Motivation für die nächste online Vorlesung deutlich steigern. Aber wir freuen uns auf die Zeiten, wenn wir mit unseren Studierenden wieder gemeinsam in einem Raum experimentieren können!
Last year in pre-social distancing times, Torge and I brought hands-on rotating tank experiments into his “atmosphere and ocean dynamics” class. The “dry theory to juicy reality” project was a lot of fun — the affordable DIYnamics rotating tables are great to give students hands-on experiences in small groups and to see — by running the same experiment on four rotating tables in parallel — how the same experimental setup can lead to very different realizations because of tiny differences in boundary conditions.
Instead of a classical lab report, we asked students to write a pupular science text about an experiment of their choosing. We got lots of great results (see all of them on our blog “Teaching Ocean Science“), but there is one that particularly stood out to me, and the author, Johanna Knauf, kindly agreed to me publishing it here. Enjoy!
I am super impressed with this comic, and also increadibly flattered and touched. This comic is the most meaningful feedback on my teaching and science communication I ever got and that I can possibly imagine. Thank you, Johanna!
P.S.: Curious about how we modified the project to work with social distancing? Check it out here!
Torge and I are planning to run the “tilting of a frontal surface under rotation / cylinder collapse” experiment as “remote kitchen oceanography” in his class on Thursday, so I’ve been practicing it today. It didn’t work out quite as well as it did when Pierre and I were running it in Bergen years ago, so if you are looking for my best movie of that experiment, you should go read the old blog post.
The idea is that a density front is set up by spinning up a tank in which a bottom-less cylinder contains a denser fluid, set up into a less dense fluid. Once the tank is spun up, the cylinder is removed, releasing the denser fluid into the less dense one. In contrast to the non-rotating case, where the dense water would sink to the bottom of the tank and form a layer underneath the less dense water, here the cylinder changes its shape to form a cone that retains its shape. The slope of the front is determined by both the rotation rate and the density contrast.
What I can show you today is what it looks like on my DIYnamics rotating table in my kitchen (and it’s pretty cool that all these different experiments can be run on such a simple setup, isn’t it?!). This is from two weeks ago:
And a second attempt done today (I’m not showing you all the failed ones in between, and since I’m a little sick, I’m also not showing you what I look like, and spare you the sound of my incoherend explanations ;-)). But: Now everything is set up so I can use my right hand to pull out the cylinder to introduce fewer disturbances (spoiler alert: didn’t work out — see all the waves on the tank after I remove the cylinder?)
Check out the flower “floats” — the ones on the remains of the cylinder are rotating in the same direction as the tank, only faster! That’s something we didn’t show in Bergen and that I think is really neat.
What I learned about how to set up the experiment: I filled the cylinder with ice cubes and then filled water into the donut outside of the cylinder. That way, water pressure would push water through the petroleum jelly seal at the bottom of the cylinder inside, but the dye of the melting ice cubes would not seep out (very much). Also, the cold melt water would make the water inside the cylinder denser (make sure to stir!). The whole fancy “get water out and refill using a syringe” stuff sounds nice but just isn’t feasible in my setup…
In this case, having a larger tank would be really helpful, because the disturbances introduced in either case are probably more or less the same, but the smaller the tank, the larger the relative effect of a disturbance… Also, my tripod was making it really difficult for me to reach into the tank without hitting it, both for filling the tank and for removing the cylinder. I guess if we didn’t need a top view, things would be a lot easier… ;-)
![[annotated photo] Photo of water flowing over a weir, annotated with arrows showing particle velocities](https://mirjamglessmer.com/wp-content/uploads/2020/12/FotG-624x350.jpg)