Tag Archives: Taylor column

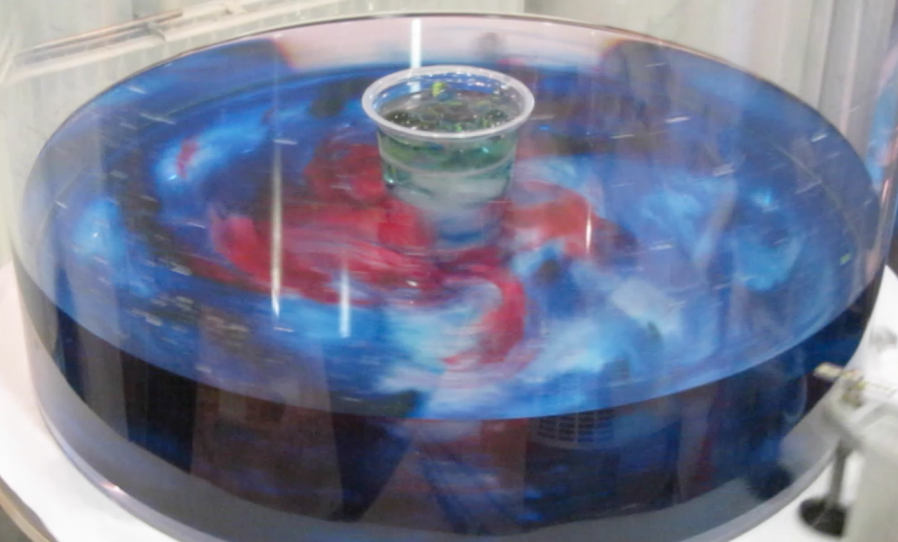
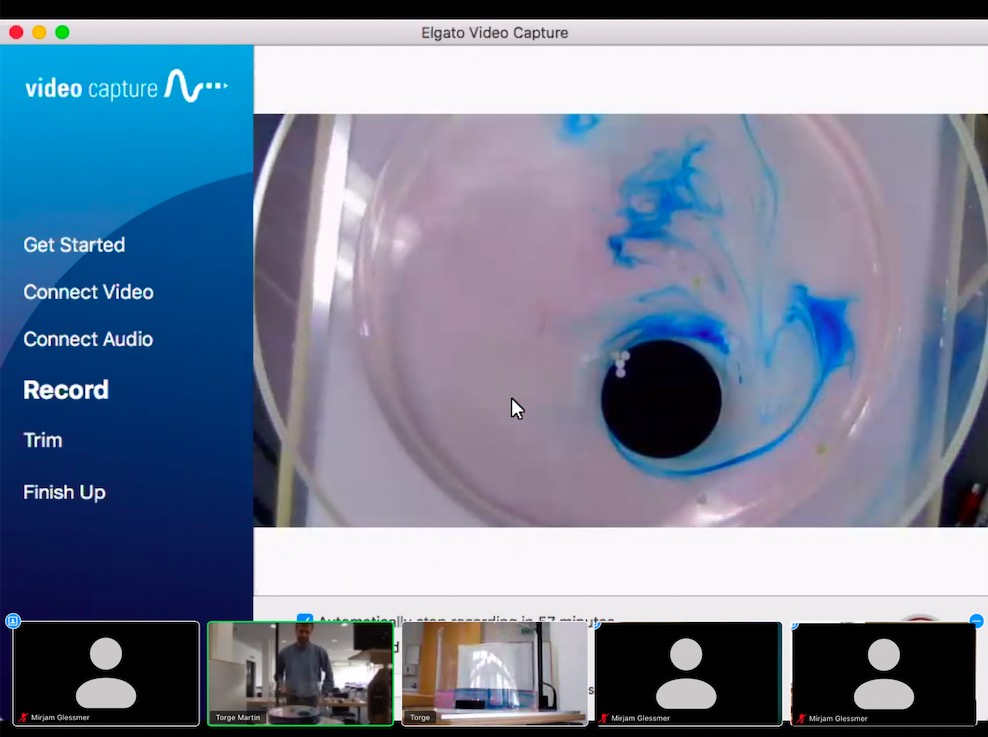
Collaborative Taylor column experiments during lockdown

We’ve become quite experienced with remotely-controlled rotating tank experiments, but the current lockdown brought us into yet another new-to-us situation: We had plans to film and live-stream tank experiments from Geomar, but not being employed there, I am currently not allowed in the building! So what happened this morning is that Torge and I met up on Zoom and I watched from home as he had all the fun.

It all started out quite well — camera tests worked well, water was in the tank, I was having fun taking screenshots. Well, and I was wishing I was there, playing, rather than watching and occassionally interrupting with instructions or unsolicited advice!

When we were done setting things up, students joined in for their exercise session (no, it’s not me three times in the meeting below, I just edited that in for privacy because we didn’t ask students for permissions to use their pictures), and a lively discussion ensued. Topic of the day were eddies in the ocean, and it was all leading up to the Taylor column experiment that we had only recently figured out.

The Taylor column experiment basically shows that rotating flows cannot just flow across an obstacle, they have to stay 2D and thus move around it. Which worked out beautifully! The blue dye started out upstream of the obstacle and got deformed into these beautiful filaments as it is moving around the hockey puck and the Taylor column on top of it (The puck is only blocking the lower part of the water column, above it there is just water!).

It all went super well until we fell into the trap we’ve been falling in ever since we started working with the tank: The co-rotating camera switches off when the power to the rotating table is switched off, which is the easiest way for the rotation to be switched off. So yeah. Below you see Torge trying to save the day by holding his laptop above the tank to give students a look into the tank after it stopped. Oh well…

But all in all, it worked super well and it’s great to see how virtual teaching and learning can be a really good substitute for in-person classes. But we are still looking forward to the times when we can all play together again!

Taylor column in rheoscopic fluid

I have a slightly complicated history with Taylor column experiments — even though the experiments look fine compared to all other videos I’ve found online, I somehow always had higher expectations.

But now I’ve tried doing the experiment in a rheoscopic fluid (approximately 2cm of it over the hockey puck) and it looks a whole lot better in person than in these pics!

Here is a movie of the experiment. The Taylor column is created by first spinning up the tank to (almost, or in my case not quite because I didn’t have enough time but really wanted to try this) solid body rotation, and then slightly reducing the rotation rate (and then slightly increasing it again) in order to create a flow relative to the obstacle.

In the movie it becomes quite clear that while in the very beginning a lot of fluid gets advected across the puck, this does not happen when the fluid is (close to) solid body rotation. Then, there is a column of fluid (the Taylor column) spinning on top of the obstacle.

But there are other cool features visible in the movie, like the shear instabilities around the puck, and the lee waves downstream of it.

Can’t wait to spin this up to full solid body rotation on Thursday and try again!

Taylor column

I was super keen on trying the Taylor column experiment, but maybe I expected things to look too much like my sketch below, or my technique isn’t quite perfect yet, but in any case, the results don’t look as good as I had hoped.

This is the setup I was aiming for:

  • put ice hockey puck (two in our case), ca 1/5th water depth, ca 1/4 diameter of tank
  • rotating our tank at 5rpm (ca 7 on GFI’s large tank’s display) with the obstacle in the water until solid body rotation is reached (We know that solid body rotation is reached if paper bits distributed on surface all rotate at same rate as the tank).
  • change the rotation rate a tiny little bit so water moves relative to tank and obstacle, i.e. we have created a current flowing in the rotating system.

And here is what happened.

First attempt.

  • tank was rotating way too fast
  • tank wasn’t in solid body rotation because it wasn’t level
  • one of the hockey pucks didn’t stay in place but moved to the edge of the tank as the tank (slowly!) accelerated
  • more confetti on the surface!

But! We see that there is clearly something happening around the hockey puck that seems to deform the curtain of blue dye.


Second attempt.

  • Stopped too rapidly / bumpy

Even though the blue dye curtain moves over the pucks initially, we see that they develop a wake or something, deforming the dye.


Third attempt.

Accidentally deleted the movie, so we will have to make do with a couple of pics I took while the experiment was running.

Slowing down worked a lot better this time round. We clearly see that the dye curtains are deformed around the Taylor columns and don’t move over the pucks.


Fourth attempt.

I think I am finally accepting that this way of introducing dye as a tracer isn’t working as I had hoped…

And this is when my camera decided to stop working…

Fifth attempt.

Back to the basics: Confetti floating on the surface.

Before slowing down, the field of confetti looked like this.

Then, the tank was slowed down and the field got deformed. Some confetti went over the puck, but there is an eddy downstream of it that catches confetti.

And the confetti that went over the puck seem to be stuck there.


Final attempt (for now).

More confetti. This is the situation before slowing down the tank:

Confetti distribution is influenced by the puck similarly to what we saw in the dye: Some confetti are slowed down upstream, some move around the puck.

Eventually, most confetti end up in the puck’s wake.

Planetary Rossby waves on Beta-plane. A super easy tank experiment!

This is seriously one of the easiest tank experiments I have ever run! And I have been completely overthinking it for the last couple of weeks.

Quick reminder: This is what we think hope will happen: On a slope, melt water from a dyed ice cube will sink, creating a Taylor column that will be driven down the slope by gravity and back up the slope by vorticity conservation, leading to a “westward” movement in a stretched, cyclonic trajectory.

We are using the DIYnamics setup: A LEGO-driven Lazy Susan. And as a tank, we are using a transparent plastic storage box that I have had for many years, and the sloping bottom is made out of two breakfast boards that happened to be a good size.

Water is filled to “just below the edge of the white clips when they are in the lower position” (forgot to take measurements, this is seriously what I wrote down in my notes. We didn’t really think this experiment would work…)

The tank is then rotated at the LEGO motor’s speed (one rotation approximately every 3 seconds) and spun into solid body rotation. We waited for approximately 10 minutes, although I think we had reached solid body rotation a lot faster. But we had a lot of surface waves that were induced by some rotation that we couldn’t track down and fix. But in the end they turned out to not matter.

To start the experiment, Torge released a blue ice cube in the eastern corner of the shallow end. As the ice cube started melting, the cold melt water sank down towards the ground, where it started flowing towards the bottom of the tank. That increased the water column’s positive relative vorticity, which drove it back up the slope.

This was super cool to watch, especially since the ice cube started spinning cyclonically itself, too, so was moving in the same direction and faster than the rotating tank.

You see this rotation quite well in the movie below (if you manage to watch without getting seasick. We have a co-rotating setup coming up, it’s just not ready yet…)

Very soon, these amazing meandering structures appear: Rossby waves! :-)

And over time it becomes clear that the eddies that are being shed from the column rotating with the ice cubes are constant throughout the whole water depth.

It is a little difficult to observe that the structure is really the same throughout the whole water column since the color in the eddies that were shed is very faint, especially compared to the ice cube and the melt water, but below you might be able to spot it for the big eddy on the left.

Or maybe here? (And note the surface waves that become visible in the reflection of the joint between the two breakfast boards that make up the sloping bottom. Why is there so much vibration in the system???)

You can definitely see the surface-to-bottom structures in the following movie if you don’t let yourself be distracted by a little #HamburgLove on the back of the breakfast boards. Watching this makes you feel really dizzy, and we’ve been starting at this for more than the 8 seconds of the clip below ;-)

After a while, the Taylor column with the ice cube floating on top starts visibly moving towards the west, too. See how it has almost reached the edge of the first breakfast board already?

And because this was so cool, we obviously had to repeat the experiment. New water, new ice cube.

But: This time with an audience of excited oceanographers :-)

This time round, we also added a second ice cube after the first one had moved almost all the way towards the west (btw, do you see how that one has this really cool eddy around it, whereas the one in the east is only just starting to rotate and create its own Taylor column?)

And last not least: Happy selfie because I realized that there are way too few pictures like this on my blog, where you see what things look like (in this case in the GEOMAR seminar room) and who I am playing with (left to right: Torge, Franzi, Joke, Jan) :-)

Taylor column in a rotating tank

For both of my tank experiment projects, in Bergen and in Kiel, we want to develop a Taylor column demonstration. So here are my notes on the setup we are considering, but before actually having tried it.

Since water under rotation becomes rigid, funny things can happen. For example if a current in a rotating system hits an obstacle, even if the obstacle isn’t high at all relative to the water depth, the current has to move around the obstacle as if it reached all the way from the bottom to the surface. This can be shown in a rotating tank, so of course that’s what we are planning to do!

We are following the Weather in a Tank instructions:

  • rotating our tank at 5rpm with the obstacle in the water until solid body rotation is reached (We know that solid body rotation is reached if paper bits distributed on surface all rotate at same rate as the tank).
  • change the rotation rate a little (they suggest as little as -0.1 rpm) so water moves relative to tank and obstacle, i.e. we have created a current flowing in the rotating system.

As the current meets the obstacle, columns of water have to move around the obstacle as if it went all the way from the bottom to the surface. This is made visible by the paper bits floating on the surface that are also moving around the area where the obstacle is located, even though the obstacle is far down at the bottom of the tank and there is still plenty of water over it.

In the sketch below, the red dotted line indicates a concentric trajectory in the tank that would go right across the obstacle, the green arrows indicate how the flow is diverted around the Taylor column that forms over the obstacle throughout the whole water depth.

Or at least that’s what I hope will happen! I am always a little sceptical with tank experiments that require changing the rotation rate, since that’s what we do to show both turbulence and Ekman layers, neither of which we want to prominently happen in this case here. On the other hand, we are supposed to be changing the rotation rate only very slightly, and in the videos I have seen it did work out. But this is an experiment that is supposedly difficult to run, so we will see…

I also came across about a super cool extra that Robbie Nedbor-Gross and Louis Dumas implemented in this demo: a moving Taylor column! when the obstacle is moved, the Taylor column above it moves with it. Check out their video, it is really impressive! However I think implementing this feature isn’t currently very high on my list of priorities. But it would be fun!

Combining rotation of a water tank with a temperature gradient: A Hadley cell circulation demo!

Yesterday, we combined a thermally-driven overturning circulation with the effects of rotation, and thus created a Hadley cell circulation. And while the tank was turning faster than we would have liked, we still managed to create a circulation that largely resembles the sketch below: An axially-symmetric overturning circulation (with cold water, indicated by blue arrows, moving down near the cooling in the middle and then outwards, and warmer water moving up along the outer rim and then towards the middle of the tank) which induces the thermal wind flow (sketched in green: Fast surface current in the direction of rotation but even faster than the tank is rotating, and slow bottom flow in the opposite direction).

But what would happen if we increased the tank’s rotation rate? It would make the induced azimuthal flow, the thermal wind, faster too, until it eventually becomes unstable and breaks down into eddies. And then, the experiment (first blogged about a long time ago) looks similar to this one: Lots and lots of eddies that are now rigid vertically and move as Taylor columns!

Heat exchange between the cold core and the warmer areas towards the rim of the tank now doesn’t happen via overturning any more, but looks something like sketched below: We now have radial currents bringing warm water towards the middle (red) and cold water away from it (blue), and the eddies that create those currents are coherent over the whole depth of the tank.

This is actually a really nice demonstration of the circulation in mid- and high latitudes where the weather is determined by baroclinic instabilities, i.e. weather systems just like the eddies we are showing here.

Btw, having two different experiments both represent the same Hadley cell circulation isn’t a contradiction in itself: On Earth, the Coriolis parameter changes with latitude, but in the tank, the Coriolis parameter is the same throughout the tank. So depending on what latitude we want to represent, we need to change the tank’s rotation rate.

Here is an (old) movie of the experiment, and I can’t wait for our own tanks to be ready to produce a new one!