Category Archives: method

Using the “jigsaw” method for practicing solving problem-sets

A method to get all students engaged in solving problem sets.

A very common problem during problem-set solving sessions is that instead of all students being actively involved in the exercise, in each group there is one student working on the problem set, while the rest of the group is watching, paying more or (more likely) less attention. And here is what you can do to change that:

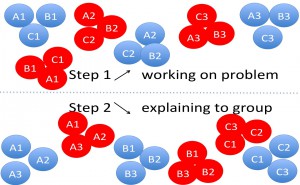
The jigsaw method (in German often called the “expert” method), you split your class into small groups. For the sake of clarity let’s assume for now that there are 9 students in your class; this would give you three groups with three students each. Each of your groups now get their own problem to work on. After a certain amount of time, the groups are mixed: In each of the new groups, you will have one member of each of the old groups. In these new groups, every student tells the other two about the problem she has been working on in her previous group and hopefully explains it well enough that in the end, everybody knows how to solve all of the problems.

This is a great method for many reasons:

  • students are actively engaged when solving the problem in their first group, because they know they will have to be the expert on it later, explaining it to others who didn’t get the chance to work on this specific problem before
  • in the second set of groups, everybody has to explain something at some point
  • you, the instructor, get to cover more problem sets this way than if you were to do all of them in sequence with the whole group.

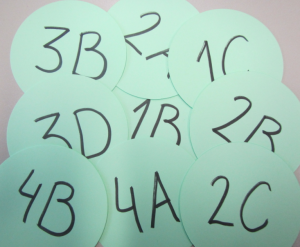
How do you make sure that everybody knows which group they belong to at any given time? A very simple way is to just prepare little cards which you hand out to the students, as shown below:

IMG_0314

Cards to help organize the practice and discussion groups

The system then works like this: Everybody first works on the problem with the number they have on their card. Group 1 working on problem 1, group 2 on problem 2, and so forth. In the second step, all the As are grouped together and explain their problems to each other, as are the Bs, the Cs, …

Jigsaw with 9 participants

And what do I do if I have more than 9 students?

This works well with 16 students, too. 25 is already a lot – 5 people in each group is probably the upper limit of what is still productive. But you can easily split larger groups into groups of nine by color-coding your cards. Then all the reds work together, and go through the system described above, as do the blues, the greens, the yellows…
Slide2

Jigsaw with 18 participants in 6 sub-groups of 9 students going through the system as described above

This is a method that needs a little practice. And switching seats to get all students  in the right groups takes time, as does working well together in groups. But it is definitely worth the initial friction once people have gotten used to it!
Creating a continuous stratification in a tank, using the double bucket filling method

Because I am getting sick of stratifications not working out the way I planned them.

Creating stratifications, especially continuous stratifications, is a pain. Since I wanted a nice stratification for an experiment recently, I finally decided to do a literature search on how the professionals create their stratifications. And the one method that was mentioned over and over again was the double bucket method, which I will present to you today.

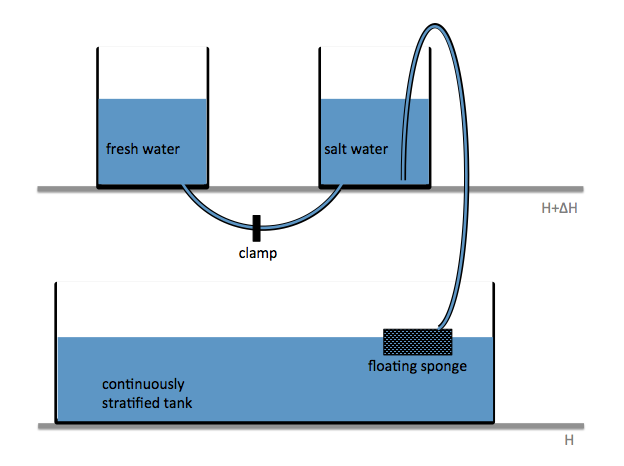
Two reservoirs are placed at a higher level than the tank to be filled, and connected with a U-tube which is initially closed with a clamp. Both reservoirs are filled with fresh water. To one of the buckets, salt is added to achieve the highest desired salinity in the stratification we are aiming for. From this bucket, a pump pumps water down into the tank to be filled (or, for the low-tech version: use air pressure and a bubble-free hose to drive water down into the tank as shown in the figure above!); the lower end of the hose rests on a sponge that will float on the water in the tank. When the pump is switched on (or alternatively, the bubble-free hose from the reservoir to the tank opened), the clamp is removed from the U-tube. So for every unit of salt water leaving the salty reservoir through the hose, half a unit of fresh water flows in to keep the water levels in both reservoirs the same height. Thus the salt water is, little by little, mixed with fresh water, so the water flowing out into the tank gets gradually fresher. If all goes well, this results in a continuous salinity stratification.

Things that might go wrong include, but are not limited to,

  • freshwater not mixing well in the saline reservoir, hence the salinity in that reservoir not changing continuously. To avoid that, stir.
  • bubbles in the U-tube (especially if the U-tube is run over the top edges of the reservoirs which is a lot more feasible than drilling holes into the reservoirs) messing up the flow. It is important to make sure there is no air in the tube connecting the two reservoirs!
  • water shooting out of the hose and off the floating sponge to mess up the stratification in the tank. Avoid this by lowering the flow rate if you can adjust your pump, or by floating a larger sponge.

P.S.: For more practical tips for tank experiments, check out the post “water seeks its level” in which I describe how to keep the water level in a tank constant despite having an inflow to the tank.

First day of class – student introductions.

How do you get students to get to know each other quickly while getting to know them yourself at the same time?

The new school year is almost upon us and we are facing new students soon. For many kinds of classes, there is a huge benefit from students knowing each other well, and from the teacher knowing the students. But how do you achieve that, especially in a large class, without having to spend enormous amounts of class time on it?

There are of course tons of different methods. But one thing that has worked really well for me is to ask a question like “where are you from?” and have people position themselves on an imaginary map (you show which direction is north, but they have to talk to each other to figure out where they have to position themselves relative to the others). For the first question they are usually a bit hesitant, but if you ask three or four, it works really well. For other questions you could ask which of the class topics they are especially interested in, on which topic they have the most knowledge already, or the least, or where they want to go professionally, or what their favorite holiday destination is – all kinds of stuff. Depending on the level of the class, you can ask questions more on the topic of the class or more on a personal level.

This is highly interactive because you always have to talk to people to find your own position, and it is very interesting to see how the most complex configurations of students form, representing maps to scale even though some people might live in the same city whereas other people are from a different continent, for example.

The best thing is that it is a lot easier to remember stuff like “oh, those two used to live really close to where I am from, we were all clustered together for that question”, “those two are interested in exactly the same stuff as I am because they were right next to me when the question was x”, … than to recall that information from when everybody had to introduce themselves one after the other.

I really like this method, give it a try! And don’t be discouraged if students are hesitant at first, they will get into it at the second or third question. And getting them up and moving does wonders for the atmosphere in the room and makes it a lot more comfortable for you, too, to stand in front of a new class.

Rainbows III

Updated movie following Arne’s advice.

When I asked for feedback on the rainbow movies the other day, Arne had a pretty good idea for how one of the explanations could be made more intuitive. I have other people’s comments still in the queue and I’m working on them, this is still very much in the trial & error phase… And unfortunately it’s in german, which I didn’t realize until I had uploaded it.

But please do keep the comments coming, I will include them eventually!

How to ask multiple-choice questions when specifically wanting to test knowledge, comprehension or application

Multiple choice questions at different levels of Bloom’s taxonomy.

Let’s assume you are convinced that using ABCD-cards or clickers in your teaching is a good idea. But now you want to tailor your questions such as to specifically test for example knowledge, comprehension, application, analysis, synthesis or evaluation; the six educational goals described in Bloom’s taxonomy. How do you do that?

I was recently reading a paper on “the memorial consequences of multiple-choice testing” by Marsh et al. (2007), and while the focus of that paper is clearly elsewhere, they give a very nice example of one question tailored once to test knowledge (Bloom level 1) and once to test application (Bloom level 3).

For testing knowledge, they describe asking “What biological term describes an organism’s slow adjustment to new conditions?”. They give four possible answers: acclimation, gravitation, maturation, and migration. Then for testing application, they would ask “What biological term describes fish slowly adjusting to water temperature in a new tank?” and the possible answers for this question are the same as for the first question.

Even if you are not as struck by the beauty of this example as I was, you surely appreciate that this sent me on a literature search of examples how Bloom’s taxonomy can help design multiple choice questions. And indeed I found a great resource. I haven’t been able to track down the whole paper unfortunately, but the “Appendix C: MCQs and Bloom’s Taxonomy” of “Designing and Managing MCQs” by Carneson, Delpierre and Masters contains a wealth of examples. Rather than just repeating their examples, I am giving you my own examples inspired by theirs*. But theirs are certainly worth reading, too!

Bloom level 1: Knowledge

At this level, all that is asked is that students recall knowledge.

Example 1.1

Which of the following persons first explained the phenomenon of “westward intensification”?

  1. Sverdrup
  2. Munk
  3. Nansen
  4. Stommel
  5. Coriolis

Example 1.2

In oceanography, which one of the following definitions describes the term “thermocline”?

  1. An oceanographic region where a strong temperature change occurs
  2. The depth range were temperature changes rapidly
  3. The depth range where density changes rapidly
  4. A strong temperature gradient
  5. An isoline of constant temperature

Example 1.3

Molecular diffusivities depend on the property or substance being diffused. From low to high molecular diffusivities, which of the sequences below is correct?

  1. Temperature > salt > sugar
  2. Sugar > salt > temperature
  3. temperature > salt == sugar
  4. temperature > sugar > salt

Bloom level 2. Comprehension

At this level, understanding of knowledge is tested.

Example 2.1

Which of the following describes what an ADCP measures?

  1. How quickly a sound signal is reflected by plankton in sea water
  2. How the frequency of a reflected sound signal changes
  3. How fast water is moving relative to the instrument
  4. How the sound speed changes with depth in sea water

Bloom level 3: Application

Knowledge and comprehension of the knowledge are assumed, now it is about testing whether it can also be applied.

Example 3.1

What velocity will a shallow water wave have in 2.5 m deep water?

  1. 1 m/s
  2. 2 m/s
  3. 5 m/s
  4. 10 m/s

Example 3.2

Which instrument would you use to make measurements with if you wanted to calculate the volume transport of a current across a ridge?

  1. CTD
  2. ADCP
  3. ARGO float
  4. Winkler titrator

This were only the first three Bloom-levels, but this post is long enough already, so I’ll stop here for now and get back to you with the others later.

Can you see using the Bloom taxonomy as a tool you would use when preparing multiple-choice questions?

If you are reading this post and think that it is helpful for your own teaching, I’d appreciate if you dropped me a quick line; this post specifically was actually more work than play to write. But if you find it helpful I’d be more than happy to continue with this kind of content. Just lemme know! :-)

* If these questions were used in class rather than as a way of testing, they should additionally contain the option “I don’t know”. Giving that option avoids wild guessing and gives you a clearer feedback on whether or not students know (or think they know) the answer. Makes the data a whole lot easier to interpret for you!

Classifying educational goals using Bloom’s taxonomy

How can you classify different levels of skills you want your students to gain from your classes?

Learning objectives are traditionally categorized after Bloom’s (1956) taxonomy. Bloom separates learning objectives in three classes: cognitive, affective and psychomotor. Cognitive learning objectives are about what people know, understand and about their thinking processes dealing with and synthesizing that knowledge. Affective learning objectives are about feelings and emotions. Lastly psychomotor learning objectives are about what people do with their hands. Even though Bloom was trying to combine all three classes, in the context of today’s university education, the focus is clearly on cognitive learning objectives.

Cognitive learning objectives can be divided into sub-categories. From low-level to high-level processes those categories are as follows:

Knowledge Learning gains on this level can for example be tested by asking students to repeat, define or list facts, definitions, or vocabulary.

Comprehension In order to test comprehension, students can for example be asked to describe, determine, demonstrate, explain, translate or discuss.

Application Ability to apply concepts is shown for example by carrying out a procedure, calculating, solving, illustrating, transferring.

Analysis Competency on this level can be tested by asking students to contrast and compare, to analyze, to test, to categorize, to distinguish.

Synthesis Ability to synthesize can be shown by assembling, developing, constructing, designing, organizing or conceiving a product or method.

Evaluation The highest level, evaluation, can be tested by asking students to justify, assess, value, evaluate, appraise or select.

In the next post I’ll talk about how you can use this classification to help with developing good multiple-choice questions, so stay tuned!

Rainbows and refraction II

Taking the same graphics as in this post, but presenting them differently.

In the previous post, I presented a screen cast explaining, in a very text-booky way, how rainbows form. Today, I am using the same graphics, but I have broken the movie into six individual snippets.

I’m starting out from the schematic that concluded last post’s movie and ask  five questions that you could ask yourself to check whether you understand the schematic:

Ideally I want to link the other five of the movies into the one above, but I haven’t figured out how to do that yet, so here you go for the answers:

What do you think of this way of presenting the material? Do you like it better than the textbook-y movie? I’m curious to hear your opinions!

For both this and the other way of displaying the material, I am toying with the idea of adding quizzes throughout the movies, in a programmed learning kind of way. But considering all the pros and cons, I haven’t made a final decision on it yet. What do you think?

Rainbows and refraction

Why is a rainbow always red on top and blue at the bottom?

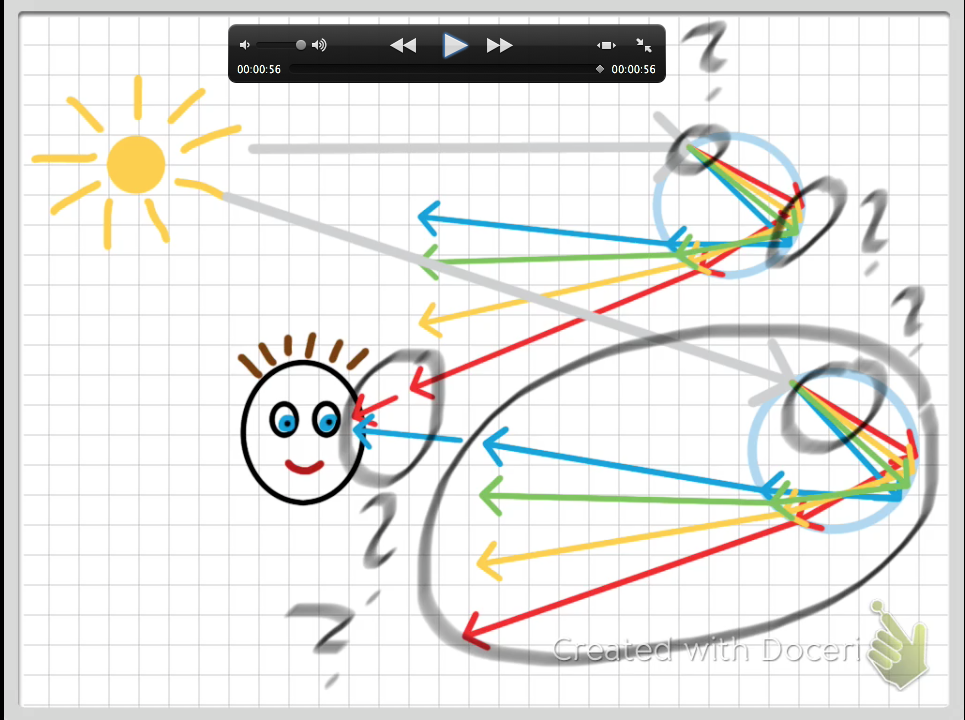
We always talk about prisms and refraction and stuff, but be honest – would you be able to explain the order of colors in a rainbow without pausing and thinking first?

Screen shot 2014-07-13 at 3.34.19 PM

Rainbow. Picture taken in Laufenselden in 1996

As I said the other day, I am currently experimenting with screen casts. This is my very first attempt – I didn’t write a script so it is pretty chaotic, I have a cold (which you can hear from my voice), my handwriting sucks, the movie is, at 4 minutes, about twice as long as I wanted it to be – it is not perfect and I will certainly modify it before using it in teaching. But I would be very interested in your feedback so I can improve it!

As you noticed, this is a very textbook-y screen cast. I’ll present an alternative model for the same topic in my next post.

P.S.: As you might have noticed from the watermarks in the video, I have continued experimenting with screen cast programs and am currently using Doceri. And I am very happy with it!

Teaching videos

Trying to figure out a technique that works for me.

I recently talked to a professor at my university who is toying with the idea of making teaching videos. As a reader of my blog you know the kind of videos I usually show here: Pretty much un-edited movies of some kind of experiment. No voice-overs, no text floating in and out, nothing to make those videos work as stand-alone teaching units. And that is how I want them for my own teaching: When I use them in class, I show them on mute, and run and pause and re-run and point and talk, all the time reacting to my students’ reactions. However, this was not how that professor wanted to use the videos in his classes. And since I was ready to try something new and had wanted to explore teaching videos for some time, here we go.

What that professor told me he wanted to do was basically have a document camera on his desk to record him drawing on a piece of paper in addition to recording his oral explanations while he is drawing. So this is the first thing I tried. For your reference I’m posting a movie below, but be warned: I stopped editing fairly early on because I realized it wasn’t working for me and I wanted to try something else.

Why was this not working for me? Well, basically because I didn’t like the camera’s weird perspective on the paper (yes, I realize I could have set up the whole thing differently!), the shadows the tripod, the camera and my hand cast on the paper, the inflexibility when I had drawn something and couldn’t change it but had to start over. Plus pausing the camera and starting up again was complicated (as in: the camera moved, there were shadows on the paper, I would have to edit the transitions). At this point I hadn’t written a script, so when I was starting to think about the voice-over, I realized that the story would be a lot easier if I drew things in a different order (for example if I drew the incoming ray, the refracted ray and only then the vertical line relative to which we measure the angles). Somehow it all felt like too much of a hassle.

So the next thing I tried was drawing on a tablet and doing a screen cast of that. Below you see my very first attempt. The clear advantage here is that I can easily pause and resume recording. While recording is paused, I can draw more or import graphics. I’m using ScreenChomp, which was the first tool I had at hand. I might still try others, but I am actually pretty happy with how easy it is to use and how well it works right away. Again, this isn’t a finished movie (I’m for example expecting my handwriting to become a lot clearer when I’m used to writing on a tablet and when I’m using a pen rather than my finger) and I am only posting to give you an idea of what you could expect using that tool.

My conclusion: A lot more promising than recording the drawing on paper! And definitely an option that I am going to explore further.

There are also screen capture tools that my university is already using in combination with lecture recordings, and I am going to find out more about how (well) they work tomorrow from my colleague Alex. [edit: Wow. There are so many different software solutions! I’ll definitely present them in more detail at some point…]

There are all kinds of theories on how to make teaching videos (for example by Derek Muller et al. (2008) who show that including misconceptions in teaching videos helps people learn better than just simply showing them a good and correct explanation) and in what didactical scenarios to use them (for example the flipped classroom scenario). And now that I am confident that the technical aspects can work without too much of a hassle, I’m ready to start working on the didactical aspects. Stay tuned!

Giving feedback on student writing

When feedback is more confusing than helpful.

The other day I came across a blog post on Teaching & Learning in Higher Ed. on responding to student writing/writers by P. T. Corrigan. And one point of that post struck home, and that point is on contradictory teacher feedback.

When I am asked to provide feedback on my peers’ writing, I always ask them about what stage in the writing process they are in and what kind of feedback do they want. Are they in the copy-editing stage and want me to check for spelling and commas, or is this a first draft and they are still open for input on the way their thoughts are organized, or even on the arguments they are making? If a thesis is to be printed that same evening, I am not going to suggest major restructuring of the document. If we are talking about a first draft, I might mark a typo that catches my eye, but I won’t focus on finding every single typo in the document.

But when we give feedback to students, we often give them all the different kinds of feedback at once, leaving them to sort through the feedback and likely sending contradictory messages in the process. Marking all the tiny details that could, and maybe should, be modified suggests that changes to the text are on a polishing level. When we suggest a completely different structure at the same time, chances are that rather than re-writing, students will just move existing blocks of text, assuming that since we provided feedback on a typo-level, those blocks of text are in their final, polished form already when that might not be how we perceive the text.

Thinking about this now, I realize that the feedback I give on student writing does not only need to be tailored to the specific purpose much better, it also needs to come with more meta information about what aspect of the writing my focus is on at that point in time. Only giving feedback on the structure without pointing out grammatical mistakes only sends the right message when it is made clear that the focus, right now, is only on the structure of the document. Similarly, students need to understand that copy-editing will usually not improve the bigger framing of the document and only focus on layout and typo-type corrections.

We’ve intuitively been doing a lot of this pretty well already. But go read Corrigan’s blog post and the literature he links to – it’s certainly worth a read!