Category Archives: hands-on activity (easy)

An overturning experiment

A simple experiment that shows how the large-scale thermally-driven ocean circulation works.

Someone recently asked me whether I had ideas for experiments for her course in ocean sciences for non-majors. Since most of the experiments I’ve been showing on this blog were run in the context of Bachelor or Master oceanography-major courses, she didn’t think that the experiments were as easily transferable to other settings as I had claimed.

So here is proof: You can do pretty complex experiments with non-university level students. To prove my point, let’s go to a primary school.

IMG_3219

Experimenting with a primary school class.

The experiment we are running here is the global (thermal) conveyor belt. In a long and narrow tank filled with water, a heating and a cooling element are inserted at either end. Dye is added onto the elements to visualize the flow of water.

IMG_3212

Adding dye to visualize the thermally driven flow in the tank.

In the image above you see that there is something blue near the bottom of the tank, and I am adding red dye to the other side. Blue is used to track the cold water and red to track the warm water (intuitive color-coding goes a long way, no matter how old your students are!)

IMG_3214

The experiment as seen by the teacher.

What you see here is the cold blue water sinking to the bottom of the tank and spreading, and the warm red water rising to the water’s surface and spreading there. As the warm water reaches the cooling pads, it gets cooled, becomes denser and sinks. Similarly, the cold water reaching the warming pads becomes less dense and rises, closing the loop.

Modeling the Denmark Strait Overflow

Ha, this is a bad pun. We are modeling the Denmark Strait Overflow – but in a non-numerical, small-scale-and-playdough kind of way.

More than a year ago, Kjetil and I ran that experiment with a group of high-school students and when writing a post about a much more sophisticated version of this experiment I realized I never documented this one in the first place. So here we go!

IMG_3604_small

The set-up: Tupper ware with a modeling clay ridge (“let’s call it Greenland-Scotland-Ridge”) across, filled with water to a level above the ridge, cooled with a sport’s-injury cooling pack in “the North”.

Dye is added to the “northern end” of the tank (i.e. the end where the water is being cooled by a sport’s injury cooling pack). As the water cools, it becomes denser and fills up the reservoir on the northern end until it spills over the clay ridge.

IMG_3592_small

The overflow. See the blue, dense reservoir on the left and the dense water spilling over the ridge.

This is a very simple demonstration of how overflows actually work.

IMG_3607_small

Kjetil, his Master student Eli and some of the high-school students. Can you see the sketch of the Denmark Strait Overflow on the slide in the background? (Plus, for everybody who is interested: This is the food coloring I have been using right there in the front right!)

Barometer problem.

Still talking about hydrostatic pressure.

Yes, I am not done with hydrostatic pressure yet!

One of the problems students were given in the study “Identifying and addressing student difficulties with hydrostatic pressure” by Loverude, Heron and Kautz is a barometer problem.

hydrostaticpressure02

Barometer problem – compare the pressure at point x and y.

Students are asked to compare the pressure at point X and point Y. Apparently, this is not as obvious as it seems to me. So before I go into the detailed discussion (I might do it in a later post – anyone interested in reading it?), I thought I’d just set this up. Because to me it seems that if you see this sitting there with the liquid clearly not moving one way or another, the solution has to be clear. We’ll see what others think, but here we go:

If you want proof that the tubes are open at the bottom and that there still is a hydrostatic equilibrium, watch the movie below. Spoiler alert: You might have fallen asleep by the time things start moving in the movie ;-)

Cartesian diver – organic version

Using orange peel as cartesian divers.

Guess what my mom told me when we were playing with cartesian divers the other day? That orange peel works really well as a cartesian diver! Who would have thought?

And just because we like playing we tried both orange peel and tangerine peel. Watch!

Funnily enough, they behave very differently. While the thick orange peel works really well, the much less thick tangerine peel very quickly looses all the air bubbles and hence the buoyancy and the ability to adjust buoyancy. So if in doubt (and not interested in extending the experiment to a lesson in contrast and compare) – oranges are the way to go!

Cartesian diver

Compressibility of water and air.

Today I want to talk about the different compressibilities of water and air. Actually, no, I just want to show you an experiment. One way to visualize that air is a whole lot more compressible than water is to look at cartesian divers. You probably know the fancy ones as shown on the far left of the picture below that you typically find at Christmas Markets or high-end (i.e. nerdy) toy stores.

But, as you probably guessed already, this post is about making those divers from scratch. You probably know that you could just use those old-fashioned eye-drop pipettes, or normal plastic pipettes. But how boring is that? (Plus how much material do you need when doing this experiment with a big class!) All you need is shown in the image below: Straws, scissors and paper clips.

Some of the more complicated instructions tell you to cut a piece of straw and put modeling clay on top to seal it, but I’m lazy. A much simpler version is shown here: Bend a straw, cut the long end, close the two ends together with a paper clip (also helps as added weight to adjust the buoyancy of the diver) and there you are!

How does that homemade diver dance? Watch the movie below:

So how do the classical cartesian diver compare to homemade one?

So we see that while both of them dive up and down, they don’t behave exactly the same. And if we were using this experiment in class, we would now talk about how this is due to the different volumes of air in the two divers, and the different densities of the structures themselves. But what I find much more important right now: My diver doesn’t turn as nicely as the conventional one! So what is one to do?

Exactly. Poke a hole in it. Let’s find out if that did the trick?

Almost as nice as the glass diver, no? So now start playing and send me movies of your divers! :-)

Non-newtonian fluids.

Playing with cornstarch and water.

The other day my mom and I played with cornstarch and water. I have always been wanting to experiment more with non-newtonian fluids, and then I had found the perfect support team to film movies of people sinking into quicksand:

Sadly, it turns out that while he does sink slowly, it doesn’t look nearly as impressive as I had hoped, even though the quicksand has a sickly green color. (Doesn’t food coloring make everything better???)

But small drawbacks have never kept us from playing, so watch the movie below to see how the cornstach-water mixture is clearly a fluid but on the other hand can be cut with a knife. Fascinating. Get thee some cornstarch and start playing!

And guys, I am wondering. Would you rather read more about the science behind the experiments, or are you more interested in just seeing the experiments and getting ideas of what you would like to try yourself? Please let me know!

Molecular diffusion of heat and salt

Why heat and salt diffuse at different rates.

Why do heat and salt diffuse at different rates? This seems to always be puzzling students when talking about double diffusion.

Well, why should they diffuse at the same rate? The processes of molecular diffusion of heat and salt are very different.

In the case of heat, a transfer of heat only means that particles hit and transfer energy. The warmer the substance, the faster the particles’ movements. So faster particles hitting slower particles will transfer momentum, and by slowing down one of the particles and speeding up the other one, this is de facto a heat exchange.

A transfer of salt on the other hand means that ions have to be transported from a region of higher concentration to a region of lower concentration. In order for this to happen, they have to travel over physical distances larger than just the wiggling connected to molecular movement, and they have to exchange place with water molecules and clusters.

Clearly, this second process is a lot more time-consuming than the first one?

Salt fingering – DIY

How to easily set up the stratification for the salt fingering process.

Setting up stratifications in tanks is a pain. Of course there are sophisticated methods, but when you want to just quickly set something up in class (or in your own kitchen) you don’t necessarily want to go through the whole hassle of a proper lab setup.

For double diffusive mixing, there are several methods out there that people routinely use.

For example the hose-and-funnel technique, where the less dense fluid is filled in the tank first and then the denser fluid is slid underneath with the help of a hose and a funnel. And a diffuser at the end of the hose. And careful pouring. And usually a lot more mixing than desired.

Or the plastic-wrap-to-prevent-mixing technique, where the dense fluid is put into the tank, covered by plastic wrap, and then the lighter fluid is poured on top. Then the plastic wrap is removed and by doing so the stratification is being destroyed. (No video because I was frustrated and deleted it right away)

Or some other techniques that I tried and didn’t find too impressive. (No videos either for the same reason as above)

But then accidentally I came across this one:

Granted, this is not a realistic model of an oceanic stratification. But as you can see towards the end of that movie, that turns out to be a blessing in disguise if you want to talk about the process in detail. As you see in the movie, the salt fingers inside the bottle are much smaller than the salt fingers outside the bottle. Because, clearly, inside the bottle the warm water is cooled both at the interface with the cold water inside the bottle, and by heat conduction through the walls of the bottle, since the water is surrounded by cold water. The warm water that flowed out of the bottle and up towards the water’s surface is only cooled at the interface with the water below (the air above is warmer than the cold water). So this gives you the perfect opportunity to discuss the scaling of salt fingers depending on the stratification without having to go through the pains of actually preparing stratifications with different gradients in temperature or salinity.

Diffusive layering. Or: This is not a trick question!

The “other” double-diffusive mixing process.

After having talked extensively about double diffusive mixing in my courses, I tend to assume that students not only remember that there is such thing as double-diffusive mixing, but that they also remember our discussions on how the process works, and that they would be able to transfer this to processes other than salt fingering.

So in two courses (at different universities) I asked students in the exam to describe what would happen in a stably stratified body of water, where cold and fresh water overlies warm and salty water. And in both courses I have been surprised (read: shocked) by the responses I got.

The by far most common response goes along these lines: “Cold water is denser than warm water, so it will sink to the bottom and the warm water will rise”.

What I find frustrating about this (besides the fact that they didn’t notice that I clearly stated in the question that the stratification was stably stratified) is that whenever I talked about density, I mention how density depends on both temperature and salinity.

The next most common response is then this: “Heat diffuses a factor 100 faster than salt. Hence, salt fingers will form at the interface”. This answer then continues on describing salt fingering and never even mentions that the stratification I described in the question was actually the opposite one to the one they are assuming. So here, students clearly jumped to the conclusion that if I bothered describing a stratification, it clearly had to be the one for my favorite process (even though during those discussions I made sure to mention diffusive layering, too, but without talking it through in as much detail as salt fingering).

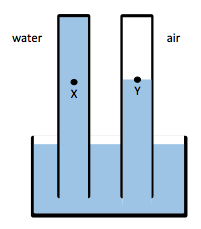
But then there are always students (usually the ones who don’t have a lot of confidence in their oceanography skills) who take the questions I ask at face value. Those are the students who go on to write something like this (numbering referring to the sketch below):

1) The initial stratification is stable in density, with cold and fresh water over warm and salty water. This means that the salinity stratification outweighs the temperature stratification in terms of density.

2) Since temperature diffuses a factor 100 faster than salinity, a thin layer with an intermediate temperature will form around the interface in salinity, that will persist for a while.

3) Focussing above the interface now, we have a stratification where cold and fresh water overlies lukewarm and fresh water. This stratification is hence unstable in temperature and convective overturning will occur. Below the interface, a similarly unstable layer has formed: lukewarm and salty water over warm and salty water. Again, convective overturning will occur.

The thickness of those layers depends on the initial temperature stratification and on how quickly temperature exchange happens during the overturning. In the end, two new temperature interfaces will have formed.

IMG_5958_DL

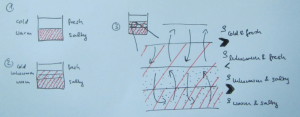
Sketch of the diffusive layering process. The red shading indicates warmer temperatures, the black dots indicate higher salinities.

And yes – that is exactly the response I wanted to hear!

So why do only so few students answer this question correctly? Don’t they understand that when I talk about salt fingering it is only an example of a double-diffusive process and not the only double-diffusive process there is? That was my initial thought after I saw the exams in the first class. So for the second class, I made sure to mention diffusive layering even more, and to explicitly say that I was talking through only one of the processes and that it might be helpful if they went through the other one on their own. Yet in the exams, the results did not change. And I have no idea. Do you? Then please let me know!