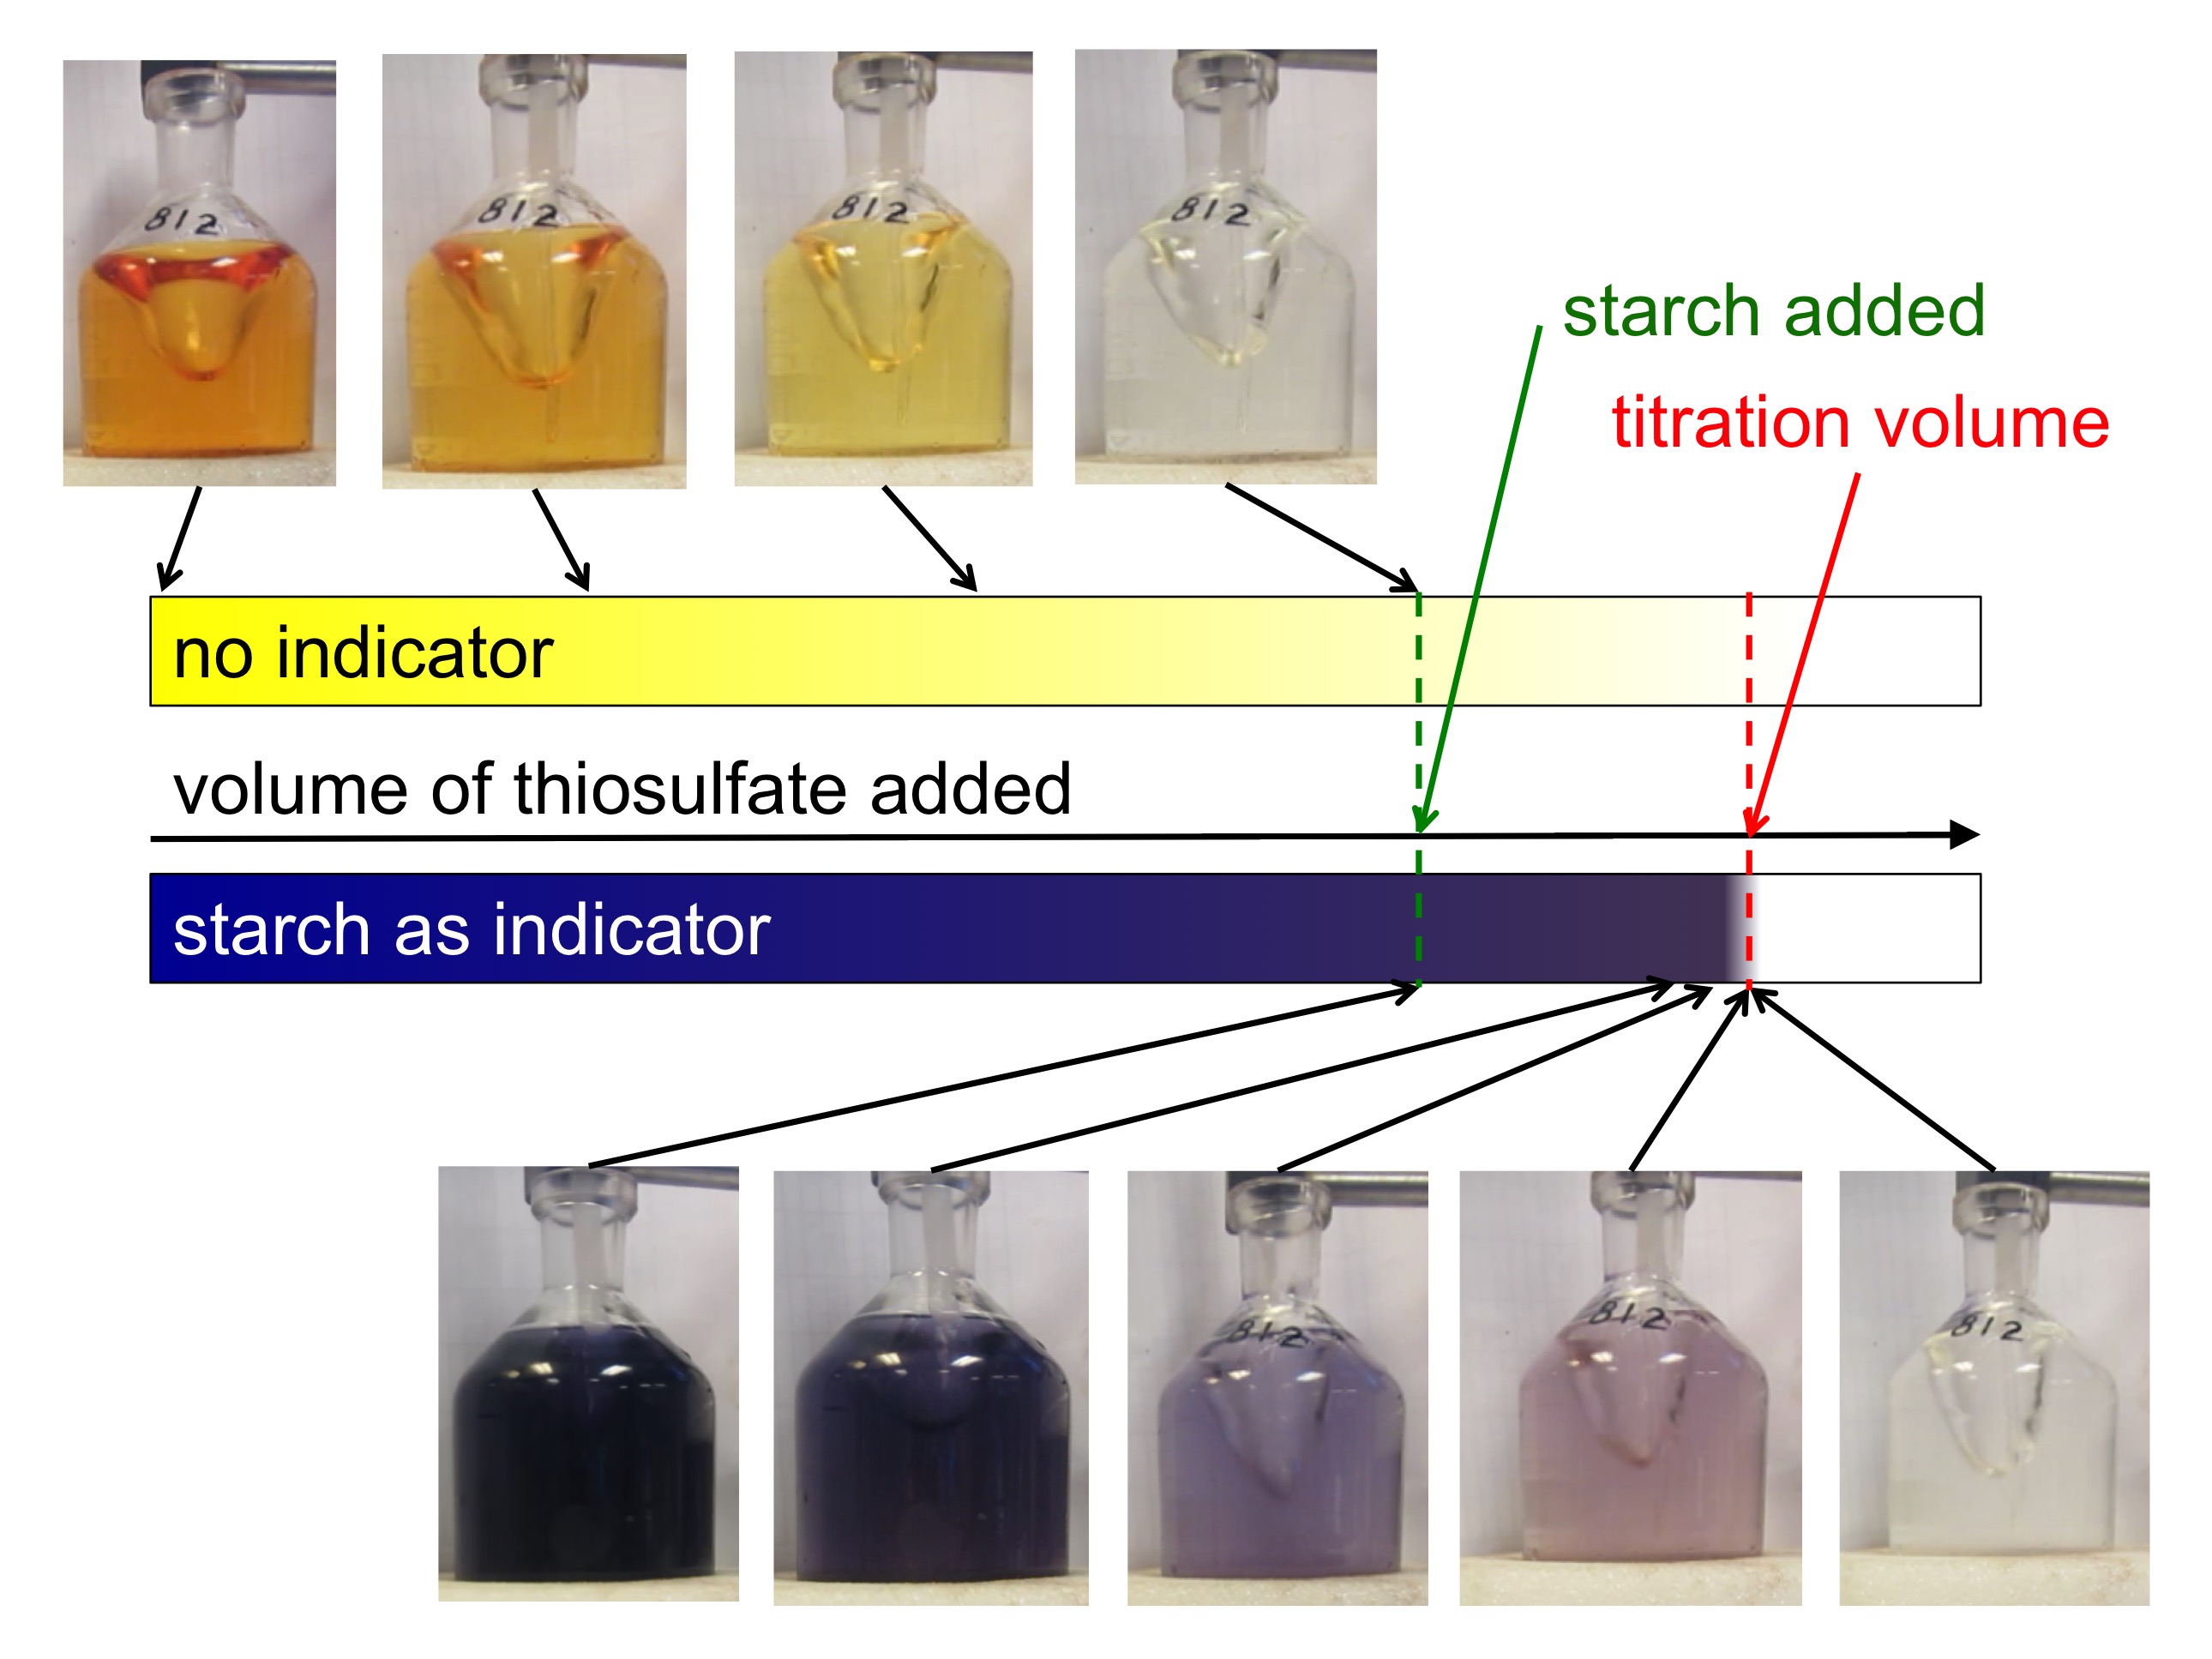
Good thing laboratory equipment is always labeled with the volume!
Even though I have played plenty with Legos as a child and am fairly good at 3D stuff, my mind just can’t estimate these volumes correctly. To me, the 500 ml cylinder looks a lot larger than 1 l volumetric flask and it blows my mind that if I fill the complete content of the cylinder into the volumetric flask, it is only half full.
I guess it’s kinda obvious that the ocean always appears to be the color of the sky. On grey days, the ocean looks grey. If the sky is blue, so is the ocean. But if the sky is two-colored? See for yourself!
Sometimes waves are very regular and mostly of the same length. Those are the ones that I usually talk about when I talk about interference of waves. But of course, other times, there are different kinds of waves with different histories and different lengths, and those do interfere, too. For example in the picture below, there are long swell waves caused by a distant storm, and then small wind waves on top of those, caused by a local breeze.
The really long swell you can’t even see in the picture, because waves with a couple hundred meters wavelength and just a dozen or so centimeters height are just really hard to photograph… But you get the idea!
The other day (well, the other day when I was still at sea and wrote that blog post. Been quite a while since…), when sailing in calm waters, I noticed the wavelets of a bow wave.
And I cannot not see them these days! No matter how much the other waves try to disguise any trace the boat might be trying to leave to prove its existence, the bow wave wavelets put up a fight to be noticed.
Below, you see the direction the ship is sailing in (yellow), the wash from the broken bow waves (green) and the wavelets that form the bow wave (red).
And they look extremely pretty in the setting sun, too!
If you like pictures like this, you’ll love my book! Stay tuned!
Here you see a formerly smooth patch of water where the Håkon Mosby was until a minute ago, and you see how long waves have already propagated into that smooth patch while shorter waves are everywhere in the choppy water around the smooth patch, but have yet to propagate into it. Now that I think of it I’ve seen this many times before, I just never noticed. It’s even visible in the video I posted with the other blog post.
And here is a video. Note how the long waves invade the smooth spot of water long before the shorter waves do:
So in my previous post we deployed a mooring (in fact, those pictures were from the deployment of several different moorings). Now how do we get such a monster back on board again?
Recovering a mooring is always slightly nerve-wracking, because even though we’ve tried very hard to forget about this possibility during the year the mooring was out there in the ocean, it is never 100% certain that we will actually be able to recover it. It might not be there any more, or it might be out of batteries. I have been on cruises where we have had to give up on recovering moorings, or on another one where we had to dredge for a mooring (and found it!). Luckily, on this cruise things went smoothly and the way they were supposed to:
A sound signal is sent and establishes contact with a releaser that connects the anchor with the rest of the mooring. After establishing the position of the mooring, a signal is sent and the releaser lets go of the anchor: The mooring floats up to the surface!
Then, the task is to spot the orange floatation thingies in the waves.
And bring the ship close enough to actually connect a hook to it.
Once it is on the hook, it needs to be brought on board.
Remember, it’s hundreds to thousands meter of rope we are talking about! Luckily the Håkon Mosby is (as all research ships are) equipped with plenty of winches and cranes and a super helpful, knowledgeable and skilled crew.
Instruments are brought on board individually (or, in this case, a releaser).
After having been out in the ocean for a year or two, they are sometimes overgrown with stuff. And in this particular case, that bio stuff was stinky!
But pretty, I have to admit. I think it’s some sort of cold water coral. I think. Any biologists here?
But there is always a lot of stuff to be recovered.
And also pretty interesting: This is the first time I got a good look into one of those orange flotation thingies. I knew there was a glass sphere inside, but it was nice to actually see one. I had previously seen one that had imploded – it ended up pretty much pulverized. But so this is what we knock around on deck and throw out into the ocean:
But yeah. In a nutshell, this is how moorings are recovered.
Do you want to know the full story behind the rope in the mystery picture the other day? On the recent Håkon Mosby cruise, we did a lot of mooring work, and that rope was part of a mooring that we recovered after it has been out in the Iceland Sea for two years.
So what are those moorings all about? The idea behind moorings is that it is super expensive to go out on research ships and that you can only stay out for a fairly short period of time compared to the amount of time you would like to cover with measurements. Therefore, installing instrumentation in the sea and leaving it out there for extended periods of time to measure and store data without anyone being close by, looking after it, gets you a lot of data that you could otherwise never obtain. Once a mooring is in the water, there is no communication with it at all until, after a year or two, we come back to pick up the instruments, read out the data and start on the science.
Moorings basically consist of a lot of rope. They are one or more long pieces of rope held down to the sea floor by a large metal anchor and then pulled in an upright position by large buoys that float at some depth underneath the sea surface. And then there are lots and lots of instruments attached to the ropes at different depths, most with their own buoyant orange floatation thingies [technical term] attached so that, if the ropes broke accidentally, they would float up to the surface and there is the (tiny) chance they might be recovered.
Below is a sketch of a mooring on the Kögur section (And check out the website http://kogur.whoi.edu for tons of information on that section!) to give you an idea of what those things look like (thanks, Kjetil, for letting me use the sketch, and thanks, Steinar, for the awesome work!). I was actually on both the cruise deploying that mooring in 2011 and recovering it in 2012 – check out the cruise blogs for those cruises, well worth a read even years later!
So now without further ado: on to deploying a mooring!
Before a mooring can be deployed, though, a lot of work goes into preparing ropes of the correct lengths with shackles in between where instruments or floatation thingies go.
On the day the mooring is deployed, instruments get attached to the ropes in the correct spots, so they end up at the right depths in the water.
Since moorings are typically several hundred to thousands of meters long, instruments and floatation thingies cannot be attached beforehand and the whole thing then just be thrown out into the water. Instead, when a part of the mooring is ready, out it goes into the sea to make room on deck for the next one to be prepared to avoid creating a gigantic knot filled with very expensive instrumentation.
The whole thing has to be very well coordinated, since there are several cranes and winches involved, and many expensive instruments that are all to end up at a specified depth to measure specific features.
Below we see orange buoyancy floatation thingies being lowered into the sea, and still on deck there is an acoustic current meter that will be next.
One thing I found super interesting on this cruise was to see the different generations of instruments all in use. For example, what we see being lowered into the sea in the picture below, above those orange flotation thingies, is a rotating current meter, predecessor to the acoustic current meter we saw in the image above. Rotating current meters work pretty similar to how we measure wind at home weather stations: The red vane will position the instrument in the current and the little wheel will turn with the current. Both the orientation of the instrument and the rotations of the wheel will be recorded.
When all the instruments and orange floatation thingies are attached to the rope and it has all been lowered into the sea, everything is still floating on the surface. The final act is to drop the anchor that will pull everything under water and in an upright position. This, again, requires a lot of precision, because where the anchor is dropped determines the position in from all the data is going to be collected. So the way this works is that the ship is steaming pretty slowly towards the target position while instrumentation, floatation thingies and rope go over board, and if everything is timed well, by the time everything is out in the sea, the final position has been reached and the anchor can go out.
Exciting stuff! One mooring we even deployed before breakfast (and I am showing this mainly because I like the colors in this pic).
Next post will be on: So now how do we get those things back on deck again after their stint out at sea?
You might recognize a couple of details that might give you a hint: There are waves parallel to the rope and drops of water falling from the rope.
And here is what happened: A floating rope was repeatedly being pulled up from the water’s surface and then sank back down as the research ship Håkon Mosby moved in swell (white). Each time the rope broke the surface, it caused waves that propagate away from it, the ones we see as lines parallel to the rope (yellow). And when it was pulled up, water dripped from it, so drops falling directly underneath the rope (green) cause the wave rings (red).
Like posts like these? Then you will love my upcoming book! Stay tuned! :-)
When measuring dissolved oxygen with automatic titration, the instrumentation that I used previously used a UV lamp and a detector: After each tiny volume of the titrant was added, the amount of UV light that made it through the sample as it changed it color from its original apple juicy-color to clear was measured and noted. Two lines were fitted to those data points: One while the color of the sample was still changing, the other when it wasn’t any more. The titration volume is found at the intersection of those lines.
Winkler titration: What an automatic titration system measures
When measuring oxygen with manual titration, like I did on this cruise, we can’t take all those individual data points and then fit lines, we can just take one single reading the moment we think the titration volume has been reached (well, we can note down volumes when we think we are close, and then just use the one we think was closest to something actually happening. But we don’t have a good account of how close we were at each of those volumes, and we can’t go back in time to compare values, so it still comes down to either getting it right or not). Having a good indicator that clearly shows when the titration volume (I.e. the point at which the amount of thiosulfate solution added to the sample is proportional to the concentration of dissolved oxygen in the original sample) is reached is key.
Luckily, Kristin prepared an awesome starch mixture which I got to use that makes it a lot easier to determine the point when titration is done. You add it when the yellow of the sample has become so light that it gets difficult to see whether it is still yellow or clear already, and the sample turns a deep, dark purple. As you come closer to the titration point, color changes little until you are very close, when it changes very rapidly (that’s why you only put it in once you are fairly close, otherwise the looooong time with no changes would likely lead to you becoming too impatient, adding too large volumes at a time, and over-titrating [at least if you are like me at all]). Adding starch late and then having it change very sensitively to added thiosulfate makes it very easy to determine the exact volume of thiosulfate needed.
Winkler titration: Sketch of the color changes of just the sample, or a sample with an added starch solution, during titration. Note how it is a lot easier to find the titration volume when starch is added at the right moment!
And here are a couple of impressions of what it looks like for real:
Winkler titration: Sketch + photos of the color changes of just the sample, or a sample with an added starch solution, during titration. Note how it is a lot easier to find the titration volume when starch is added at the right moment!
When writing this post and showing it to people, I have been warned repeatedly to not make myself redundant by making it too easy for other people to just print this blog post and go take my spot on the next cruise to measure oxygen. So I just want to state: Clearly there is more to measuring oxygen than what was shown here! For example, you need to measure standards to calibrate your measurements, which I am too lazy to write about right now. And most importantly: If something goes wrong, you need to be able to figure out how to fix things. And that’s not always a piece of cake, I can tell you… So please don’t use this as a manual. But I’m happy to talk about my experiences if anyone is interested!
And Kjetil and Emil, I really want to go on that winter cruise! :-)
So how do we actually measure dissolved oxygen concentrations from the samples we took in the last post?
We are using a method called “titration” to determine the unknown concentration of dissolved oxygen in our sea water sample. And this is how titration works in general: During titration, we add known volumes of a chemical, called “titrant”, to the sample until all of our unknown amount of the substance we want to measure has reacted with the second chemical. The volume of the titrant that we needed to add until all of the substance-to-be-measured is used up is called the “titration volume” and it is proportional to the volume of the substance-to-be-measured we had in the sample and that we want to figure out. Since the chemical reactions of the substances are well known, the factor that needs to be used to convert one substance into the other is known, too.
Unfortunately, when attempting to measure oxygen, we can’t add the titrant directly to the water sample, but a couple of other steps have to happen before. Remember the last post? We ended by adding reagents to the sample:
To be precise, we add manganese sulfate first and then a mixture of sodium iodide and sodium hydroxide. This is shaken really well to mix everything. A white manganese hydroxide precipitate forms but is quickly oxidized by the oxygen in the sample. When this happens, the sample turns the color of brownish cloudy apple juice. This is where it is important that we don’t have air bubbles in the sample – the oxygen contained in those would also take part in the reaction which would later look like there had been a higher concentration of dissolved oxygen in the sample.
After a little while, a yellowish-brownish precipitate falls out. This is what we later want to measure, as the dissolved oxygen is bound in there and can’t take part in any further reactions for the time being.
A sample then looks like this:
Or, for a full crate of samples:
Next, using a syringe, we need to carefully, take about 20ml of water off of the top of the sample flask (because we will measure inside the sample flask and need to make room for the magnet stirrer and chemicals to be added later). This works surprisingly well without disturbing the precipitate at the bottom of the bottle!
Next, we add acid (sulfuric acid in our case) to the sample to dissolve the precipitate back into solution.
Where in contact with the acid, the apple juice becomes clear.
It will become clear everywhere once the magnet stirrer starts mixing the acid and the rest of the sample.
And now we are ready to start titrating!
In titration, we add known amounts of the titrant, thiosulfate solution in our case, to our sample until we reach the “titration volume”, where all oxygen has reacted. The task is figuring out the titration volume. This can be done for example by adding an indicator that changes color when the sample changes from acidic to basic. Then we need to note down the volume of the titrant, the titration volume, at the exact point that happens. The titration volume of thiosulfate solution is then proportional to the concentration of dissolved oxygen in the original sample (again, provided there were no air bubbles trapped in the sample).
We’ll talk about what this looks like in practice in the next blog post :-)