Category Archives: hands-on activity (easy)

Steam boat

A pop pop boat in action!

Following up on the steam-powered spinning top we talked about earlier, today we have a steam-powered pop pop boat.

IMG_0432

My little steam boat out at sea

The mechanism is exactly the same as for the spinning top, except the boat is propelled forward rather than spinning around its own axis.

IMG_0446

Tiny candle on spoon heats up water tank that is connected to the tubes that come out at the stern of the boat, driving the boat forward.

Since the water that is pressed out of the tube is being sucked back in one might wander why the boat is still driving forward rather than driving forward and then being pulled backwards when the water is pulled back up into the tube. Here is why:

poppopboat

Water coming out of the tube is pushed mainly backward, water sucked in is sucked in from many different directions. An analogy that someone told me about is that it is fairly easy to blow out a candle that is some distance away, whereas it is really really difficult (probably impossible) to suck it out from the same distance.

Watch the movie to see the boat drive around:

[vimeo 115379711]

Steam-powered spinning top

How changing the state of water can drive motion.

Somehow over the holidays we ended up playing with a lot of toys related to the change of state of water, or the expansion of air. First, over the next couple of posts, let’s go through the ones dealing with the change of state.

IMG_0438

A steam-powered spinning top.

The steam-powered spinning top is super simple. It’s a cork disc with a loop of copper tubing on top. The two open ends of the copper tube come through the cork disk into the water, where they are twisted at a 90 degree angle in opposite directions.

The copper tube is filled with water. A tea candle is placed on the disk underneath the copper tube. As the candle heats up the tube and the water inside, eventually the water will change its state from liquid to gaseous, it dramatically increases its volume: Water at 100 deg C has a density of approximately 0.96 kg/l. Water vapor at the same temperature has a density of approximately 0.6 g/l. Since mass can’t be lost, it has to go somewhere, in this case out at the ends of the tube. Since the increase in volume happens quite suddenly, this leads to a sharp pulse, propelling the spinning top. As the water vapor reaches parts of the tube that aren’t directly above the candle, it cools and becomes liquid again, drastically decreasing its volume, sucking water back up into the copper tube.

This is what it looks like:

Enigma

My friend F and I used to send each other coded messages. Without ever telling each other what cipher was used, though – figuring out how to decipher the message was the main source of entertainment, the actual content of the message was never important.
The first ciphers were fairly easy, like simple substitution ciphers. But then after a while we both started writing programs to both cipher and decipher, because the more complex the systems got, the less fun it was to go through the tables or transformations for every single letter that needed to be coded or decoded. And then after a while we stopped.
So this is what I did over Christmas:
2014-12-26 16.11.39

Home-made Enigma 

And then, obviously, I had to decipher stuff. Luckily my dad is as fond of these kind of games as I am! And – as I found out earlier this week – some of my colleagues are completely and utterly fascinated by this kind of stuff, too.
Check it out, it is fun! :-)


Which displaces more water, a boat with the anchor onboard or in the water?

Not that this is a big effect in the ocean, but still, it’s a nice demo.

A body submerges into the water until it displaces an amount of water that is equal to its own weight. So if you have a ship with an anchor onboard, and then you drop the anchor into the water. Will that affect the water level? And if so, how?

anchor_and_boat

How much water is displaced by a boat carrying the anchor onboard vs a boat and the anchor in the water? It’s the same amount of water in the jars and the same coins in both pictures…

I like this demonstration because it is so easy and also because so few people get it right when you ask them about it (which is actually a bit shocking).

Building a miniature well

Groundwater dynamics in the kitchen.

This activity is suitable for young children who wonder where the tap water comes from. All you need is some sand, an empty toilet paper roll, and some water.

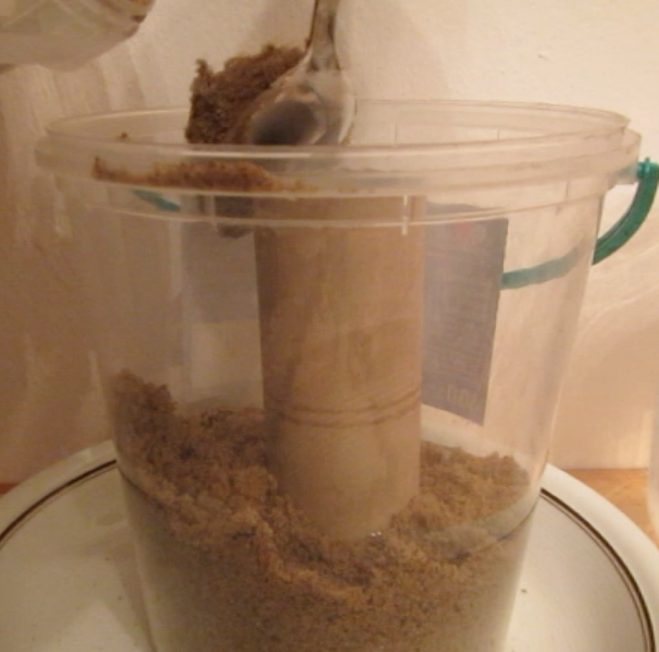
First, you need to build your well. You could dig a hole into a sand-filled bucket and then put in the toilet paper roll, or you can just set the roll into a bucket and then fill sand around it (which is what I did).

MVI_0349

Put your empty toilet paper roll in a larger vessel and fill the space around the roll with sand.

Next, you “let it rain” on the sand to replenish the ground water.

MVI_0349_2

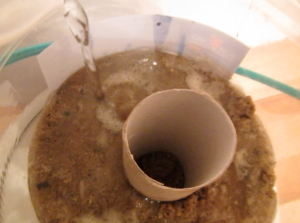
Let it “rain” to replenish the groundwater.

After a while, water starts collecting in the well, and the water level rises. It looks pretty yucky at first, clearly the sand I got from the playground is pretty dirty.

MVI_0349_3

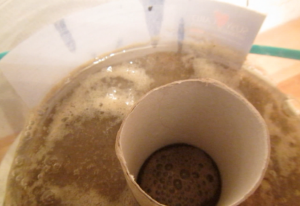
After a while, the water starts rising up in the well.

Things to discuss:

  • How will different sands / soils influence the water quality in your well?
  • What could you do to improve the water quality?
  • What effect will torrential downpours (like what I did above) have on the water quality compared to nice and slow summer rain?

And then if you want to go there, you could discuss pollutants in the soil that will have an effect on water quality etc..

And you could actually try different sands / soils on water that you either color, or in which you dissolve other things, or in which you suspend things. But I was too lazy to do this for this post. But I might come back to this experiment for nicer pictures in natural light, but you might have to wait for that until next summer :-(

I really like this demo, it is quick and easy and nice if you don’t feel like digging a massive hole in your garden (which I did not).

Fog and clouds in a bottle

A little bit of hands-on meteorology for a change.

This post is inspired by www.planet-science.com‘s “fog in a bottle” and “make a cloud in a bottle” posts. Inspired meaning that I had to try and recreate their experiments after I saw this when approaching Zurich airport recently:

IMG_0301

Clouds and fog somewhere close to Zurich airport.

So let’s start with fog in a bottle. I’m doing fog in a jar, because it is easier to balance a sieve with ice cubes on a wide-mouthed jar than on a bottle… There is about 2 cm of hot water in the jar and the sieve with ice cubes is put on top to cool the moist air enough for fog to form.

And now the cloud in a bottle. This one is fun! And a lot more impressive in the flesh than in the movie, so try it out yourself! Suck some smoke into a bottle that contains a little water. Close the cap, press and release the bottle and see a cloud forming when you release it. The smoke acts as condensation nuclei here. And pressure changes, temperature changes, yada yada… Anyway, try it yourself!

P.S.: Kristin – erkennst Du die Flasche? Die, die Deine Freundin Dir mitgegeben hatte, damit Du was zu trinken hast, die dann mit in Göteborg war und die ich dem Recycling zuführen sollte? Hat offensichtlich nicht geklappt, aber viele Grüße an Deine Freundin! :-)

Tides in a glass

A very simple experiment to show how waves can travel around an ocean basin.

I wrote these instructions for a book project that I was lucky enough to get involved in at the very last minute and figured I could just share them here, too. Why not try a new style every once in a while? You tidal purists out there – come up with a better experiment if you aren’t happy with this one! :-)

  • Age: 6 years and above
  • Group size: 1-3 per group
  • Time: 15 min
  • Topic: Tides in enclosed basins 

Resources and Materials:

  • 1 clear plastic cup
  • 1 waterproof pen
  • water

Introduction:

[In a previous experiment] we have learned how tides are caused by the sun and the moon. In the picture there, we see the two “mountains” of water that form on either sided of the earth. The earth rotates underneath those two “mountains” of water, which is what causes high tides twice a day.

But what happens when those “mountains” of water reach a coast? Clearly the continents are not flooded twice a day every day, so the “mountains” of water cannot travel all the way around the globe undisturbed. What does happen instead is that the tidal wave will propagate around the rim of an ocean basin, even in semi-enclosed basins like the North Sea, which we will show in the experiment below.

  1. Fill the plastic cup approximately half full with water.
  2. Mark the still water level with a permanent marker.
  3. Gently start twirling the cup and observe how the water level starts changing: On one side of the cup it rises, on the other side it falls.
  4. Continue twirling the cup and observe how the “mountain” of water moves all the way round the cup, leaning against the side of the cup, and how opposite of the “mountain” a “valley” forms that also travels around the cup.
  5. Mark those two new water levels: The higher one is the high tide line of your ocean in a cup, the lower one the low tide line.
Tides_MSB

Figure 1: Twirl a cup filled with water to see how tides propagate around an ocean basin

This is how high tide and low tide travel around an ocean basin. In the real world, though, coastlines are not as smooth as the walls of a cup, and also ocean basins are connected to each other, so tides in different basins interact. For a real world example, look at the tides in the North Sea, shown in Figure 2.

Tides2_MSB

Figure 2: Simplified timing of tides in the North Sea.


Ice cubes melting at the bottom of the beakers

Because surely there is one more post in this topic? ;-)

For those of you who haven’t heard about the “melting ice cube” obsession of mine, please check out the links to other posts at the end of this post. For everybody else’s sake, let’s dive right in!

When Kristin and I ran the workshop at EMSEA14, a couple of people asked very interesting questions. One that I totally had to follow up on was this: What would happen if the ice cubes were forced to the bottom of the beakers? Of course we knew what theory said about this, but who cares? I still had to try.

If you have ever tried holding down ice cubes with straws…

MVI_9786

…and we have a movie of this! :-)

…you might know that that is quite difficult. So this is the experimental setup I ended up with:

MVI_0251_01

Ice cubes melting at the bottom of a fresh water and a salt water beaker

Zooming out a little bit, this is my fancy equipment:

Screen shot 2014-10-12 at 8.59.10 AM

The camera gets a white skirt over the tripod because the reflection of the tripod is seriously annoying

Zooming out a little more, this is the whole setup:

Screen shot 2014-10-12 at 8.58.46 AM

Chair on table in my winter garden, holding the white-ish oilcloth that serves as background. I should invest in a proper rod for the upper edge of the oil cloth, the current one has suffered a bit…

I know that some people want to try the experiment for themselves, so I’ll hide the rest of the experiment behind the cut, at least until Kristin tells me that she’s done it :-)

Continue reading

Why folic acid might be good for people, but not so good for tank experiments

I had to do the complete series of experiments, of course…

The other day I mentioned that I had used salt from my kitchen for the “ice cubes melting in fresh and salt water” experiment, and that that salt was the super healthy one that was both iodized and containing folic acid. And what happened is that the experiment looked like I was using milk. Not what I had envisioned.

MVI_9236

Ice cubes melting in fresh water (left) and in iodized-salt-with-folic-acid water (right)

Since I had often before used just regular table salt – which is usually iodized – I was intrigued by the opaqueness that seemed to be due to the addition of folic acid. Or was it? That I had never noticed the milky-ness of the salt water didn’t necessarily mean that it had not been milky before. So this is what the same experiment looks like if regular iodized table salt is used:

MVI_9249

Ice cubes melting in fresh water (left) and in iodized-salt water (right). Turbulence in the freshwater beaker due to me stirring (don’t ask)

In the literature it is always recommended to use kosher salt for experiments. Kosher meaning in this context that the salt should be only NaCl with no other additions. I happened to have some at hand after having bought it for the “teaching oceanography” workshop in San Francisco last year (after the salt that I brought for the workshop didn’t make it to the US. Long story). So this is what that looks like:

MVI_9248

Ice cubes melting in fresh water (left) and in kosher salt water (right)

In summary: Folic acid is what makes the salt water look opaque – but iodized salt is completely fine for tank experiments. I think it’s tiny air bubbles that cling to something folic acid-y, but I have no clue what is going on. I noticed that the dusty stuff settled down over night (so the top experiment here is a lot clearer than the experiment I ran with the same batch of water the day before), but even the next day the water wasn’t completely clear.

Anyway, now we know. And I came out of this series with more movies of ice cubes melting in fresh water and salt water!

Links to previous posts on the topic after the cut.

[Edit: Using my mom’s iodized, but not folic acid containing, table salt leads to milky water, too. So there you have it. I have no clue what is going on!]

Continue reading