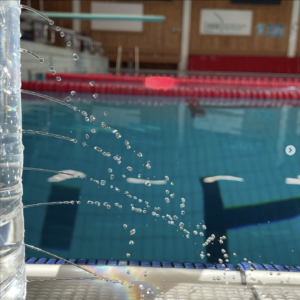
I did this demo for my freediving club Active Divers (and if you aren’t following us on Insta yet, that’s what I am taking all these pretty pictures for!): 1.5l PET bottle with holes punched in every 2cm, then filled with water. Looks cool and works pretty well (except the second hole from the bottom up, which I punched in a part of the bottle’s wall that wasn’t vertical, so the resulting jet doesn’t come out horizontally in the beginning and messes up the picture. Should have thought that through before…).
Tag Archives: hydrostatic pressure
Mariotte’s bottle: A nifty trick to control “reservoir height” in #dropphotography
In earlier posts on drop photography, you might have noticed that the reservoirs for the water that drops out and creates the beautiful liquid art has a weird cork on top, sealing it off, and a glass pipe sticking through. I’ve been wanting to explain what that’s all about for a while, but had to finally draw the picture for our liquid art workshop yesterday. So here we go!
Above, you see Wlodek adjusting something about it, and below is my sketch: A Mariotte’s bottle!
Very useful little thing to control pressure in a reservoir, and with pressure the “reservoir height” that is felt at the outflow, even though the reservoir height is actually changing. Basically, it’s a way to trick the system to feel a constant hydrostatic pressure.
Below on the left, you see the bottle when it has just been filled. A cork is sealing the top of the bottle, except that the inside and outside are connected by a pipe on top and the outflow at the bottom. Initially, the water level inside the top pipe and the bottle are the same and the pressure on both water surfaces is the atmospheric pressure.
As water flows out of the bottle, the water level in the bottle starts sinking. The head space (the air inside the bottle above the water) is sealed off from the outside, so as the water level sinks, its volume increases and its pressure (and thus the pressure on the water surface inside the bottle) sinks. In the middle plot below you see what happens then: The water level inside the pipe starts sinking to compensate for the missing volume inside the bottle.
Eventually, air starts bubbling out of the pipe into the headspace, and the water level inside the pipe is at the very bottom end of the pipe (right plot above). The pressure at this level (marked as A) is now atmospheric pressure, not only at the bottom of the pipe, but throughout the whole bottle. And the pressure at this level will continue to stay at atmospheric pressure levels for as long as the water level is still higher than the bottom end of this pipe. Occasionally, air will bubble out of there to compensate for further outflow.
So at the outflow, we always have the hydrostatic pressure relating to the height from B to A, no matter how much or little water there is in the reservoir. That means that all drop pictures in a series will have similar conditions, even as the reservoir is slowly getting empty. How cool is that? I love those kind of things. So simple, yet so efficient! :-)
Pythagoras’ Cup
Yep, I’ve been playing this weekend :-) After seeing this on Facebook a while back I just couldn’t resist… Enjoy! :-)
Taking the hydrostatic paradox to the next (water) level
How well do people understand hydrostatics? I am preparing a workshop for tomorrow night and I am getting very bored by the questions that I have been using to introduce clickers for quite a lot of workshops now. So I decided to use the hydrostatic paradox this time around.
The first question is the standard one: If you have a U-tube and water level is given on one side, then what is the water level like on the other side? We all know the typical student answer (that typically 25% of the students are convinced of!): On the wider side the water level has to be lower since a larger volume of water is heavier than the smaller volume on the other side.
Clearly, this is not the case:
However, what happens if you use that fat separator jug the way it was intended to be used and fill it with two layers of different density (which is really what it is intended for: to separate fat from gravy! Your classical 2-layer system)?
Turns out that now the two water levels in the main body of the jug and in the spout are not the same any more: Since we filled the dense water in through the spout, the spout is filled with dense water, as is the bottom part of the jug. Only the upper part of the jug now contains fresh water.
The difference in height is only maybe a millimetre, but it is there, and it is clearly visible:
We’ll see how well they’ll do tomorrow when I only give them levels 1 and 3, and ask them to put level 2 in. Obviously we are taking the hydrostatic paradox to the next (water) level here! :-)
When water doesn’t seek its level
Last week we talked about misconceptions related to hydrostatic pressure, and how water always seeks its level. Today I’m gonna show you circumstances in which this is actually not the case!
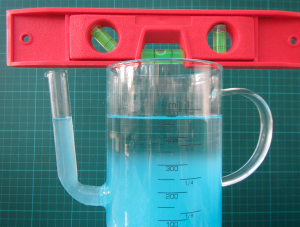
We take the fat separator jug we used last week. Today, it is filled with fresh water, to which we add very salty water through the jug’s spout. What is going to happen? Watch the movie and find out!
Turns out that now the two water levels in the main body of the jug and in the spout are not the same any more: Since we filled the dense water in through the spout, the spout is filled with dense water, as is the bottom part of the jug. Only the upper part of the jug now contains fresh water.
The difference in height is only maybe a millimetre, but it is there, and it is clearly visible.
Do you see the opportunities for discussions this experiment provides? If we knew the exact volumes of fresh water and salt water, and the exact salinity, we could measure the difference in height of the water levels and try to figure out how much mixing must have taken place when the fresh water was added to the jug. Or we could use the difference in height to try and calculate the density difference between fresh water and salt water and then from that calculate salinity. So many possibilities! :-)
Water seeks its level
There are a lot of misconceptions related to hydrostatic pressure. One of them is that if you took a jug like the one below (or a U-tube, as in my post on letter tubes and misconceptions around hydrostatic pressure) the water level would have to be higher in the narrow snout of the jug than in the main body. So when I saw a cheap-ish fat separator jug recently, I had to get it “for my blog” (ok, because I wanted to play with it) to show that water, indeed, seeks its level.
But it turns out it is really difficult to take pictures of the water level! My first attempt (above) was with dyed water because I thought that might make it easier to see what is going on. Turns out that the adhesion of water makes it really difficult to observe the water level: The water is pulled up along the walls of the jug, leading to these weird changes in color.
In the picture below, taken from slightly above water level, you can see the curvature of the water surface both in the main body of the jug and in the spout:
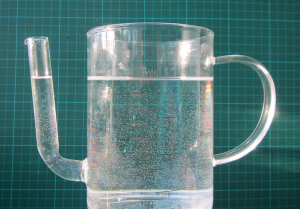
Using clear water turns out to be the best way to photograph this phenomenon (below).
So there you see it: Water seeks its level!
Another problem with this setup is that the spout is so narrow that I am not entirely sure capillary effects don’t come into play.
One thing we can do about it: reduce surface tension by adding a little bit of dish soap!
Now you clearly see it. Don’t you? :-)
Non-leaking bottle.
Still more on hydrostatic pressure.
Just because it is cool :-)
Letter tubes and hydrostatic pressure
How less than 25% of the tested students give consistent answers to these problems.
This is already the third blog post talking about the paper “Identifying and addressing student difficulties with hydrostatic pressure” by Loverude, Heron and Kautz (the first two posts here and here). But I am still a bit in shock by what I read in that paper.
Consider the figure below. A N-shaped tube filled with water.
Students are asked to rank the pressure at points G, X, Y, Z.
Because I hate reading electronics papers where they give you the questions and the students’ misconceptions, but don’t tell you what the correct answer would be (how would I know?) I am going to give you the answer, but I’ll assume that you know it anyway. Clearly, points X, Y and Z have the same pressure, whereas the pressure at point G is less.
So what do students say?
A very prominent answer, according to the authors of the study, is that students confuse pressure with weight. Since there is more water above X than above any of the other points, the pressure here seems to have to be highest. And following this logic, the pressure at Z is the smallest (for a sketch of the wrong “h”s that go into this answer, see the figure above).
Using a different-shaped tube, and asked again to rank pressures, students find different results (rather than giving the correct answer, which would be that the pressure at X and Y is the same, the one at W is higher and the one at Z is lower):
Here, many students conclude that the pressure must be increasing from X through W through Y through Z, hence perceiving pressure as varying along the curvature of the letter.
When students in that study were shown both letters together, this is what the typical answers look like:
The authors find that less than 25% of the students answer these two problems (even when shown side-by-side) consistently. And consistently means just that: They either answer both correctly, OR they answer both of them based on the misconception described for the N-tube, OR they answer both of them based on the misconception described for the U-tube.
This means that 75% of the students in the study didn’t even have a mental model that they consistently used. And those were students who had gone through the standard instruction in hydrostatics. This makes me wonder how this translates to my own students. I have never explicitly talked about these kinds of problems, assuming that students had a full grasp of the material. But clearly this is an assumption that should not be made. But where do we have to start teaching if this is still so fraught with difficulties? Do you have any ideas? Then please let me know.
Barometer problem.
Still talking about hydrostatic pressure.
Yes, I am not done with hydrostatic pressure yet!
One of the problems students were given in the study “Identifying and addressing student difficulties with hydrostatic pressure” by Loverude, Heron and Kautz is a barometer problem.
Students are asked to compare the pressure at point X and point Y. Apparently, this is not as obvious as it seems to me. So before I go into the detailed discussion (I might do it in a later post – anyone interested in reading it?), I thought I’d just set this up. Because to me it seems that if you see this sitting there with the liquid clearly not moving one way or another, the solution has to be clear. We’ll see what others think, but here we go:
If you want proof that the tubes are open at the bottom and that there still is a hydrostatic equilibrium, watch the movie below. Spoiler alert: You might have fallen asleep by the time things start moving in the movie ;-)
Hydrostatic pressure
What are students not understanding about hydrostatic pressure?
Tomorrow (today by the time this post will go online, I guess) I will present the paper “Identifying and addressing student difficulties with hydrostatic pressure” by Loverude, Heron and Kautz at the Journal Club at work. So tonight I am trying out a couple of experiments that I would like to show with it.
I already know that I am not supposed to show the experiments during the talk, but I figure that there is no harm in having them prepared in case anyone wants to see them afterwards.
And good thing I tried them before instead of just assuming that they would work!
For the first experiment, I had this awesome idea to re-create something I saw as a child when on vacation on a farm:
I was clearly very impressed with it – this picture is from 1994 and I remembered it and asked my parents to track it down for me!
Anyway. Since I wasn’t sure if my colleagues would be happy with that amount of water on the floor, I decided to go for a smaller version of the same thing.
This is what I wanted it to look like (and what it looks like in my presentation):
And this is what the experiment ended up looking like:
How disappointing! I guess the holes that I poked into the bottle aren’t well made. But good thing I tried. Watch the movie if you want to pay attention to if you ever want to present this experiment.
Yes. You want to use tape that keeps the water inside the bottle. Until you want to take the tape off. Then you wish you had used something that actually comes off…… ;-)