My friend Alice Langhans runs a super cool science communication Instagram (@edu_al_ice), where she posts about her experiences as PhD student in physics education research. And there is a lot more going on on that Instagram than just pretty (but oh so pretty!) pictures. I make sure to read all her posts, because there are always interesting, motivating, inspiring thoughts hidden behind that “read more” button. And now she’s even started a new series of physics experiments on #experimentalfriday, and I am super excited that she wrote this guest post for me!
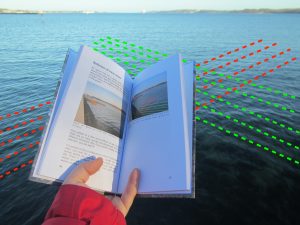
But now look at the picture below, and then read about some magic! :-)
Alice writes:
Magic! One of the arrows changes its direction and here is why:
Click for large picture. Picture by Alice Langhans.
First, the arrows are unchanged and visible through the glass.
Click for large picture. Picture by Alice Langhans.
Adding water to the glass, the image of the arrow gets bigger and appears mirrored!
Click for large picture. Picture by Alice Langhans.
With even more water even the second arrow appears bigger and mirrored.
Click for large picture. Picture by Alice Langhans.
The waterglass I used is round and the refraction of light in water is different than in air, which makes the water glass act like a positive (converging) lens. This is why the image of the arrow appears bigger and mirrored.
Think of the arrow as many points, each of which is the source of a divergent bundle of light. The light coming from the point that is the arrowhead on the right, is refracted through the waterglass and reaches our eye to the left. The light from the left end of the arrow refracts in such a way that it now enters our eye on the right side.
Notice, how you can also see how the upper arrow appears even bigger? The glass is more wide at that height, magnifying properties of the water glass lens are therefore increased.
Isn’t that a super nice demo? I love it! Thank you for writing this guest post, Alice! :-)
P.S.: Alice has just been interviewed for a podcast. Curious what she’s talking about on there? Me too, but that’s why I follow her Instagram (@edu_al_ice) — to never miss out on all the cool stuff she’s up to! :-)
I’ve been coming up with #scicommchall challenges for well over a year now, and I have always met them. Except for last November, when the challenge was to do an elevator pitch and post a movie of it. Since this is something I really want to do, I decided to force myself to it and repeat the challenge this January. And man, was this hard! For a lot of reasons: I don’t think what I am saying captures the essence of what my job is about, I hate seeing myself on video, I hate listening to my own voice even more, and wow is it difficult to get some alone time in the elevator at work! I’m really not satisfied with the result just yet. But I am sharing to maybe inspire others to join me in my efforts. Will you join me? :-)
So here are two versions, first one with English subtitles.
And then here a non-subtitled one that includes a couple of takeouts (because those are always my favorite part of every movie ;-))
But I am not done here, and my #scicommchall to myself remains: to write a better script, to film it in an elevator, and to upload it on the internet! :-) How is this #scicommchall working for you? Show me your elevator pitches!
Interesting year-in-review: despite amazing photo opportunities in Cyprus and Norway and other beautiful places, the Kiel fjord is clearly dominating my most successful Instagram posts of 2018 (only two are not from the Kiel fjord, one is from the Kiel Canal and another one from the Eckernförde bight, so still very close to home…). But I guess it shows the “Kiel” in my Instagram handle @fascinocean_kiel wasn’t an accident ;-)
One of the 2018 achievements that I feel most proud of is developing a social media strategy for the science communication research project Kiel Science Outreach Campus, and implementing it together with the project’s 11 PhD students plus a couple more colleagues who we “entrained” along the way. And now an article we wrote about the whole social media has just been published! (pdf of the article and a link to the full issue No 4 of the IPN Journal). Check it out, as well as our Twitter @KiSOC_Kiel and Instagram @KiSOC_Kiel — both lead to the project’s central social media, which in turn often link to our individual scicomm social media profiles.
Even when I fully intend to just go for a Saturday afternoon walk to catch up with a friend, this is what happens…
I get distracted by waves. Like the crisscrossing pattern of waves and their reflections that you see below.
Or the amazing bow waves of ships passing by. Isn’t it fascinating what a huge amount of water is displaced by the ship’s bulbous bow, piling up into a mountain in front of it, then the sharp dip where the actual ship begins? (If you want to read about why ships are built with a bulbous bow, check out this old blogpost).
Having a bulbous bow alone does not always lead to the same bow wave. Which is fairly obvious when you think about it, of course the speed of the ship or the shape of the bow influence the wave field that is created, but also how heavily the ship is loaded, i.e. how deep the bow is in the water.
What you can see very nicely on the sequence of pictures of bows and bow waves in this post are bulbous bows going from fairly far out of the water (above) to fully submerged (towards the end).
And I just love the sharp contrast of the smooth water piling up and then the turbulence and breaking waves right there. Interesting example of subcritical and supercritical speeds, btw: The ship travels faster than the bow wave (so the bow wave can’t overtake the ship, but always stays behind it, forming a two-dimensional Mach cone).
The ship in the picture below is the odd one out in this blogpost: It does not have a bulbous bow but just pushes water in front of it. This is an interesting example of a bow shape that is clearly not optimized for energy efficiency when traveling large distances, but then the purpose of that ship is obviously a different one. But isn’t it amazing how such a small ship creates waves larger than all the other much bigger ships do, just because they have better bow shapes?
But beautiful wakes nonetheless. I love those tiny ripples riding on top of the wakes!
And, of course, the checkerboard pattern of a wave field and its reflection.
Here is another example of a ship with a bulbous bow, this time it is almost submerged. Since they are designed to be fully submerged, this ship is loaded in a way that is closer to what it was made for, and you see that the generated waves are smaller than the ones in the pictures up top.
And look at its wake — really not a lot going on here, especially when compared to the much smaller ship a couple of pictures higher up in this post!
Now for a ship that is hardly creating any waves at all, the mountain of water that it’s pushing in front of its bow looks especially weird since the bulbous bow isn’t visible any more.
See? (And isn’t it cool how the chronological order of pictures in this post just coincided with ships laying deeper and deeper in the water? I love it when stuff like that happens :-D)
And then, of course, I had to include some more pictures of beautiful wakes…
Do you see, comparing the picture above and below, how the first one was taken when the wake had just reached the shore, and the second one the wake was reflected on the shoreline already?
Not many things make me as happy as wave watching :-)
P.S.: Ok, one last bonus picture (non-chronological, we saw it some time during the walk. But that’s ok, I wasn’t going to include it until the post was already done and I decided that you just HAD to see this): Someone who is clearly not using their bulbous bow to their advantage. But at least I get to show you what they look like when they are not in the water. And we got to speculate about how annoying it is to be on a ship with such a strong tilt all day :-D
I’ve been wondering. Are foggy mornings where all you can see are waves (and a couple of seagulls) opportunities on which everybody else sees the world like I always see it (i.e. mainly focussed on waves), or do “normal people” just see the seagulls and, well, fog?
Below, for example, the first thing I notice are the wakes. And then possibly the birds creating them (since, of course, I am interested in what caused the waves) and the algae growing in the water (because I am looking down to see if there are more waves to see). But even looking at the picture now, I focus on the wakes and on how amazing it is that you see the middle one going all the way across the picture. And that the seagull in the front only started swimming at the middle of the image, since that’s where its wake starts.
I do like to have some birds or structures in my pictures for visual interest, but the reason I took the picture below was to show how foggy it actually was this morning. And how calm the Kiel fjord was with hardly any waves and therefore very nice reflections of even the flag pole. That is very unusual.
And then, in the image below, I finally spotted the Sweden ferry coming into Kiel port. I knew it had to be there because I had heard the engine for a couple of minutes already and it sounded very close, but it was nowhere to be seen. Can you spot the blue underwater hull and possible the blue writing saying Stena Line at the lower end of the upper third of the picture? But the reason I took that picture was mainly so that, when talking about the wake later (and of course I set out to take pictures of that wake specifically. Yep, that’s how I structure my Sunday mornings), I would have a reference for how foggy it was.
Because as much as I like watching ships, what I am even more interested in are their wakes. I really like how the otherwise calm surface clearly shows very detailed reflections that are only distorted by the wake. Look for example at the little life guard stand and its reflections — the poles holding up the roof are reflected on at least four different waves, repeating that very distinct part of the structure in different places depending on the surface slope of the wave. Or, to the left of the bottom reflection of that life guard stand, the reflection of the railing that seems to be mirrored. How awesome is that?
But then I also really like interferences of waves as shown below. Little seagull and its wake riding on the remaining wake of the Sweden ferry…
Or little random wave rings radiating out from a rock that is submerged and then resurfaces with each wave reaching it.
And what I find super fascinating in the picture below is how you see the longer waves in the undulations of the dark reflection of the structure of the jetty (careful though, it would never be a straight line since each individual pillar and the shoulder on top of which the actual gangway sits creates a little edge in the reflection), and then the short wavelength waves creating a noise on top.
And then, last but not least, the thing that I love to look at every single time: the waves and their reflections on the sea wall, creating a crisscross pattern.
Now imagine you had been on this walk with me. Would you have seen all the wave stuff, I saw?What are the kinds of things that you would have noticed that I clearly did not (since I did not mention them here)?
I’d love your input: If your student lab for GFD tank experiments had to downsize, but you had to present a “wish list” for a smaller replacement, what would be on that list? Below are my considerations, but I would be super grateful for any additional input or comments! :-)
Background and “boundary conditions”
The awesome towing tank that you have come to love (see picture above) will have to be removed to make room for a new cantina. It might get moved into a smaller room, or possibly replaced all together. Here are some external requirements, as far as I am aware of them:
the (new) tank should ideally be movable so the (small) room can be used multi-purpose
since the new room is fairly small, people would be happy if the new tank was also smaller than the old one
the rotating table is kept (and a second, smaller one, exists in the building)
There are other, smaller tanks that will be kept for other experiments, dimensions approximately 175x15x40cm and smaller
the whole proposal needs to be inexpensive enough so that the likelyhood that it will actually be approved is moderate to fair ;-)
Here are a couple of things I think need to be definitely considered.
Dimensions of the tank
If the tank was to be replaced by a smaller one, how small could the smaller one be?
The dimension of the new tank depend, of course, on the type of experiment that should be done in the tank. Experiments that I have run in the tank that is to be replaced and that in my opinion should definitely be made possible in the new location/tank include
“Dead water”, where a ship creates internal waves on a density interface (instructions)
Internal lee waves & hydraulic jumps, where a mountain is moved at the bottom of the tank (instructions)
Surface waves running up on a slope (I haven’t blogged about that yet, movies waiting to be edited)
If we want to be able to continue running these experiments, here is why we should not sacrifice the dimensions of the tank.
Why we need the tank length
The first reason for keeping the length of the tank is that the “mountains” being towed to create the lee waves are already 1 and 1.5m long, respectively. This is a length that is “lost” for actual experiments, because obviously the mountain needs space inside the tank on either end (so in its start and end position). Additionally, when the mountain starts to move, it has to move for some distance before the flow starts displaying the features we want to present: Initially, there is no reservoir on the “upstream” side of the mountain and it only builds up over the first half meter or so.
The second reason for keeping the length of the tank are wave reflections once the ship or mountain comes close to the other side of the tank. Reflected surface waves running against the ship will set up additional drag that we don’t want when we are focussing on the interaction between the ship and the internal wave field. Reflected internal waves similarly mess things up in both experiments
The third reason for keeping the length of the tank is its purpose: as teaching tank. Even if one might get away with a slightly shorter tank for experiments when you just film and investigate the short stretch in the middle of the tank where there are no issues with either the push you gave the system when starting the experiment or the reflections when you get near the end, the whole purpose of the tank is to have students observe. This means that there needs to be a good amount of time where the phenomenon in question is actually present and observable, which, for the tank, means that it has to be as long as possible.
Why we need the tank width
In the experiments mentioned above, with exception of the “dead water” experiment, the tank represents a “slice” of the ocean. We are not interested in changes across the width of the tank, and therefore it does not need to be very wide. However, if there is water moving inside the tank, there will be friction with the side walls and the thinner the tank, the more important the influence of that friction will become. If you look for example at the surface imprint of internal wave experiment, you do see that the flow is slowed down on either side. So if you want flow that is outside of the boundary layers on either side, you need to keep some width.
Secondly, not changing the tank’s width has the advantage that no new mountains/ships need to be built.
Another, practical argument for a wide-ish tank (that I feel VERY strongly about) is that the tank will need to be cleaned. Not just rinsed with water, but scrubbed with a sponge. And I have had my hands inside enough tanks to appreciate if the tank is wide enough that my arm does not have to touch both sides at all times when reaching in to clean the tank.
Why we need the tank depth
The first reason for keeping the height is that for the “dead water” experiment, even the existing tank is a lot shallower than what we’d like from theory (more here). If we go shallower, at some point the interactions between the internal waves and the ground will become so large that it will mess up everything.
Another reason for keeping the depth is the “waves running up a slope” experiment. If you want waves running up a slope (and building up in height as they do), you have the choice between high walls of the tank or water spilling. Just sayin’…
And last not least: this tank has been used in “actual” research (rather than just teaching demonstrations, more on that on Elin’s blog), so if nothing else, those guys will have thought long and hard about what they need before building the tank…
Without getting too philosophical here about models and what they can and cannot achieve (and tank experiments being models of phenomena in the ocean), the problem is that scaling of the ocean into a tiny tank does not work, so “just use a mountain/boat half the size of the existing ones!” is actually not possible. Similarly to how if you build the most amazing model train landscape, at some point you will decide that tiny white dots are accurate enough representations of daisies on a lawn, if you go to a certain size, the tank will not be able to display everything you want to see. So going smaller and smaller and smaller just does not work. A more in-depth and scientific discussion of the issue here.
Other features of the tank
When building a new tank or setting up the existing tank in a new spot, there are some features that I consider to be important:
The tank needs a white, intransparent back wall (either permanently or draped with something) so that students can easily focus on what is going on inside the tank. Tank experiments are difficult to observe and even more difficult to take pictures of, the better the contrast against a calm background, the better
The tank should be made of glass or some other material that can get scrubbed without scratching the surface. Even if there is only tap water in the tank, it’s incredible how dirty tanks get and how hard they have to be scrubbed to get clean again!
The tank needs plenty of inlets for source waters to allow for many different uses. With the current tank, I have mainly used an inlet through the bottom to set up stratifications, because it allowed for careful layering “from below”. But sometimes it would be very convenient to have inlets from the side close to the bottom, too. And yes, a hose could also be lowered into the tank to have water flow in near the bottom, but then there needs to be some type of construction on which a hose can be mounted so it stays in one place and does not move.
There needs to be scaffolding above the tank, and it needs to be easily modifiable to mount cameras, pulleys, lights, …
We need mechanism to tow mountains and ships. The current tank has two different mechanisms set up, one for mountains, one for ships. While the one for the ship is home-made and easily reproducible in a different setting (instructions), the one to tow the mountain with is not. If there was a new mechanism built, one would need to make sure the speeds at which the mountain can be towed matches the internal wave speed to be used in the experiment, which depends on the stratification. This is easy enough to calculate, but it needs to be done before anything is built. And the mechanism does require very securely installed pulleys at the bottom of the tank which need to be considered and planned for right from the start.
“Source” reservoirs
The “source” reservoirs (plural!) are the reservoirs in which water is prepared before the tank is filled. It is crucial that water can be prepared in advance; mixing water inside the tank is not feasible.
There should be two source reservoirs, each large enough to carry half the volume of the tank. This way, good stratifications can be set up easily (see here for how that works. Of course it works also with smaller reservoirs in which you prepare water in batches as you see below. But what can happen then is that you don’t get the water properties exactly right and you end up seeing stuff you did not want to see, as for example here, which can mess up your whole experiment)
Both reservoirs should sit above the height of the tank so that the water can be driven into the tank by gravity (yes, pumps could work, too, more on that below).
“Sink” reservoir
Depending on the kind of dyes and tracer used in the water, the water will need to be collected and disposed of rather than just being poured down the drain. The reservoir that catches the “waste” water needs to
be able to hold the whole volume of the tank
sit lower than the tank so gravity will empty the tank into the reservoir (or there needs to be a fast pump to empty the tank, more on that below)
be able to be either transported out of the room and the building (which means that doors have to be wide enough, no steps on the way out, …) or there needs to be a way to empty out the reservoir, too
be able to either easily be replaced by an empty one, or there needs to be some kind of mechanism for who empties it within a couple of hours of it being filled, so that the next experiment can be run and emptied out
If the waste water is just plain clear tap water, it can be reused for future experiments. In this case, it can be stored and there need to be…
Pumps
If reservoirs cannot be located above and below tank height to use gravity to fill and empty the tanks, we need pumps (plural).
A fast pump to empty out the tank into the sink reservoir, which can also be used to recycle the water from the sink reservoir into the source reservoirs
One pump that can be regulated very precisely even at low flow rates to set the inflow into the tank
Preferable the first and the latter are not the same, because changing settings between calibrating the pump for an experiment, setting it on full power to empty the tank, and calibrating it again will cause a lot of extra work.
Inlets for dyes
Sometimes it would be extremely convenient if there was a possibility to insert dyes into the tank for short, distinct periods of time during filling to mark different layers. For this, it would be great to be able to connect syringes to the inlet
Hoses and adapters
I’ve worked for years with whatever hoses I could find, and tons of different adapters to connect the hoses to my reservoir, the tap, the tank. It would be so much less of a hassle if someone thought through which hoses will actually be needed, bought them at the right diameter and length, and outfitted them with the adapters they needed to work.
Space to run the experiment
The tank needs to be accessible from the back side so the experimenter can run the experiment without walking in front of the observers (since the whole purpose of the tank is to be observed by students). The experimenter also needs to be able to get out from behind the tank without a hassle so he or she can point out features of interest on the other side.
Also, very importantly, the experimenter needs to be able to reach taps very quickly (without squeezing through a tight gap or climbing over something) in case hoses come loose, or the emergency stop for any mechanism pulling mountains in case something goes wrong there.
Space for observers
There needs to be enough room to have a class of 25ish students plus ideally a handful of other interested people in the room. But not only do they need to fit into the room, they also need to be able to see the experiments (they should not have to stand in several rows behind each other, so all the small people in the back get to see are the shoulders of the people in front). Ideally, there will be space so they can duck down to have their eyes at the same height as the features of interest (e.g. the density interface). If the students don’t have the chance to observe, there is no point of running an experiment in the first place.
Filming
Ideally, when designing the layout of the room, it is considered how tank experiments will be documented, i.e. most likely filmed, and there needs to be space at a sufficient distance from the tank to set up a tripod etc..
Lighting
Both for direct observations and for students observing tank experiments, it is crucial that the lighting in the room has been carefully planned so there are minimal reflections on the walls of the tank and students are not blinded by light coming through the back of the tank if a backlighting solution is chosen.
Summary
In my experience, even though many instructors are extremely interested in having their students observe experiments, there are not many people willing to run tank experiments of the scale we are talking about here in their teaching. This is because there is a lot of work involved in setting up those experiments, running them, and cleaning up afterwards. Also there are a lot of fears of experiments “going wrong” and instructors then having to react to unexpected observations. Running tank experiments requires considerable skill and experience. So if we want people using the new room and new tank at all, this has to be made as easy as possible for them. Therefore I would highly recommend that someone with expertise in setting up and running experiments, and using them in teaching, gets involved in designing and setting up the new room. And I’d definitely be willing to be that person. Just sayin’ ;-)
Just in case you have not listened to Ronja and Maxie’s podcast Treibholz yet, you definitely should! Ronja and Maxie are learning about oceanography and taking everyone along with them. Educational and entertaining to listen to!
And then I also got to be part of it last year, which was great fun! Check out the episodes that include interviews with me:
In the first one (actually their episode 15), we talk about what made me want to study oceanography, what drives the gulf stream, the importance of eddies in the ocean, and a lot more.
And then there are three advent specials, each approximately 10 minutes long, talking about being at sea on research cruises (1. Advent on why it’s awesome to be at sea, 2. Advent on what is being measured on oceanographic cruises, 3. Advent on what it’s like at sea).
And now I am eagerly awaiting the new and exciting stuff that will happen on Treibholz in 2019, looking forward to listening to more oceanography with Maxie and Ronja!
There is a theme these days: one of Hamburg’s most famous sights, the concert hall called Elbphilharmonie.
And not only is it a pretty impressive buildings, it’s located right at the port of Hamburg, and, more importantly, right across from my new work place!
Yesterday morning there was a lot of ice on the puddle in front of it (above), this morning, by the time I got there, it was crushed (below).
And when I left tonight, there was some drizzle in the air and I did not feel like checking on the puddle.
Are you going to see this every day now? No, fear not — there are some cool blog posts in the pipeline! :-)
From dawn til dusk (which wasn’t actually as long a time as it sounds ;-)), first day in my new job as programme manager of the citizen science project on biodiversity “GEO-Tag der Natur“. I am looking forward to great views on the way to and from work! And I am suuuper excited to be starting this job! I will tell you more about it once I had the chance to settle in a little.
Even though wave watching is not part of the job, I could not help but notice those puddles. Not only because of the reflections of Elbphilharmonie on them, but because when I arrived there was a little ice on them (see above)! Which was gone when I left, but there were some tiny wind ripples (see below). Which one do you think is more beautiful? I can’t decide!