Tag Archives: teaching

Bridging the gap between conventional mathematics teaching and the topics that engineering students are really interested in

I’m very excited to announce that I, together with Christian Seifert, have been awarded a Tandem Fellowship by the Stifterverband für die Deutsche Wissenschaft. Christian, among other things, teaches undergraduate mathematics for engineers, and together we have developed a concept to improve instruction, which we now get support to implement.

The problem that we are addressing is that mathematics is taught to 1300 students from 12 different engineering study programs at once. At the moment, in addition to lectures and practice sessions in both very large and small groups, students get weekly online exercises that they can earn bonus points with. Student feedback is positive – they appreciate the opportunity to practice, they like that they are nudged towards continuously working on whatever is currently going on in class, and obviously they like to earn bonus points they can use on the exam.
However, mathematics is not typically a subject that non-mathematicians are very keen on. Many feel like there is no relevance of the content to their lives or even their studies. And many don’t feel confident they have a chance to succeed.
As I wrote in my recent posts on motivation, both believing that you can succeed and seeing the relevance of things you are supposed to be studying to your life are necessary for people to feel intrinsically motivated. So this is where we want to start.
Since the experience with the weekly online tests is so positive, we want to develop exercises that apply the mathematics they are currently learning to topics from their own, chosen fields. So if they are supposed to practice solving a set of linear equations, students of mechanical engineering, for example, might as well use one from a mechanical engineering case. Or even better: they might be asked to develop this set of equations first, and then solve it. By connecting mathematics with topics students are really interested in, we hope to get them to engage more with matematics.
More engagement will then likely mean that they improve their understanding both of mathmatics itself and – equally important – of their main subjects, where currently manystudents lack the math skills required. At the same time, we hope this will increase student motivation for both subjects.
Of course, there is still a lot of work to be done to first implement this concept and then evaluate whether it is working as well as we thought it would, and then probably modifying it and evaluating some more. But I am excited to get started!

What does the awkward silence mean?

I really want to recommend a blog post by Paul T. Corrigan that I recently read on “Teaching and Learning in Higher Ed”: When students don’t answer a question, what does the awkward silence mean?

We’ve all been there: We’ve asked a question and nobody replied. Worse, even, they avoid our eyes. What can we do? Check out the post for a surprisingly simple idea!

Guest post: Estimating salinity as a homework assignment

Today I am super excited to share a guest post that my awesome friend Joke Lübbecke wrote for us. Joke is a professor in physical oceanography in Kiel, and we like to chat about teaching occasionally. She has great ideas for exciting tasks for students to do and I bet they learn a lot from her. Here is what she writes (and the photos in this post are the original photos that her students kindly agreed to let us use on this blog. Thanks very much!):

Estimating salinity as a homework assignment

When I gave the second-year oceanography students in my class bottles of salt water and – without any further instructions – asked them to find out what the salinity was, I wasn’t really sure what to expect. Would they just take a sip and guess 35? Would they all use the same approach? So when they handed in their solutions in the following week I was very happy to see how creative they had been and how many different things they had tried to get to an answer. For example, they had

  • Evaporated the water and weighted the dry salt
Joke_image001

Evaporating water from salt water and weighing the remaining salt to measure salinity

  • Used differences in buoyancy between salt and fresh water
Joke_image002

Measuring salinity by comparing buoyancy with known samples

  • Measured the electric resistance of the sample, then tried to mix a solution with the same resistance by adding more and more (defined quantities of) salt to a fresh water sample
Joke_image003

Measuring salinity by measuring the resistance of the sample and reproducing a sample with known salinity and the same resistance

or simply

  • Tasted the sample and compared to water samples with known salinities :-)

The numbers they came up with were as diverse as their approaches so this was also a nice demonstration of the difficulties to accurately measure salinity.

(And of course the salinity of the water sample they got was about 35, but who cares? – the journey is the reward!)

Facilitating student group work

Grouping students together for collaborative work is easy, but how do we make them work as a team?
Collaborative learning is often propagated as the ultimate tool to increase learning outcomes, help students learn at a deeper level and remember what they learned for longer, and become better team players as professionals. But many people I work with perceive “group work” as a hassle that costs a lot of time, lets weak or lazy students hide behind others, breeds conflict, and is deemed more of a “kindergarten” method than worthy of being used at a university.
I recently found a paper that addresses all those issues and – even better – provides instruction on how to organize student team work! “Turning Student Groups into Effective Teams” by Oakley et al., 2004. I’ll give a brief summary of their main points below.


Should you even form teams?
Do you form them or let them form themselves? The authors are clear on this point:
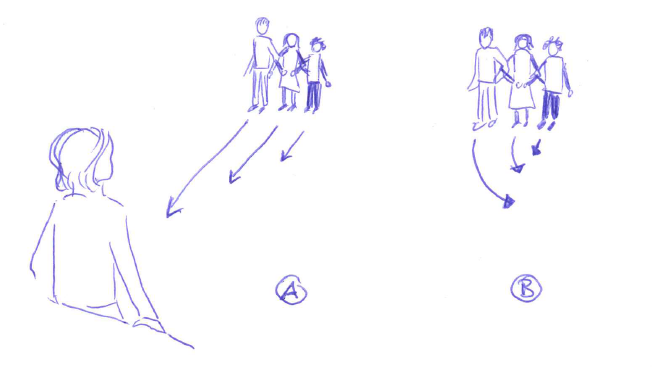
“Instructors should form teams rather than allowing students to self-select.” As we’ve seen over and over, if students are allowed to find themselves together in the groups they’d like to work in, weak students will likely end up working together, and strong students will end up working together. This is, for obvious reasons, not optimal for the weak groups, but also the strong groups don’t benefit as much from the assignments as they could when working in mixed groups: Strong students tend to divvy up the work among themselves and put pieces together in the end without much discussion of how the individual pieces fit, ignoring the bigger picture. Forming student groups rather than having them self-select will raise objections from the students, but it is probably worth facing that discussion anyway.


Then how do you form groups?
The authors present two guidelines, based on previous research:
1. Make sure groups are diverse in ability and that they have common free time slots outside of class so they have a chance to meet up.
2. Make sure at-risk minority students are well included in their groups
Team sizes, they say, are optimally between 3 and 5 members.
The second guide line on at-risk minority students is interesting: In the case of women being the minority you are currently concerned about, they suggest to form groups with all men, all women, two of each, two or three women and one man, but not one woman and two or three men, because the isolation that woman might feel within her team could reinforce the feeling of isolation at university.


And what data do you need to form groups?
This is where I am not sure the authors’ advice can be applied to our situation. Of course, it is desirable to know grades in previous courses etc, but collecting that data is problematic in our legal system.


And what if I want to re-form groups?
The authors announce that they will re-shuffle after 4-6 weeks unless they get individual signed requests to stay together from all team members. Which they report they do from most teams except the really dysfunctional ones. They also report that difficult (domineering or uncooperative) team members usually behave a lot better in the new teams.


So now we have groups. But how do we build effective teams?
The authors say “With a group, the whole is often equal to or less than the sum of its parts; with a team, the whole is always greater.”, so investing into team building is definitely worthwhile. The fist thing they recommend is to


-> establish expectations
This consists of two steps: Set out clear guidelines and have team members formulate a common set of expectations of one another. The authors provide forms to help guide the process, a statement of policies and an agreement on expectations. The former gives guidelines of how good teamwork should be done, the latter is a form that students sign and hand in.
A nice tip is to have students name their teams, maybe based on common interests, to help build identity in the team.


-> give instructions on effective team practices
In order for students to learn to work in teams effectively, the authors give several pieces of advice that they tell students:
– Stick to your assigned roles! It will make teamwork run more smoothly, plus each roles comes with a skill set that you are expected to practice while filling that role, so don’t cheat yourself out of that learning experience
– Don’t “divide and conquer”. If you split up the work and only stick it back together in the end, you won’t learn enough about all parts of the project to fully understand what we want you to understand.
– Come up with solutions individually and then discuss them as a team. If you are always listening to the fastest person on your team coming up with ideas, you won’t get the practice yourself that you need later.


Dealing with problematic team members
Have you ever been on a team where everybody pulled their fair share of the weight, nobody tried domineering the group, nobody refused to work in the team, and everybody had the same goal? Right, me neither. So what can you do?
The authors suggest handing out a short text on “coping with hitchhikers and couch potatoes on teams” and ask students to write a short essay on it. Having them write something about the text makes sure they have actually read it – and maybe even thought about it. The authors state – and I find this super interesting even though not surprising – that “probably the best predictor of a problematic team member is a sloppy and superficial response to this assignment.”


-> firing students from teams, or students quitting
The authors present a model of “firing” problematic students from teams, or individual students resigning, where the whole group has to go through a counseling session with the instructor. Both parties learn to actively listen, repeating the complainer’s case back to the complainer. This, the authors say, almost always resolves the problem because by verbalizing someone else’s position, a reflexion process sets in. If things are not resolved, however, a week later a letter is sent notifying everybody on the team and the instructor of the intention of firing or quitting. A week later, if things haven’t improved, a second letter is sent, again to everybody on the team plus the instructor, finalizing the decision. Apparently this hardly ever happens because things have resolved themselves before.


For those students that do get fired there are several possible models: They can either get zeros on the team assignments for the rest of the year, or find another team that is willing to take them on. The authors point out the importance of having those rules written out in the time and age of lawsuits.


-> the crisis clinic
Another measure that the authors suggest is to occasionally run “crisis clinics”, i.e. short sessions on problematic behaviors, like for example hitchhiking, and putting students together to brainstorm how to deal with those issues. Collecting ideas serves two purposes: To show hitchhikers how frustrated the rest of the group might get with their behavior, and also to equip everybody with the strategies to deal with that kind of behavior.

But it is also important to point out to students that if they continue putting a hitchhiker’s name on the group assignment, they can’t complain later.


Puuuuh. The authors continue on, talking about peer grading and going through a long list of FAQs, but I think for today I’ve written enough. But check out the paper, there is so much more in there than I could talk about here!

Barbara Oakley, Rebecca Brent, Richard M. Felder, & Imad Elhajj (2004). Turning Student Groups into Effective Teams New Forums Press, Inc., P. O. Box 876, Stillwater, OK

Rogue waves in a bath tub

Trying to create rogue waves in the bath tub of the infamous “red house”.

As a part of their projects, students in the CMM31 in Isafjördur course had to conduct an experiment, document and interpret it. One of the students, Silvia, chose to create rogue waves in the bath tub of the “red house”, one of the student houses, and I was invited to participate and eat delicious cupcakes.

Since rogue waves can have devastating effects on ships they encounter, clearly we had to have a ship. None were to be found, so we had to make our own.

Since most studies of rogue waves in wave tanks had a hard time actually producing the waves (and a bathtub might not be the most ideal setup) we did not have high hopes that our experiment would be successful. And we did not manage to produce rogue waves in the strict sense – but we managed to avoid major spillage of the tub and still sink a couple of the paper boats, so at least we were getting some results.

Great to see students do experiments on a Sunday afternoon!

How sound is refracted towards the regions of minimum speed.

Students acting out the process of sound being refracted towards the region of minimum speed.

We’ve been talking about refraction lately. Waves get bent in the direction of lower velocity. This holds for light and sound and even ocean waves. However, students find it conceptually difficult to understand why waves are being bent towards lower rather than higher speeds, so I came up with this very simple demonstration.

Students, arms joint, are acting as a wave crest. Students on the one side of the student chain are told to move very slowly, students on the other side are asked to move quickly towards the instructor. Everybody takes care to not hurt anybody, so if tension builds up in the chain, everybody has to react to reduce the tension. What happens is that the “wave crest” of students changes direction towards the side of the slowest motion.

Easy visualization and – since it involved students getting up, joining arms and doing something – also very memorable. Win – win!

Another easy example: When you are sliding on an icy road and your foot gets caught in grass or gravel or something on one side (== region of lower velocity), you start skidding towards the side with the obstacle, not towards the middle of the icy road.

Examinations via Skype.

My experience with an examination via Skype.

In 2012, I taught two lectures via Skype at the University Centre of the Westfjords, while actually physically sitting in Norway. That experience is described in this post. When writing that post, I remembered that I also have experience in doing examinations via Skype. Except that experience was as a student, not as a teacher. In 2011, I defended a Master’s thesis at the University of Hamburg while, again, being physically located in Norway. How did that work out?

Defending a thesis via Skype is not that uncommon these days and actually a very easy, cheap and environmentally friendly way of defending when you no longer live in the place where you studied (or when you cannot travel there for other reasons). The way it worked in my case was that I had two opponents on the call, and since we were all to cheap for the upgrade, we could only hear each other and did not have a video connection. Which made it less stressful for me – when I am video-skyping, I tend to focus on my own video way too much, and thinking about how weird my hair looks or how I should sit in a specific position to block something behind me that would otherwise be visible. This tends to take away brain power from the topic I should be focussing on. Since I knew both their voices, there was also not an issue with knowing who was speaking at any given time (if you are ever on a call/skype with a group of people and there is even one person who doesn’t know everybody else really well: Please make sure to always announce who you are when you start speaking!).

I had to give a presentation, which I did by sending them the slides in advance and asking them to look at specific slides while I was talking about them. Thanks to my friend Nadine who let me borrow her apartment, I had a fast internet connection and privacy. What more do you need?

The only stressful time was waiting for them to call back after the exam when they were discussing my grade, but I guess that is a really stressful time no matter the setting.

So yes – examinations via Skype are actually a good option! No bad experiences here.

Hydrothermal springs

Hydrothermal springs that you can visit without a deep-sea submersible.

When teaching about hydrothermal springs, I usually use a video a friend of mine took of hydrothermal vents on the mid-Atlantic ridge on the WHOI submersible Alvin. But being on Iceland now, there is much better material available which students can even go and experience themselves.

In the Blue Lagoon close to Reykjavik.

I am too chicken to take my camera under water in the Blue Lagoon to film the hot springs, but there are other hot springs all over Iceland that are less scary, for example this one that my friend Astrid found in the middle of a meadow.

MVI_4960b

View from the top into the hot spring – do you see the bubbles breaking the surface?

And here I even dared take my camera under water.

View of the hot spring under water – that’s where the bubbles come from!

Granted, this is not quite as impressive as a black smoker or the Blue Lagoon. But the water in the whole little lake was warmer than about 40 degrees Celsius, and the hot spring is sitting randomly in a field. That’s hand-on geothermal heating for you!

On drawing on the board by hand in real time

Drawing by hand on the board in real time rather than projecting a finished schematic?

It is funny. During my undergrad, LCD projectors were just starting to arrive at the university. Many of the classes I attended during my first years used overhead projectors and hand-written slides, or sometimes printed slides if someone wanted to show really fancy things like figures from a paper. Occasionally people would draw or write on the slides during class, and every room that I have ever been taught in during that time did have several blackboards that were used quite frequently.

These days, however, things are differently. At my mom’s school, many classrooms don’t even have blackboards (or whiteboards) any more, but instead they have a fancy screen that they can show things on and draw on (with a limited number of colors, I think 3?). Many rooms at universities are similarly not equipped with boards any more, and most lectures that I have either seen or heard people talk about over the last couple of years exclusively use LCD projectors that people hook up to their personal laptops.

On the one hand, that is a great development – it is so much easier to show all kinds of different graphics and also to find and display information on the internet in real time. On the other hand, though, it has become much more difficult to talk students through graphics slowly enough that they can draw with you as you are talking and at the same time understand what they are drawing.

Sketch of the mechanisms causing westward intensification of subtropical gyres – here the “before” stage where the symmetrical gyre would spin up since the wind is inputting more vorticity that is being taken out by other mechanisms.

The other day, I was teaching about westward intensification in subtropical gyres. For that, I wanted to use the schematics above and below, showing how vorticity input from the wind is balanced by change in  vorticity through change in latitude as well as through friction with the boundary. I had that schematic in my powerpoint presentation, even broken down into small pieces that would be added sequentially, but at last minute decided to draw it on the whiteboard instead.

Sketch of the mechanisms causing westward intensification of subtropical gyres – here the “after” stage – the vorticity input by wind is balanced by energy lost through friction with the western boundary in an asymmetrical gyre. Voila -your western boundary current!

And I am convinced that that was a good decision. Firstly, drawing helped me mention every detail of the schematic, since I was talking about what I was drawing while drawing it. When just clicking through slides it happens much more easily that things get forgotten or skipped. Secondly, since I had to draw and talk at the same time, the figure only appeared slowly enough on the board that the students could follow every step and copy the drawing at the same time. And lastly, the students saw that it is actually possible to draw the whole schematic from memory, and not just by having learned it by heart, but by telling the story and drawing what I was talking about.

Does that mean that I will draw every schematic I use in class? Certainly not. But what it does mean is that I found it helpful to remember how useful it is to draw occasionally, especially to demonstrate how I want students to be able to talk about content: By constructing a picture from scratch, slowly building and adding on to it, until the whole theory is completed.

Why do we get an Ekman spiral?

Visualizing an Ekman spiral using a deck of cards.

To state this right upfront: this post will not explain why the surface layer is moving at a 45 degree angle to the wind direction, and if anyone has a great idea for a simple demo for that please let me know! It will also not explain why the layers are turning further and further the deeper down you go. But what I am trying to do today is give an intuitive understanding for why all the theoretical layers in the water column turn in response to the surface layer and hence why an Ekman spiral develops if we accept that the surface layer is turning relative to the wind direction.

Demonstrating the formation of an Ekman spiral using a deck of cards.

You will need a deck of cards. Bonus points if they are “salmon fly” cards like mine (seriously – who could walk past a deck of cards with salmon flies on them? Plus I needed a deck of cards because I was already in Iceland when I realized I wanted to show this demo).

All you do now is put the stack in front of you. Put your hand on the top card, twist gently while applying a little bit of pressure. Voila – your Ekman spiral develops! It is turning the wrong way round, but the main point is that the twist is being transferred downwards from layer to layer and not only the top layer twisting while the other layers stay motionless.

And because people seem to always like movies: