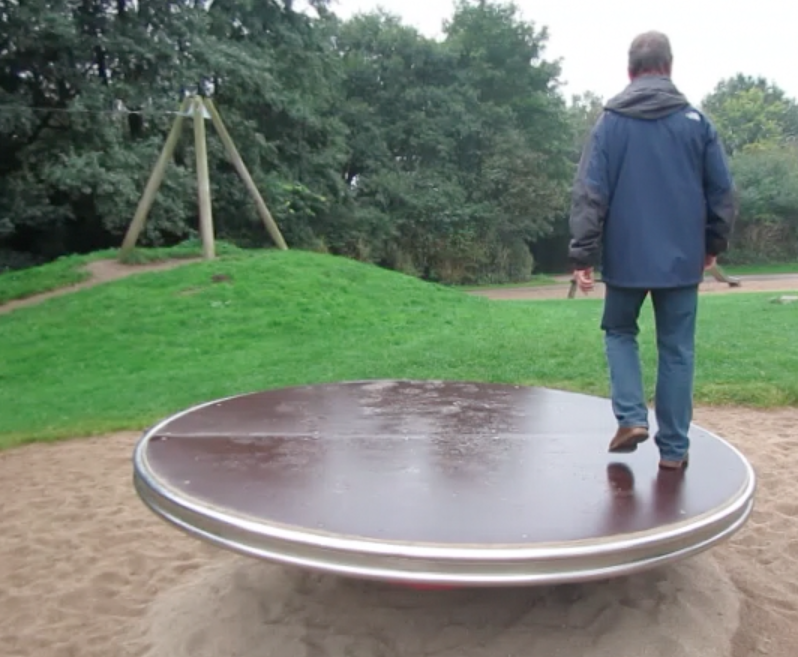
So how do we teach about the Coriolis force? The following is a shortened version of an article that Pierre de Wet and I wrote when I was still in Bergen, check it out here.
The Coriolis demonstration
A demonstration observing a body on a rotating table from within and from outside the rotating system was run as part of the practical experimentation component of the “Introduction to Oceanography” semester course. Students were in the second year of their Bachelors in meteorology and oceanography at the Geophysical Institute of the University of Bergen, Norway. Similar experiments are run at many universities as part of their oceanography or geophysical fluid dynamics instruction.
Materials:
- Rotating table with a co-rotating video camera (See Figure 1. For simpler and less expensive setups, please refer to “Possible modifications of the activity”)
- Screen where images from the camera can be displayed
- Solid metal spheres
- Ramp to launch the spheres from
- Tape to mark positions on the floor
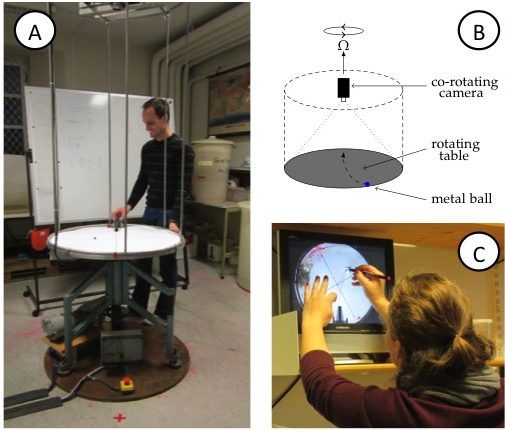
Figure 1A: View of the rotating table. Note the video camera on the scaffolding above the table and the red x (marking the catcher’s position) on the floor in front of the table, diametrically across from where, that very instant, the ball is launched on a ramp. B: Sketch of the rotating table, the mounted (co-rotating) camera, the ramp and the ball on the table. C: Student tracing the curved trajectory of the metal ball on a transparency. On the screen, the experiment is shown as filmed by the co-rotating camera, hence in the rotating frame of reference.
Time needed:
About 45 minutes to one hour per student group. The groups should be sufficiently small so as to ensure active participation of every student. In our small lab space, five has proven to be the upper limit on the number of students per group.
Student task:
In the demonstration, a metal ball is launched from a ramp on a rotating table (Figure 1A,B). Students simultaneously observe the motion from two vantage points: where they are standing in the room, i.e. outside of the rotating system of the table; and, on a screen that displays the table, as captured by a co-rotating camera mounted above it. They are subsequently asked to:
- trace the trajectory seen on the screen on a transparency (Figure 1C),
- measure the radius of this drawn trajectory; and
- compare the trajectory’s radius to the theorized value.
The latter is calculated from the measured rotation rate of the table and the linear velocity of the ball, determined by launching the ball along a straight line on the floor.
Instructional approach
In years prior to 2012, the course had been run along the conventional lines of instruction in an undergraduate physics lab: the students read the instructions, conduct the experiment and write a report.
In 2012, we decided to include an elicit-confront-resolve approach to help students realize and understand the seemingly conflicting observations made from inside versus outside of the rotating system (Figure 2). The three steps we employed are described in detail below.
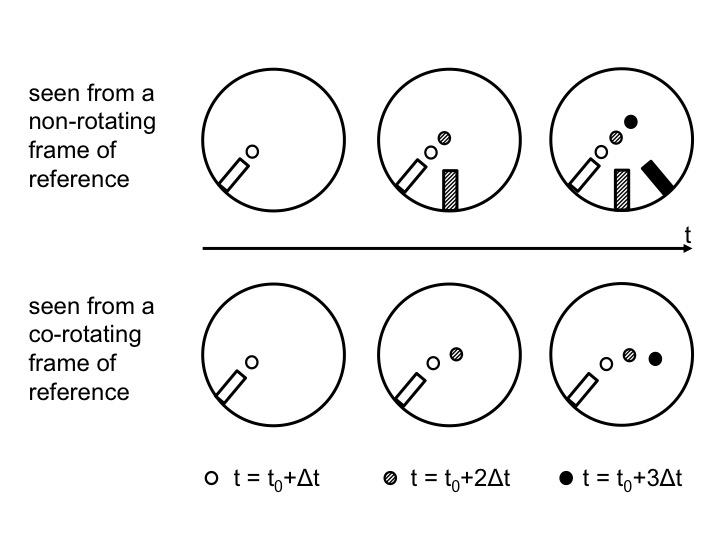
Figure 2: Positions of the ramp and the ball as observed from above in the non-rotating (top) and rotating (bottom) case. Time progresses from left to right. In the top plots, the position in inert space is shown. From left to right, the current position of the ramp and ball are added with gradually darkening colors. In the bottom plots, the ramp stays in the same position, but the ball moves and the current position is always displayed with the darkest color.
- Elicit the lingering misconception
1.a The general function of the “elicit” step
The goal of this first step is to make students aware of their beliefs of what will happen in a given situation, no matter what those beliefs might be. By discussing what students anticipate to observe under different physical conditions before the actual experiment is conducted, the students’ insights are put to the test. Sketching different scenarios (Fan (2015), Ainsworth et al. (2011)) and trying to answer questions before observing experiments are important steps in the learning process since students are usually unaware of their premises and assumptions. These need to be explicated and verbalized before they can be tested, and either be built on, or, if necessary, overcome.
1.b What the “elicit” step means in the context of our experiment
Students have been taught in introductory lectures that in a counter-clockwise rotating system (i.e. in the Northern Hemisphere) a moving object will be deflected to the right. They are also aware that the extent to which the object is deflected depends on its velocity and the rotational speed of the reference frame.
A typical laboratory session would progress as follows: students are asked to observe the path of a ball being launched from the perimeter of the circular, not-yet rotating table by a student standing at a marked position next to the table, the “launch position”. The ball is observed to be rolling radially towards and over the center point of the table, dropping off the table diametrically opposite from the position from which it was launched. So far nothing surprising. A second student – the catcher – is asked to stand at the position where the ball dropped off the table’s edge so as to catch the ball in the non-rotating case. The position is also marked on the floor with insulation tape.
The students are now asked to predict the behavior of the ball once the table is put into slow rotation. At this point, students typically enquire about the direction of rotation and, when assured that “Northern Hemisphere” counter-clockwise rotation is being applied, their default prediction is that the ball will be deflected to the right. When asked whether the catcher should alter their position, the students commonly answer that the catcher should move some arbitrary angle, but typically less than 90 degrees, clockwise around the table. The question of the influence of an increase in the rotational rate of the table on the catcher’s placement is now posed. “Still further clockwise”, is the usual answer. This then leads to the instructor’s asking whether a rotational speed exists at which the student launching the ball, will also be able to catch it him/herself. Ordinarily the students confirm that such a situation is indeed possible.
- Confronting the misconception
2.a The general function of the “confront” step
For those cases in which the “elicit” step brought to light assumptions or beliefs that are different from the instructor’s, the “confront” step serves to show the students the discrepancy between what they stated to be true, and what they observe to be true.
2.b What the “confront” step means in the context of our experiment
The students’ predictions are subsequently put to the test by starting with the simple, non-rotating case: the ball is launched and the nominated catcher, positioned diametrically across from the launch position, seizes the ball as it falls off the table’s surface right in front of them. As in the discussion beforehand, the table is then put into rotation at incrementally increasing rates, with the ball being launched from the same position for each of the different rotational speeds. It becomes clear that the catcher need not adjust their position, but can remain standing diametrically opposite to the student launching the ball – the point where the ball drops to the floor. Hence students realize that the movement of the ball relative to the non-rotating laboratory is unaffected by the table’s rotation rate.
This observation appears counterintuitive, since the camera, rotating with the system, shows the curved trajectories the students had expected; circles with radii decreasing as the rotation rate is increased. Furthermore, to add to their confusion, when observed from their positions around the rotating table, the path of the ball on the rotating table appears to show a deflection, too. This is due to the observer’s eye being fooled by focusing on features of the table, e.g. cross hairs drawn on the table’s surface or the bars of the camera scaffold, relative to which the ball does, indeed, follow a curved trajectory. To overcome this latter trickery of the mind, the instructor may ask the students to crouch, diametrically across from the launcher, so that their line of sight is aligned with the table’s surface, i.e. at a zero zenith angle of observation. From this vantage point the ball is observed to indeed be moving in a straight line towards the observer, irrespective of the rate of rotation of the table.
To further cement the concept, the table may again be set into rotation. The launcher and the catcher are now asked to pass the ball to one another by throwing it across the table without it physically making contact with the table’s surface. As expected, the ball moves in a straight line between the launcher and the catcher, who are both observing from an inert frame of reference. However, when viewing the playback of the co-rotating camera, which represents the view from the rotating frame of reference, the trajectory is observed as curved.
- Resolving the misconception
3.a The general function of the “resolve” step
Misconceptions that were brought to light during the “elicit” step, and whose discrepancy with observations was made clear during the “confront” step, are finally corrected in the “resolve” step. While this sounds very easy, in practice it is anything but. The final step of the elicit-confront-resolve instructional approach thus presents the opportunity for the instructor to aid students in reflecting upon and reassessing previous knowledge, and for learning to take place.
3.b What the “resolve” step means in the context of our experiment
The instructor should by now be able to point out and dispel any remaining implicit assumptions, making it clear that the discrepant trajectories are undoubtedly the product of viewing the motion from different frames of reference. Despite the students’ observations and their participation in the experiment this is not a given, nor does it happen instantaneously. Oftentimes further, detailed discussion is required. Frequently students have to re-run the experiment themselves in different roles (i.e. as launcher as well as catcher) and explicitly state what they are noticing before they trust their observations.
Possible modifications of the activity:
We used the described activity to introduce the laboratory activity, after which the students had to carry out the exercise and write a report about it. Follow-up experiments that are often conducted usually include rotating water tanks to visualize the effect of the Coriolis force on the large-scale circulation of the ocean or atmosphere, for example on vortices, fronts, ocean gyres, Ekman layers, Rossby waves, the General circulation and many other phenomena (see for example Marshall and Plumb (2007)).
Despite their popularity in geophysical fluid dynamics instruction at the authors’ current and previous institutions, rotating tables might not be readily available everywhere. Good instructions for building a rotating table can, for example, be found on the “weather in a tank” website, where there is also the contact information to a supplier given: http://paoc.mit.edu/labguide/apparatus.html. A less expensive setup can be created from old disk players or even Lazy Susans. In many cases, setting the exact rotation rate is not as important as having a qualitative difference between “fast” and “slow” rotation, which is very easy to realize. In cases where a co-rotating camera is not available, by dipping the ball in either dye or chalk dust (or by simply running a pen in a straight line across the rotating surface), the trajectory in the rotating system can be visualized. The method described in this manuscript is easily adapted to such a setup.
Lastly we suggest using an elicit-confront-resolve approach even when the demonstration is not run on an actual rotating table. Even if the demonstration is only virtually conducted, for example using Urbano & Houghton (2006)’s Coriolis force simulation, the approach is beneficial to increasing conceptual understanding.
 Now. All of those issues that come up are things you can talk about and that can be explained. But I’m wondering whether this demo didn’t cause more harm than good, since the impression that might have stuck in the end is that Coriolis deflection only works under very specific circumstances, but most of the time it does not.