Part 1 and 2 of this post were first posted on the EGU’s blog on Jan 29, 2016, and Feb 29, 2016, respectively.
Part 1 gives four steps to outreach activities, part 2 uses an example to further illustrate those four steps.
Part 1: For the best hands-on outreach experiences, just provide opportunities for playing!
“For the best hands-on outreach experiences, just provide opportunities for playing!” I claim. Seriously? You wonder. We want to spark the public’s curiosity about geosciences, engage the public in thinking about topics as important as sea level rise or ocean acidification, and provide learning experiences that will enable them to take responsibility for difficult decisions. And you say we should just provide opportunities for them to play?
Yes. Hear me out. Playing does not necessarily equal mindlessly killing time. Kids learn a lot by playing, and even grown ups do. But if you prefer, we can use the term “serious play” instead of just “play”. Using the term “serious play” makes it clear that we are talking about “improvising with the unanticipated in ways that create new value”, which is exactly what outreach should be doing: getting people intrigued and wanting to understand more about your topic.
So how would we go about if we wanted to create outreach activities which gave the public opportunity to play in order to lure them into being fascinated by our field of science? There are several steps I recommend we take.
-
Identify the topic nearest and dearest to your heart
Even if your aim is to educate the public about climate change or some other big picture topic, pick the one element that fascinates you most. If you are really fascinated by what you are showing, chances are that the excitement of doing the activity will carry over to your audience. Plus, once you have this really great activity, you will likely be asked to repeat it many times, so you had better pick one that you love! J
Me, I am a physical oceanographer. I care about motion in the ocean: Why and how it happens. Consequently, all of my outreach activities have people playing with water. Sometimes at different temperatures, sometimes at different salinities, sometimes frozen, sometimes with wind, but always with water.
-
Find an intriguing question to ask
Questions that intrigue me are, for example, “do ice cubes melt faster in fresh water or in salt water?”, “how differently will ice look when I freeze salt water instead of fresh water?” or “what happens if a stratification is stable in temperature and unstable in salt?”. Of course, all these questions are related to scientific questions that I find interesting, but even without knowledge of all the science around them, they are cool questions. And they all instantly spark follow-up questions like “what would happen if the ice cubes weren’t floating, but moored to the ground?”, “what if I used sugar instead of salt?”, “wait, does the food dye influence what happens here?”. And all of those questions can be investigated right then and there. As soon as someone asks a question, you hand them the materials and let them find the answer themselves. That is why we talk about hands-on outreach activities and not demonstrations: It is about actively involving everybody in the exploration and wonder of doing scientific experiments!
-
Test with family, friends and colleagues
Many, if not all, the outreach activities I am using and promoting have been tested on family, friends and colleagues before. You know that you have found an intriguing question when your friends sacrifice the last bit of red wine they brought at a Norwegian mountain cabin, to use as stand in for food dye in an experiment you just told them about, because they absolutely have to see it for themselves!
By the way, this is always good to aim at with outreach activities: always try to keep them easy enough to be recreated at a mountain cabin, in your aunt’s kitchen, at the beach or anywhere anyone who saw it or heard about it wants to show their friends. People might occasionally have to get a little creative to replace some of the materials, but that’s part of the charm and of the inquiry we want!
-
Bring all the materials you need, and have fun!
And then, finally, Just Do It! Bring all your materials and start playing and enjoying yourself!
But now they can play with water and dye. That doesn’t mean they understand my research!
True, by focussing on a tiny aspect you won’t get to explain the whole climate system. But you will probably change the mindset of your audience, at least a little bit. Remember, you studied for many years to come to the understanding you have now, it is not a realistic expectation to convey all that in just one single outreach occasion. But by showing how difficult it is to even understand one tiny aspect (and how much there is still to discover), they will be a lot more likely to inquire more in the future, they will ask better questions (to themselves or to others) and they will be more open to learning about your science. Your activity is only the very first step. It’s the hook that will get them to talk to you, to become interested in what you have to say, to ask questions. And you can totally have backup materials ready to talk in more depth about your topic!
But what if it all goes horribly wrong during my activity?
The good thing is that since you are approaching the whole hands-on outreach as “get them to play!” rather then “show them in detail how the climate system works”, there really isn’t a lot that can go wrong. Yes, you can mess up and the experiment can just not show what you wanted to show. But every time I have had that happen to me, I could “save” the situation by engaging the participants in discussing how things could work better, similar to what Céline describes. People will continue to think about what went wrong and how to fix it, and will likely be even more intrigued than if everything had worked out perfectly.
But what if I am just not creative enough to come up with new ideas?
First, I bet once you start playing, you will come up with new ideas! But then of course, we don’t need to always create outreach activities from scratch. There are many awesome resources around. EGU has its own large collection in the teacher’s corner. And of course, Google (or any websearch of your choice) will find a lot. And if you were interested in outreach activity in physical oceanography specifically, you could always check out my blog “Adventures in Oceanography and Teaching”. I’m sure you’ll find the one activity that you will want to try yourself on a rainy Sunday afternoon. You will want to show your friends when they comes over to visit, and you’ll tell your colleagues about it. And there you are – you found your outreach activity!
Part 2: One example of how playing works in outreach activities!
In part 1, I talked about hands-on outreach in very general terms, and identified four steps to great outreach. Today, I want to talk about those four steps in more detail, using one of my favourite outreach activities as an example.
Step 1. Identify the topic nearest and dearest to your heart
Me, I am a physical oceanographer. I care about motion in the ocean: Why and how it happens. Consequently, all of my outreach activities have to do with water. Sometimes at different temperatures, sometimes at different salinities, sometimes frozen, sometimes with wind, sometimes with ships, but always with water.
Today, let’s concentrate on thermohaline circulation as the topic we want to get people interested in. That sounds like a lot, so lets break it down: we want to know how oceanic circulation is influenced by both heat and salt in the ocean. To boil this down to one short activity, let’s take away the ocean (and with that all the complicating influences of Earth’s rotation, or topography of ocean basins) and only look at what heat and salt do with water in a tank. In fact, let us focus on different temperatures at first. The easiest way to do this is to introduce water of one temperature into a volume at a different temperature, this way we don’t have to deal with the heating or cooling processes.
Introducing water can mean pouring it into the larger tank, which will lead to some kind of stratification (provided your temperatures are different enough). In order to see the stratification, it always helps to have food dye in the water you are introducing (always put food dye in the smaller volume of water, makes it a lot easier to see the contrast!). To make things most interesting, it might be nice to show two cases simultaneously: pouring hot water and cold water into a lukewarm tank. And, since we see that the hot water forms a layer on top of the lukewarm water and the cold water at the bottom, wouldn’t it be much more fun to introduce them both somewhere at medium height and see what happens?
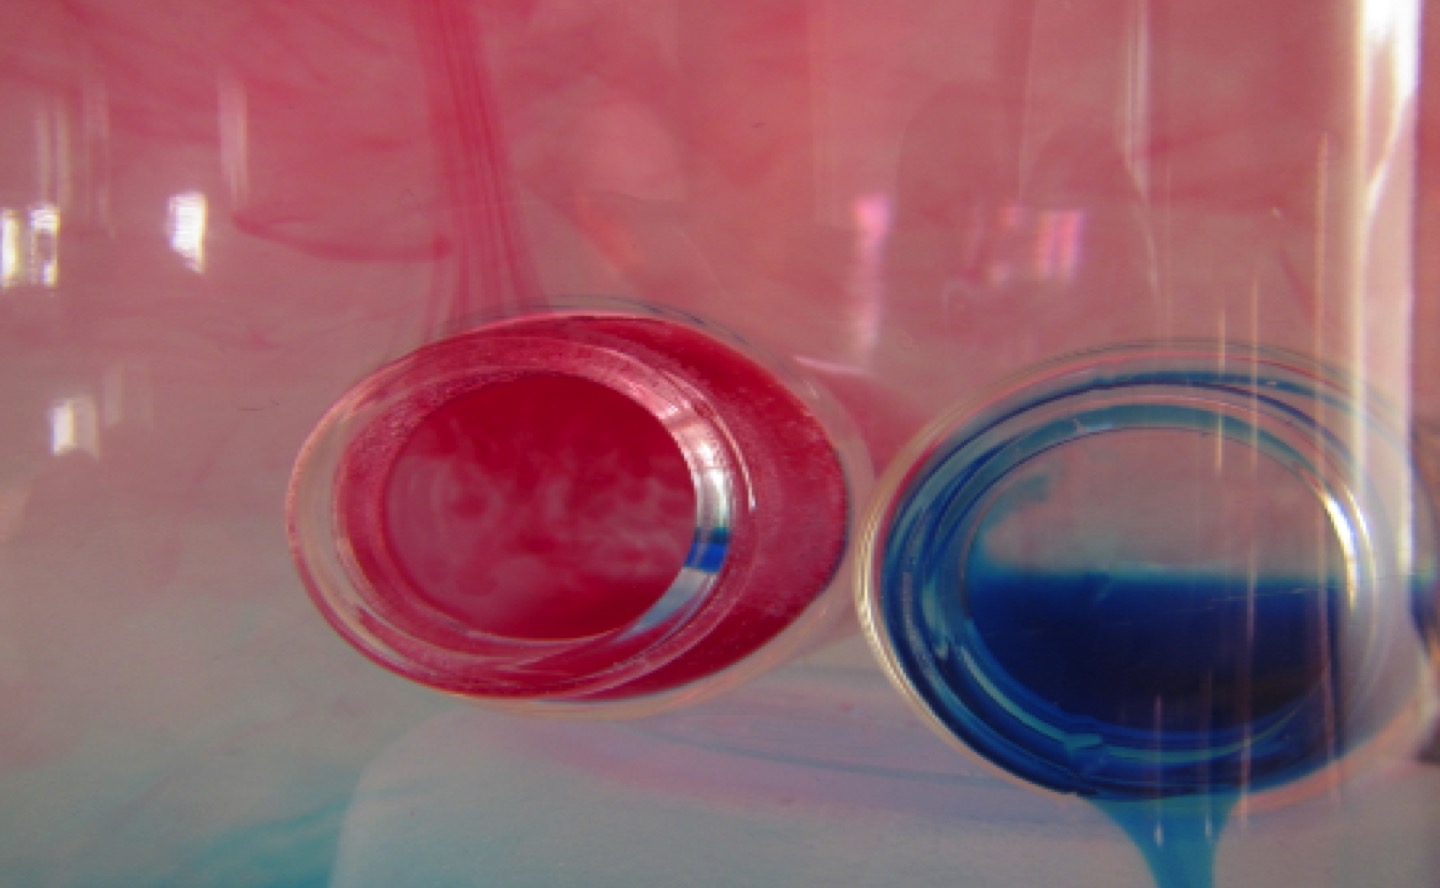
Two bottles, one filled with hot water (dyed red) and one filled with cold water (dyed blue) in a larger container of lukewarm water.
Step 2. Find an intriguing question to ask
Depending on who you want to reach as your main audience, you might need to ask different questions. For some audiences, the focus needs to clearly be on your activity’s connection to climate. For other audiences, the questions can be a simple “Wow, that looks weird. Can you figure out what is going on here?”. Depending on the context I was doing my activity in, I could for example ask:
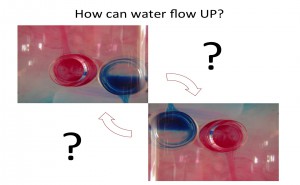
- Why is the bottle with the red water “pouring up”? The audience I might ask this question are for example kids in a school setting that I am wanting to get excited in science in general.
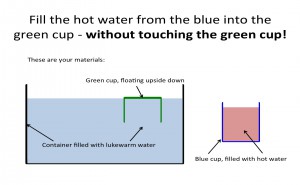
- How can I fill the green cup with hot water without touching it? Audience here could be the general public at a science fair, and if someone manages to fill the green cup, they win a sticker. This questions definitely makes people want to give it a try!
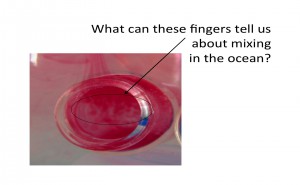
- What can these fingers tell us about how water mixes in the ocean? This question is for an audience that already knows a lot about the ocean and physical processes in it, for example university students, or a very interested general public.
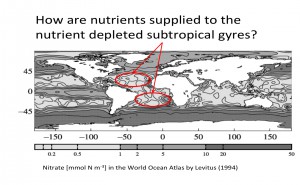
- In the subtropical gyres you have a strong salinity stratification. How can nutrients get to the surface ocean? This question is closely related to the one before, but here the element of play isn’t as prominent. So this would be for an audience that knows a lot about ocean physics and biogeochemistry already, like university students or even colleagues at scientific conferences.
- What drives global ocean currents? This is again a question that you might ask the general public since on one hand not a lot of knowledge about ocean physics is required, and it is on the other hand very easy to see the connection between your activity and the ocean.
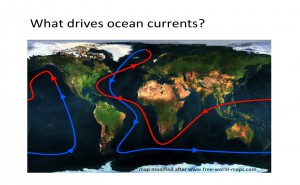
Map modified after free-world-maps.com


Step 3. Test with family, friends and colleagues
This step is important for several reasons.
First, you want to work out (most of) the kinks in the activity before using it in front of a large audience. This includes
- knowing what kind of materials you actually need to run it (For example, I tend to forget that I not only need large containers of water that are prepared at the right temperatures and salinities for several repeats of the experiment, but that in order to set up the experiment for repeats, I need somewhere to get rid of the water from previous experiments),
- seeing people get really excited about the activity (which is a good memory to calm you down when you get nervous about doing the activity in public for the first time), or, if the aren’t, a good time to tweak the activity a little.
Step 4. Bring all the materials you need, and have fun!
And there you are – ready to do your outreach activity! For your big day, this is what I would recommend:
- It sounds lame, but you should have a good packing list that includes not only stuff that you need to run the activity, but also stuff that you need to store stuff in on your way home, when everything is wet and full of food dye.
- If you are about to play with a lot of food dye or other staining substances, consider not wearing your favourite pair of white jeans. Consider also whether your scarf will be constantly hanging in your water tank getting wet, and whether your hair might get caught somewhere.
- Bring a friend to do the activity with you. It’s more fun, and it really takes away a lot of stressors if there are two people there (Run out of water? No worries, one of you can run and fetch more water while the other talks to people who still want to know what is going on. Question you have no idea how to answer? She will know, or you can look it up together later. Need the loo? How great is it that you don’t have to pack all your stuff and take it with you? ;-))
- Have someone you know for sure is interested in your activity show up early on to look at it and talk to you about it. Nothing makes it easier for other people to approach and join you in your conversation and activity as someone who is already there and obviously excited. (You can also use your friend mentioned above to play this role until things get going)
- Bring “backup materials”. Even if your activity is only very vaguely related to your research, bring a current poster of your research (maybe not the A0 version, but A3 or A4) and anything you typically show when talk about your research (Maps? Figures? Instrumentation?). When you get talking to people, chances are you will get talking about how your activity is related to bigger research questions, and you will want to be able to talk about them.
- And bring a different kind of “backup materials”: Bring pictures and/or movies of your experiment to show what it should have looked like in case the freezer that was supposed to have turned your ice cube tray full of water into ice cubes over night turns out to be a cold room.
- Take pictures. This one is super important, and I always forget about it in the heat of the moment. You constantly need that picture with you and a bunch of kids looking at your activity for grant proposals or for end-of-year reports!
- Last but not least: Have fun and take this as a great opportunity to play! Discover features in your activity that you have never noticed before, and, together with your audience, “improvise with the unanticipated in ways that create new value” – I guarantee that it will happen!
Do you have stories of your outreach to share? Any experiments we should all know about? I’d love to hear from you, please leave a comment below!
—
P.S.: This text originally appeared on my website as a page. Due to upcoming restructuring of this website, I am reposting it as a blog post. This is the original version last modified on February 1st, 2016.
Pingback: My Homepage